
Google Tag Manager: A GA4 Beginners Guide via @sejournal, @KayleLarkin
Learning a new skill, like Google Analytics 4, is intimidating. Add to this the fact that there’s a looming deadline, and you can’t afford to be dragging your feet on getting started.
I’m sharing an easy-to-follow beginners guide for setting up GA4 using Google Tag Manager to get you up and running.
In it, we’ll take a look at how Google Tag Manager works, followed by an easy five-step GA4 setup tutorial with pictures.
Google Tag Manager Defined
Google Tag Manager (GTM) is a free tag management solution that allows you to add and edit segments of code (tags) that collect and send data to Google Analytics.
For example, “back in the day,” marketers would receive a segment of code from a third-party vendor – like Facebook Ads.
This code would collect and send information about how users from Facebook Ads engaged with the site back to Facebook.
Site owners and marketers relied heavily on developers to install the code directly on the website.
But if we use Google Tag Manager, all we need to do is place one snippet of code on the website, and that container acts as a middleman between your site and third-party vendors.
Any tags we need to add or edit can be adjusted from within the GTM interface.
Aside from ease of use, the major benefit is condensed code and a much faster site.
Difference Between Google Tag Manager And Google Analytics
Google Tag Manager (GTM) and Google Analytics (GA) are completely different tools that work together to get you the data you need to make smart marketing decisions.
Google Tag Manager is used for storing and managing the code – it is literally a container.
There are no reporting features and no option to analyze data within the tag manager.
Google Analytics is used for data analysis.
All reporting – user reports, conversions and engagement, sales, etc. – can be viewed within Google Analytics.
To understand why you need GTM in addition to Google Analytics, you need to know how GA gets the data you see in reports.
Google Analytics can report on traffic acquisition and user interactions, thanks to the help of a tracking code – technically a “GA Javascript code snippet” or “gtag.js.”
When an interaction occurs on your site – a pageview, for example – the Javascript snippet tells Google Analytics.
Getting Started With Google Tag Manager
At a high level, the main steps to getting started with Google Tag Manager are creating an account, installing the container on your website, and adding tags (like the GA4 configuration tag) to collect and send the information you need.
Below, we will walk through each step for getting started with Google Tag Manager.
Consider Account Management
First, you’ll need to decide how account management will be handled.
Should someone change roles or leave your organization, you want to retain the work put into developing your analytics.
It is best practice to create the Tag Manager account using the login credentials of the person managing the account in the long term (most likely the website owner).
Tip for managing client accounts: If a client cannot create a Tag Manager account themselves, hop on a video call where you can control their screen and walk through each step.
After creating a Tag Manager account, you can add users and set permissions within the Admin screen in the top navigation.
Create A Google Tag Manager Account
Below are instructions for creating a Google Tag Manager account. This will take approximately three minutes.
Login to Tag Manager (Tag Manager tends to work best in Chrome) and click Create an account.
Enter an account name; this is commonly the organization’s name.
A Tag Manager account represents the organization’s topmost level, meaning only one account is needed per company.
A company with multiple websites with separate revenue channels can create separate containers under the same GTM account.
Select a Country and whether or not you’d like to share data to improve Google products.
Enter a Container Name. Choose a descriptive container name for internal use, most often the site URL or name of the app.
Select the Target Platform. Are you creating an account for a website (Web), app (iOS, Android), AMP, or Server?
Your final screen will look similar to the example below. Click Create.
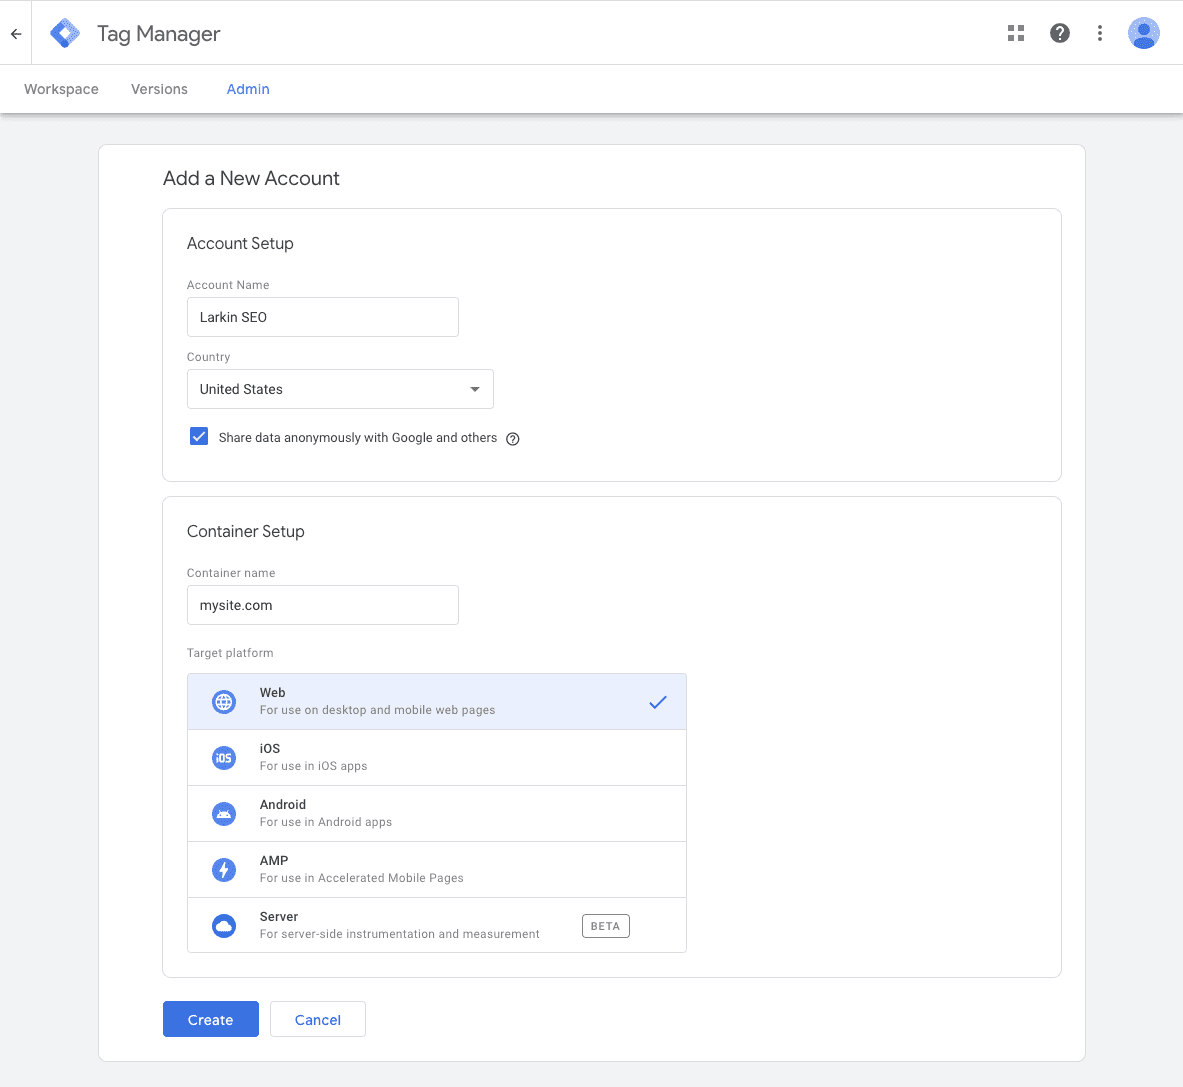 Screenshot from Google Tag Manager, October 2022
After this screen, you will be prompted to install your new GTM code. Click OK to clear this dialog, or follow the install directions.
After closing out of the snippet dialog box, you will be on the workspace screen, where you will be creating your marketing tags and triggers.
Install Google Tag Manager On Your Website
If you close the web container installation dialog box, you can find instructions to install Google Tag Manager within the Admin tab.
Instructions for installation will look like this:
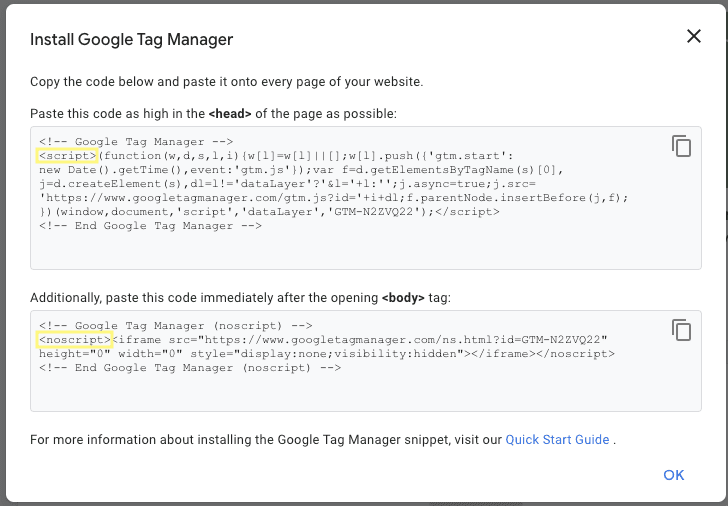 Screenshot from Google Tag Manager, October 2022
Examining the container code will help you understand how Google Tag Manager works.
In the first part, highlighted in yellow, you will see