Sometimes, content on your website becomes irrelevant or outdated and you need to decide whether to update it or delete it. It can be tricky to decide what needs to be done, but don’t let this hold you back. Regularly updating outdated content should be a key part of your content maintenance activities. Let’s help you make that decision and discuss when you should update existing content or remove it altogether.
Update old content that is still valid
On our blog, we have an article on meta descriptions that needs regular updating to keep it relevant. We just have to ensure it stays up to date with all the changes Google makes to the way it handles meta descriptions. Our post helps people write meta descriptions, even though the advice changes over time. Although the article itself might be what we call cornerstone content, its content must be updated to keep up with the latest standards, constantly.
You can also create new, valuable content by updating old posts and making them current again: old wine in new bottles, as the saying goes. You can, for example, merge multiple old blog posts about the same subject into one new post or simply replace older parts of your post with updated content.
A good rule of thumb is to check the amount of traffic you’re getting on a page or post. Are you considering removing a page or unsure about what to do with an outdated one? If that page is still attracting a lot of traffic, it would be a shame to delete it. It would be better to update it to make sure it’s accurate and reflects the latest developments in that field. If the page is not getting a lot of traffic, but the topic is important to you(r company), that can also be a good reason to reevaluate the page and update its content.
It’s likely that you have old posts or pages on your site that you no longer need. Think along the lines of a blog post about a product you stopped selling a while ago and have no intention of ever selling again. Or an announcement of an event that took place a long time ago. You may also have old pages with little or no content, known as thin content pages. This outdated content no longer adds value, now or in the foreseeable future. In that case, you need to either make it clear that this content is no longer relevant or assign the URL a new purpose.
When we talk about deleting old content, I don’t mean simply pressing “delete” and forgetting about it. If you do that, the content may still appear in Google search results for weeks after deletion. The URL might actually have some link value as well, which would be a shame to waste. So, what should you do? Here are two options:
“301 Redirect” the old post to a related one
When a URL still holds value because, say, you have a number of quality links pointing to that page, you want to leverage that value by redirecting the URL to a related one. With a 301 redirect, you’ll inform search engines and visitors that a better or newer version of this content can be found elsewhere on your site. The 301 redirect automatically sends people and Google to this page.
Say you have an old post on a specific product. You need to delete it, so the logical next step would be to redirect that post to a newer post about this product. If you don’t have that post, choose a post about the closest product possible. One that can still help out the user in a way that the old product would. Redirecting to a relevant category might be an option in some edge cases, but this should not be standard practice. Furthermore, redirecting to the homepage should be avoided — this is an SEO anti-pattern.
Tell search engines the content is intentionally gone
If there isn’t a relevant page on your site to redirect to, it’s wise to tell Google to forget about your old post entirely by serving a “410 Deleted” status. This status code will tell Google and visitors that the content didn’t just disappear; you’ve deleted it with a reason.
When Google can’t find a post, the server typically returns a “404 Not Found” status to the search engine’s bot. You’ll also find a 404 crawl error in your Google Search Console for that page. Eventually, Google will work it out, and the URL will gradually vanish from the search result pages. But this takes time.
The 410 is more powerful in the sense that it informs Google that the page is permanently deleted and will never be available again. You deleted it on purpose. Google will act on that faster than with a 404. Read up about the server status codes if this is all gibberish to you.
Cleaning up old content should be part of your content maintenance routine. If you don’t review your old posts regularly, you’re bound to encounter issues sooner or later. You might show incorrect information to visitors or hurt your own rankings by having too many pages about the same topic, increasing the chances of keyword cannibalization. So prune your content regularly and decide what to do: update, merge or delete.
Clean up orphaned content with Yoast SEO Premium
A great place to start is with your orphaned content, which is content that has zero internal links to it. You might be surprised, but most of us have orphaned content on our website. Which is a shame, because both your audience and Google won’t be able to find this content. Meaning that you might be missing out on a great place in the search results and lots of traffic.
To help you clean up your old content, we’ve created an SEO workout that identifies those pages and guides you through four simple steps to fix them. These steps enable you to determine whether you want to update or delete a page. And when you do decide to update it, it also suggests pages or posts from which you can link to this updated content.
You will need Yoast SEO Premium to use this workout. You might also want to try our other internal linking SEO workout to help you rank higher with your best content, also available in the Premium plugin:
Unlock our SEO workouts with Yoast SEO Premium
Get Yoast SEO Premium and enjoy access to all our best SEO tools, training and SEO workouts!
Ever clicked a link and landed on a “Page Not Found” error? Redirects prevent that. They send visitors and search engines to the right page automatically. Redirects are crucial for both SEO and user experience. For SEO, they preserve link equity and keep your rankings intact. Additionally, it enhances the user experience, as no one likes dead ends.
Table of contents
Key takeaways
A redirect automatically sends users and search engines from one URL to another, preventing errors like ‘Page Not Found.’
Redirects are crucial for SEO and user experience, preserving link equity and maintaining rankings.
Different types of redirects exist: 301 for permanent moves and 302 for temporary ones.
Avoid client-side redirects, such as meta refresh or JavaScript, as they can harm SEO.
Use Yoast SEO Premium to easily set up and manage redirects on your site.
What is a redirect?
A redirect is a method that automatically sends users and search engines from one URL to another. For example, if you delete a page, a redirect can send visitors to a new or related page instead of a 404 error.
How redirects work
A user or search engine requests a URL (e.g., yoursite.com/page-old).
The server responds with a redirect instruction.
The browser or search engine follows the redirect to the new URL (e.g., yoursite.com/page-new).
Redirects can point to any URL, even on a different domain.
Why redirects matter
Redirects keep your website running smoothly. Without them, visitors hit dead ends, links break, and search engines get lost. They’re not just technical fixes, because they protect your traffic, preserve rankings, and make sure users land where they’re supposed to. Whether you’re moving a page, fixing a typo in a URL, or removing old content, redirects make sure that nothing gets left behind.
When to use a redirect
Use redirects in these scenarios:
Deleted pages: Redirect to a similar page to preserve traffic.
Domain changes: Redirect the old domain to the new one.
HTTP→HTTPS: Redirect insecure URLs to secure ones.
URL restructuring: Redirect old URLs to new ones (e.g., /blog/post → /articles/post).
Temporary changes: Use a 302 for A/B tests or maintenance pages.
Types of redirects
There are various types of redirects, each serving a distinct purpose. Some are permanent, some are temporary, and some you should avoid altogether. Here’s what you need to know to pick the right one.
Not all redirects work the same way. A 301 redirect tells search engines a page has moved permanently, while a 302 redirect signals a temporary change. Client-side redirects, like meta refresh or JavaScript, exist because they’re sometimes the only option on restrictive hosting platforms or static sites, but they often create more problems than they solve. Below, we break down each type, explain when to use it, and discuss its implications for your SEO.
Redirect types at a glance
Redirect type
Use case
When to use
Browser impact
SEO impact
SEO risk
301
Permanent move
Deleted pages, domain changes, HTTP→HTTPS
Cached forever
Passes (almost) all link equity
None if used correctly
302
Temporary move
A/B testing, maintenance pages
Not cached
May not pass link equity
Can dilute SEO if used long-term
307
Temporary move (strict)
API calls, temporary content shifts
Not cached
Search engines may ignore
High if misused
308
Permanent move (strict)
Rare; use 301 instead
Cached forever
Passes link equity
None
Meta Refresh
Client-side redirect
Avoid where possible
Slow, not cached
Unreliable
High (hurts UX/SEO)
JavaScript
Client-side redirect
Avoid where possible
Slow, not cached
Unreliable
High (hurts UX/SEO)
301 redirects: Permanent moves
A 301 redirect tells browsers and search engines that a page has moved permanently. Use it when:
You delete a page and want to send visitors to a similar one.
You change your domain name.
You switch from HTTP to HTTPS.
SEO impact: 301 redirects pass virtually all link equity to the new URL. But be sure to never redirect to irrelevant pages, as this can confuse users and hurt SEO. For example, redirecting a deleted blog post about “best running shoes” to your homepage, instead of a similar post about running gear. This wastes link equity and frustrates visitors.
A 302 redirect tells browsers and search engines that a move is temporary. Use it for:
A/B testing different versions of a page.
Temporary promotions or sales pages.
Maintenance pages.
SEO impact: 302 redirects typically don’t pass ranking power like 301s. Google treats them as temporary, so they may not preserve SEO value. For permanent moves, always use a 301 to ensure link equity transfers smoothly.
Examples of when to use a 301 and 302 redirect:
Example 1: Temporary out-of-stock product (302): An online store redirects example.com/red-sneakers to example.com/blue-sneakers while red sneakers are restocked. A 302 redirect keeps the original URL alive for future use.
Example 2: A permanent domain change (301): A company moves from old-site.com to new-site.com. A 301 redirect makes sure visitors and search engines land on the new domain while preserving SEO rankings.
307 and 308 redirects: Strict rules
These redirects follow HTTP rules more strictly than 301 or 302:
Same method: If a browser sends a POST request, the redirect must also use POST.
Caching:
307: Never cached (temporary).
308: Always cached (permanent).
When to use them:
307: For temporary redirects where you must keep the same HTTP method (e.g., forms or API calls).
308: Almost never, use a 301 instead.
For most sites: Stick with 301 (permanent) or 302 (temporary). These are for specific technical cases only.
What to know about client-side redirects:
Client-side redirects, such as meta refresh or JavaScript, execute within the browser instead of on the server. They’re rarely the right choice, but here’s why you might encounter them:
Meta refresh: A HTML tag that redirects after a delay (e.g., “You’ll be redirected in 5 seconds…”).
JavaScript redirects: Code that changes the URL after the page loads.
Why should you avoid them?
Slow: The browser must load the page first, then redirect.
Unreliable: Search engines may ignore them, hurting SEO.
Bad UX: Users see a flash of the original page before redirecting.
Security risks: JavaScript redirects can be exploited for phishing.
When they’re used (despite the risks):
Shared hosting with no server access.
Legacy systems or static HTML sites.
Ad tracking or A/B testing tools.
Stick with server-side redirects (301/302) whenever possible. If you must use a client-side redirect, test it thoroughly and monitor for SEO issues.
How redirects impact SEO
Redirects do more than just send users to a new URL. They shape how search engines crawl, index, and rank your site. A well-planned redirect preserves traffic and rankings. A sloppy one can break both. Here’s what you need to know about their impact.
Ranking power
301 redirects pass most of the link equity from the old URL to the new one. This helps maintain your rankings. 302 redirects may not pass ranking power, especially if used long-term.
Crawl budget
Too many redirects can slow down how quickly search engines crawl your site. Avoid redirect chains (A→B→C) to save crawl budget.
User experience
Redirects prevent 404 errors and keep users engaged. A smooth redirect experience can reduce bounce rates.
Common redirect mistakes
Redirects seem simple, but small errors can cause big problems. Here are the most common mistakes and how to avoid them.
Redirect chains
A redirect chain happens when one URL redirects to another, which redirects to another, and so on. For example:
old-page → new-page → updated-page → final-page
Why it’s bad:
Slows down the user experience.
Wastes crawl budget, as search engines may stop following the chain before reaching the final URL.
When a page is deleted, some sites redirect all traffic to the homepage. For example:
Redirecting old-blog-post to example.com instead of a relevant blog post.
Why it’s bad:
Confuses users who expected specific content.
Search engines may see this as a “soft 404” and ignore the redirect.
Wastes ranking power that could have been passed to a relevant page.
How to fix it:
Redirect to the most relevant page available.
If no relevant page exists, return a 404 or 410 error.
Forgetting to update sitemaps
After setting up redirects, many sites forget to update their XML sitemaps. For example:
Keeping the old URL in the sitemap while redirecting it to a new URL.
Why it’s bad:
Sends mixed signals to search engines.
Wastes crawl budget on outdated URLs.
How to fix it:
Remove old URLs from the sitemap.
Add the new URLs to help search engines discover them faster.
Using redirects for thin or duplicate content
Some sites use redirects to hide thin or duplicate content. For example, redirecting multiple low-quality pages to a single high-quality page to “clean up” the site.
Why it’s bad:
Search engines may see this as manipulative.
Doesn’t address the root problem, which is low-quality content.
How to fix it:
Improve or consolidate content instead of redirecting.
Use canonical tags if duplicate content is unavoidable.
Not monitoring redirects over time
Redirects aren’t a set-it-and-forget-it task. For example:
Setting up a redirect and never checking if it’s still needed or working.
Why it’s bad:
Redirects can break over time (e.g., due to site updates or server changes).
Unnecessary redirects waste crawl budget.
How to fix it:
Audit redirects regularly (e.g., every 6 months).
Remove redirects that are no longer needed.
How to set up a redirect
Setting up redirects isn’t complicated, but the steps vary depending on your platform. Below, you’ll find straightforward instructions for the most common setups, whether you’re using WordPress, Apache, Nginx, or Cloudflare.
Pick the method that matches your setup and follow along. If you’re unsure which to use, start with the platform you’re most comfortable with.
WordPress (using Yoast SEO Premium)
Yoast SEO Premium makes it easy to set up redirects, especially when you delete or move content. Here’s how to do it:
Option 1: Manual redirects
Go to Yoast SEO → Redirects in your WordPress dashboard.
Enter the old URL (the one you want to redirect from).
Enter the new URL (the one you want to redirect to).
Select the redirect type:
301 (Permanent): For deleted or permanently moved pages.
302 (Found): For short-term changes.
Click Add Redirect.
Manually redirecting a URL in Yoast’s redirect manager
Option 2: Automatic redirects when deleting content
Yoast SEO can create redirects automatically when you delete a post or page. Here’s how:
Go to Posts or Pages in your WordPress dashboard.
Find the post or page you want to delete and click Trash.
Yoast SEO will show a pop-up asking what you’d like to do with the deleted content. You’ll see two options:
Redirect to another URL: Enter a new URL to send visitors to.
Return a 410 Content Deleted header: Inform search engines that the page is permanently deleted and should be removed from their index.
Select your preferred option and confirm.
This feature saves time and ensures visitors land on the right page. No manual setup required.
Need help with redirects? Try Yoast SEO Premium
No code, no hassle. Just smarter redirects and many other invaluable tools.
Apache (.htaccess file)
Apache uses the .htaccess file to manage redirects. If your site runs on Apache, this is the simplest way to set them up. Add the rules below to your .htaccess file, ensuring it is located in the root directory of your site.
Nginx handles redirects in the server configuration file. If your site runs on Nginx, add these rules to your server block and then reload the service to apply the changes.
Cloudflare allows you to set up redirects without modifying server files. Create a page rule to forward traffic from one URL to another, without requiring any coding. Simply enter the old and new URLs, select the redirect type, and click Save.
Redirects don’t always work as expected. A typo, a cached page, or a conflicting rule can break them, or worse, create loops that frustrate users and search engines. Below are the most common issues and how to fix them.
If something’s not working, start with the basics: check for errors, test thoroughly, and clear your cache. The solutions are usually simpler than they seem.
Why isn’t my redirect working?
Check for typos: Ensure the URLs are correct.
Clear your cache: Browsers cache 301 redirects aggressively.
Use Screaming Frog to crawl your site for 404s and redirects.
What’s the difference between a 301 and 308 redirect?
301: Most common for permanent moves. Broad browser support.
308: Strict permanent redirect. Rarely used. Same SEO impact as 301.
What is a proxy redirect?
A proxy redirect keeps the URL the same in the browser but fetches content from a different location. Used for load balancing or A/B testing. Avoid for SEO, as search engines may not follow them.
Conclusion about redirects
Redirects are a simple but powerful tool. A redirect automatically sends users and search engines from one URL to another. As a result, they keep your site running smoothly and preserve SEO value and ranking power. Remember:
Use 301 redirects for permanent moves.
Use 302 redirects for temporary changes.
Avoid client-side redirects, such as meta refresh or JavaScript.
Edwin is an experienced strategic content specialist. Before joining Yoast, he worked for a top-tier web design magazine, where he developed a keen understanding of how to create great content.
Do you need to create a 301 redirect in your WordPress site? You’ve come to the right place! We’ll show you how to set up 301 redirects using three methods. Do you know if you need to use a redirect or whether a 301 redirect is right? No worries, we’ll explain that, too.
Redirects in a nutshell
The name ‘redirect’ says it all: It sends visitors traveling from a specific page to an alternative one instead. Or, if there’s no alternative, an HTTP header (similar to redirects) can make that clear to users and search engines. It’s like registering a change of address when you move house. What if an old friend visits your old home to visit you? A redirect is like a front door note telling your visitors where you live now. Any time you change a URL or delete a page, you should think about redirects.
Different redirects serve different purposes. Since this post is all about 301 redirects, let’s look at some situations where you might need to use one.
When should you use a 301 redirect?
A 301 redirect should be used when:
You’ve permanently deleted a page on your site, but you have another similar page you want to send users to instead
You’ve changed the URL of a page that was already published
You’re moving your site to a new domain
You’re changing your URL structure, e.g. changing from HTTP to HTTPS, or removing ‘www’ from the start of your URL
These are some of the more common reasons for using a 301 redirect, but other situations require redirecting, too. And besides that, there are other redirects and HTTP headers you can use in other situations. For instance, if you permanently delete a page and there is no suitable replacement or substitute you can send users to, then a 410 redirect is what you need to use. We have another post where you can read more about which redirects to use in which situations.
Option 1: Create a 301 redirect on the server
To set up a 301 redirect using .htaccess for the given example URLs, you need to add a specific line to your site’s .htaccess file, which is located in the root directory of your WordPress installation. Here’s how you can do it:
Locate the .htaccess file: The .htaccess file is usually in the root directory of your WordPress installation.
Edit the .htaccess file: Open the .htaccess file with a text editor.
Add the redirect rule: Insert the following line at the end of the file to create the redirect. This rule indicates that requests to /page-1 should be permanently redirected to /page-2.
Redirect 301 /page-1 /page-2
Save changes: If you use an FTP client, save your changes to the .htaccess file and upload them back to your server.
Using this rule, any request to https://example.com/page-1 will be permanently redirected to https://example.com/page-2. The 301 status code indicates to search engines and browsers that the redirect is permanent. Note that this approach assumes the URLs follow the format /page-1 and /page-2 without additional subdirectories. You can adjust the path if your URLs are different.
These configurations can become unmaintainable over time, especially if you’re an avid blogger trying to improve your posts’ SEO. You must also log in to your server over FTP, edit the files, and re-upload them whenever you add a new redirect. That’s why, generally speaking, this method is not considered the way to go.
Option 2: Create a 301 redirect with Cloudflare
Most of us already use Cloudflare in one form or another, so you know that it offers a wide array of tools to help our websites perform. For instance, it comes with a Rules feature where you can set various options related to your website cache. You can also find various redirect options here; this will help you guide up redirects for everything from HTTP to HTTPS to single redirects for individual pages.
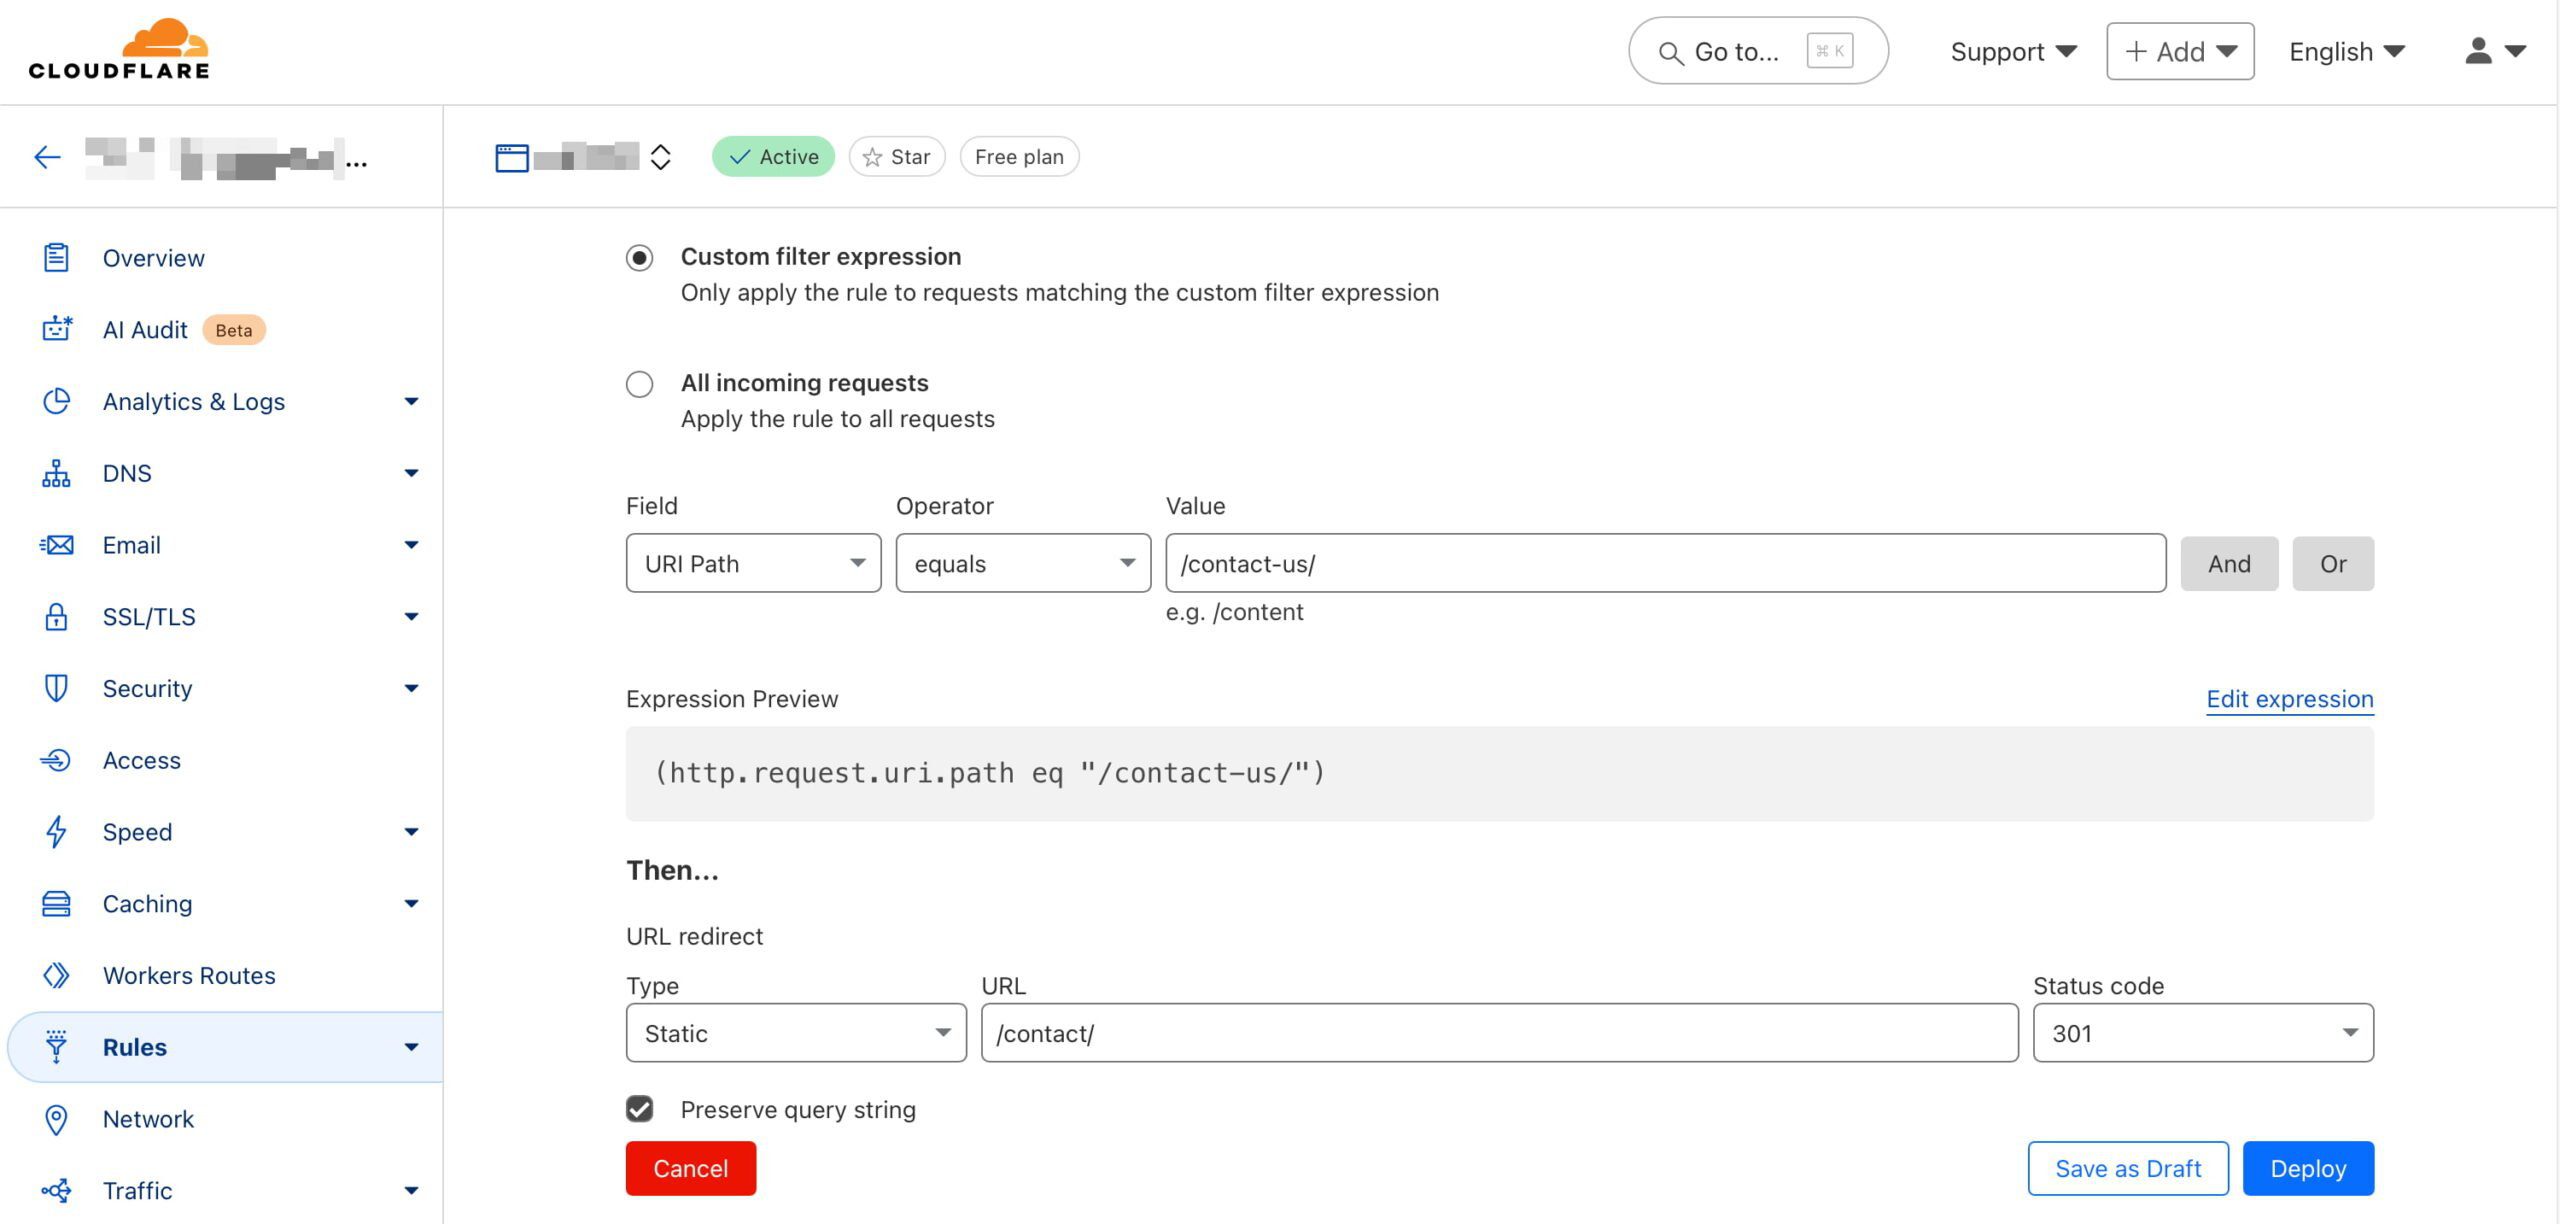
It’s easy to set up redirects through Cloudflare. Here’s how that works:
Log into your Cloudflare account: Go to the Cloudflare dashboard and select your account and domain. Then, select Rules and Overview.
Create a redirect rule: Select Create rule and then choose Redirect Rule. In the Rule name field, you might name it something like Redirect Page 1 to Page 2.
Define the matching criteria: Set a wildcard pattern and set the Request URL to https://example.com/page-1. This means any traffic to example.com/page-1 will be matched for redirection
Set the redirect parameters:
Target URL: Enter https://example.com/page-2 as the redirect destination.
Status code: Select 301 to indicate a permanent redirect.
Preserve query string: Decide based on your preference; enable this option if the original URL’s query string should be retained. When you choose to preserve the query string in a redirect, you keep any additional parameters that may be included in the original URL when redirecting to the new URL. Preserving the query string is often useful for tracking purposes, like retaining analytics or advertising parameters, ensuring that useful data isn’t lost during redirection.
Deploy the rule: Click Deploy to save and activate the redirect.
Now, whenever someone visits https://example.com/page-1, they will be redirected to https://example.com/page-2 with a 301 status code, indicating a permanent move.
You can efficiently manage traffic without touching your server configuration by setting up redirects via Cloudflare. It provides flexibility for using simple patterns or more complex URL structures.
Cloudflare offers essential tools to manage the performance of your website
Option 3: Create a 301 redirect the easy way with Yoast SEO
Our Yoast SEO Premium plugin offers you a helping hand when it comes to creating these redirects. Our built-in redirect manager assists you whenever you change the URL of a post, page, or any taxonomies that may result in a possible 404 if you don’t properly redirect visitors. In addition, we also offer you an interface to edit or remove these redirects at a later point in time. The plugin also tells you when you’re about to create a redirect that will result in a redirect loop. This looping is something you want to avoid at all costs.
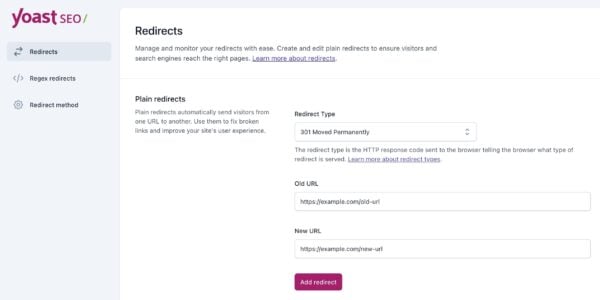
Here’s how you can set up a 301 redirect using Yoast SEO Premium in WordPress:
Access the Yoast SEO settings: Log into your WordPress admin area and navigate to the Yoast SEO section.
Open the Redirect Manager: Go to the Redirects feature in Yoast SEO Premium.
Add a new redirect: Follow the steps below to create a new rule.
In the Old URL field, enter /page-1 as the source path.
In the New URL field, enter the destination /page-2 as the complete new URL.
Choose a 301 (Moved Permanently) from the list of redirect types.
Save the Redirect: Click Add redirect, and Yoast SEO will handle the redirection.
Yoast SEO Premium also offers an option to automatically redirect deleted content. When you delete a page or post, Yoast SEO prompts you to set up a redirect to avoid broken links. This ensures visitors and search engines won’t encounter 404 errors and are smoothly directed to a relevant page.
These features are part of Yoast SEO Premium, designed to make managing redirects straightforward without manually altering code or server settings. They keep your site user-friendly and help maintain SEO performance by preventing dead links.
Adding a redirect with Yoast SEO Premium is very easy
Conclusion
Understanding how to set up 301 redirects is essential for maintaining your website’s integrity and user experience. Whether you choose Cloudflare, Yoast SEO Premium, or the .htaccess method, each approach offers a simple solution to guide visitors to the right place, preventing 404 errors and keeping your SEO rankings intact. Smoothly transitioning traffic from old links to new ones enhances usability and search visibility. Choose the best method that suits your needs and keeps your website running smoothly.
Edwin is an experienced strategic content specialist. Before joining Yoast, he worked for a top-tier web design magazine, where he developed a keen understanding of how to create great content.