WordPress 6.8: The highlights you should know about

On April 15th, 2025, ​WordPress 6.8 was released. This release, named Cecil, is aimed at bringing more control when it comes to the design of your website. It also comes with features that improve performance and enhance security for users and developers. Let’s dive into a few of the highlights in this latest release.

The Style Book for Classic themes

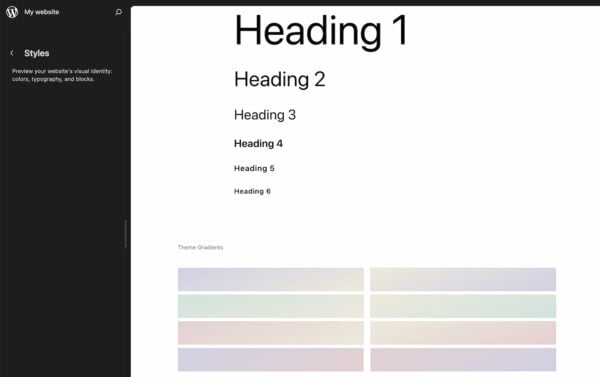
The Style Book, previously exclusive to block-based themes, is now accessible for Classic themes that have editor-styles or a theme.json file. It also comes with a new look and a few new settings to play around with. You can find this feature, or see if you have access to this feature, by going to Appearance > Design > Styles in your vertical navigation bar on the left side.

The Style Book shows the design elements of your site.

This tool gives you an overview of your site’s design elements, including colors, typography, and block styles. Just scroll down to have a look at all the design elements and whether you’re happy with everything design-wise.

Increasing performance with speculative loading

WordPress 6.8 introduces speculative loading, a feature that leverages the Speculation Rules API to prefetch or prerender pages based on user interactions. When someone clicks on a link, this page can now be preloaded. This anticipatory loading results in faster page transitions and a smoother browsing experience.

Of course, WordPress will not load everything as this would compromise performance if it becomes too much. This feature aims to keep a balance between speed and efficiency in choosing which pages to load. Developers can customize this behavior by using a plugin or writing code if they want it to act differently. It’s also good to know that this feature only works in newer browsers.

This feature is part of a longer list of enhancements focused on performance and speed, for both editing and browsing. Without going into too much detail, this update comes with improvements to the block editor, query caching and shorter interactions thanks to the Interactivity API.

WordPress 6.8 brings a few new enhancements to the design and editing experience. We’ll go into a few of them, such as the improved global styles panel, the option to turn image blocks into featured images and new density settings in table layouts.​

Global styles panel

The Global Styles Panel in the full site editor has had an update, making it easier than ever to give your website a cohesive and polished look. Now, users can tweak typography, colors, and layout settings for their entire site — all from one convenient place. Whether you’re adjusting heading sizes, setting your brand colors, or fine-tuning spacing, this central hub helps you manage your site’s design without having to dive into custom CSS or theme files.

One of the most welcome little updates in WordPress 6.8 is the ability to turn any image block directly into a featured image with a single click. No more uploading the same image twice — once in the content and once for the featured image. If you’ve already added a perfect image to your post, you can now designate it as the featured image straight from the block editor, which simplifies your workflow and saves time.
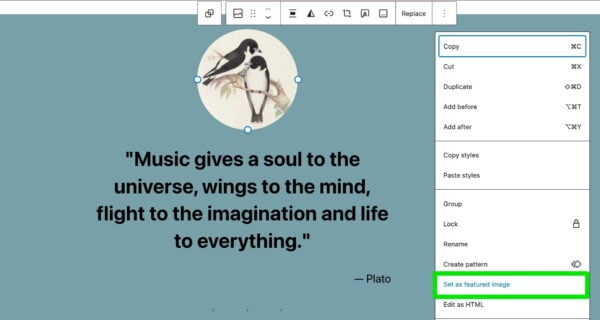
WordPress 6.8 feature: setting image block as featured image
Simply select any image in your post and click ‘Set as featured image’

Density options for your tables

WordPress 6.8 introduces new density settings for table-based layouts, particularly useful when you’re managing data-heavy content like tables in the admin or Data Views. With these new controls, you can choose how compact or spacious you want your table rows and cells to appear, depending on your personal preference or the type of content you’re handling. Whether you prefer a minimal, airy look or a dense, info-packed table, WordPress now gives you the flexibility to adjust it to suit your needs.

Under-the-hood improvements

Beyond the user-facing features, WordPress 6.8 includes a lot of enhancements under the hood. Let’s check out a few highlights.​

Higher security with bcrypt

Although less visible, this feature is one to get excited about as well. As it brings a significant boost to security. The system is moving away from the MD5-based system for password hashing and transitioning to bcrypt. This change improves overall password security and requires no action from you or your users. It’s automatically implemented and will make it a lot harder to crack passwords.

Efficient block type registration

The new release introduces a new function that makes registering multiple block types much easier for developers. Instead of writing separate code for each block, plugin and theme creators can now register a whole collection of blocks in one go. This not only reduces repetitive code but also helps keep projects organized and easier to maintain, making life simpler for developers and creating fewer opportunities for bugs.

Internationalization improvements

With WordPress powering sites across the globe, internationalization is always a priority. This release ensures that error messages generated by PHPMailer (WordPress’s email handling system) are properly localized, so users see helpful and understandable messages in their language. Additionally, any plugin update notifications sent via email will now respect the site administrator’s selected language, making routine updates more user-friendly for non-English speakers.

Accessibility enhancements

WordPress 6.8 continues the platform’s commitment to making websites more inclusive by improving accessibility across the board. One of the key changes in this release is the removal of redundant title attributes, which were often unnecessary and could cause confusion for users relying on screen readers.

This small but meaningful update helps streamline the browsing experience for people using assistive technology, ensuring that WordPress websites are more welcoming and accessible to all visitors. Other than that, there are over 100+ accessibility fixes and enhancements in this release.

Update your site to WordPress 6.8

Those are a few of the features that you’ll find in this latest release. There’s a lot of focus on enhancing the overall user experience and refining existing functionalities. Whether you’re a developer or website manager, this update is meant to make your life a bit easier and your website more secure and performant. Read the official WordPress release post for more information on this newest version of WordPress. Or, if you’re curious to see these features in action, update to the newest version and try them out yourself!

Read more: Learn how to use WordPress without touching any code »

How Do You Resolve A WordPress Plugin Conflict?

One of the scariest things that can occur with a WordPress user is that you install a plugin, and upon activation, you get a white screen of death.

This screen, where your beautifully crafted website once lived, is now plain white or produces a line or two of unformatted text.

A plugin conflict is when you have two plugins installed, and while they both work fine, running them together breaks the site.

It usually happens when plugins run in tandem, and they both come packaged with the same or similar library functions. There’s a naming conflict, and PHP produces an error.

This article will discuss how to fix them.

Plugin Conflicts Are Becoming More Rare

First of all, plugin conflict: where somebody installs a plugin that conflicts with another plugin, is becoming more rare.

WordPress, in the last few years, has introduced protections in place that means if an error does occur, rather than activate the plugin fully, it’ll backtrack automatically, provide an error, and leave the plugin deactivated.

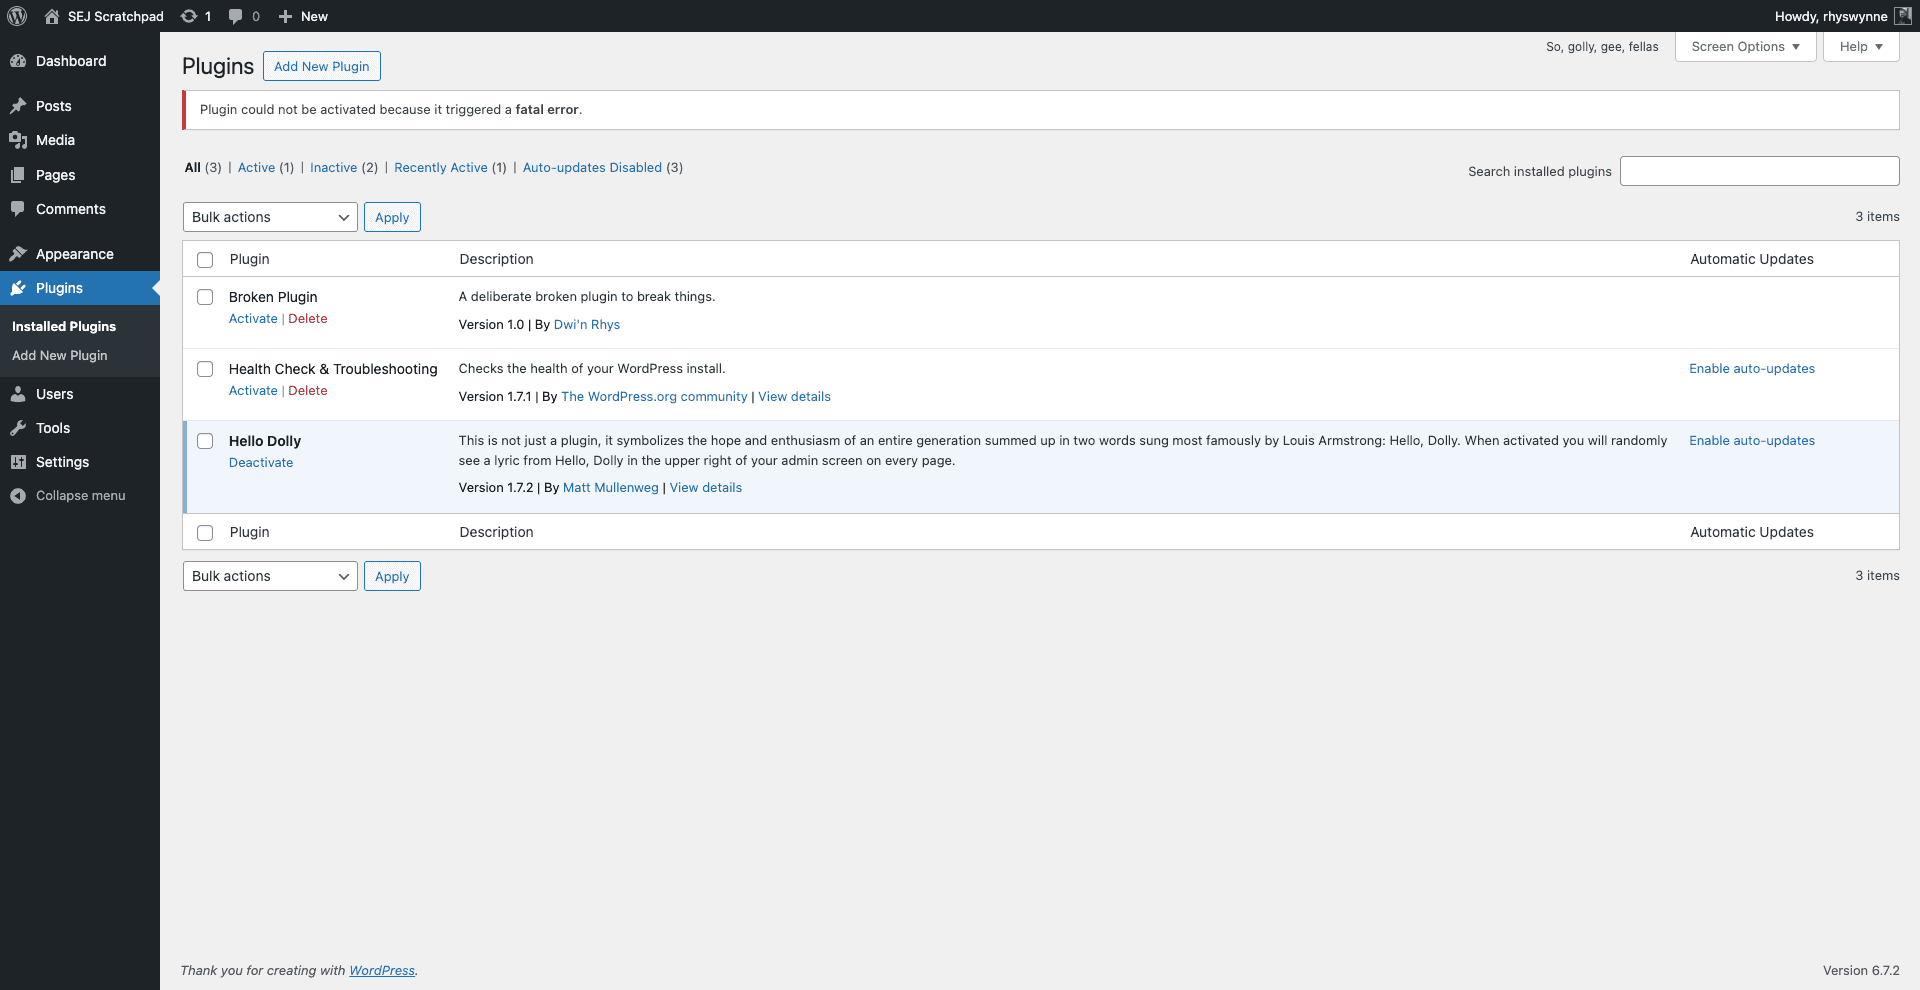
For the majority of users, this is what they see.

The plugin The plugin “Broken Plugin” is unable to be activated within WordPress as it generates a fatal error. (Image from author, March 2025)

At this point, an investigation should be done in a staging environment with this plugin, but unless it’s a unique plugin, an alternative may need to be found that doesn’t conflict with your setup.

Plugin conflicts tend to occur when you install a Must Use (MU) plugin via a service like FTP, an update to one or more plugins takes place, or you have a custom plugin activated and changes are pushed to the server.

I’ll walk you through my process of resolving plugin conflicts.

Do You Have Access To WordPress?

To begin, the first question you should ask is if you have access to WordPress.

If you do, conventional wisdom dictates that the course of action to take is to deactivate all plugins and switch to a default theme, to try and troubleshoot where the problem occurs.

If you are doing this on a live site, this isn’t ideal, as the site may still have a lot of functionality.

A different approach is to install the Health Check and Troubleshooting plugin. Installing this plugin would allow you to run a version of the site with a default theme, and no plugins installed.

Simply activate each plugin in turn until you identify the one that is causing the issue and then leave that one deactivated.

Make sure the theme is the last thing activated, as custom themes could use functionality in plugins that could bring down the site.

If You Don’t Have Access To WordPress

If you don’t have access to WordPress, then there could be a bit of a process in order to diagnose and fix the problem.

This approach is what I take as best as I can when diagnosing plugin conflicts. It can be done in any order, depending on your knowledge and what you have access to.

Have Access To The Administrative Email? You May Get An Email

If you have access to the administrator email with WordPress (set in Settings > General), you may receive an email.

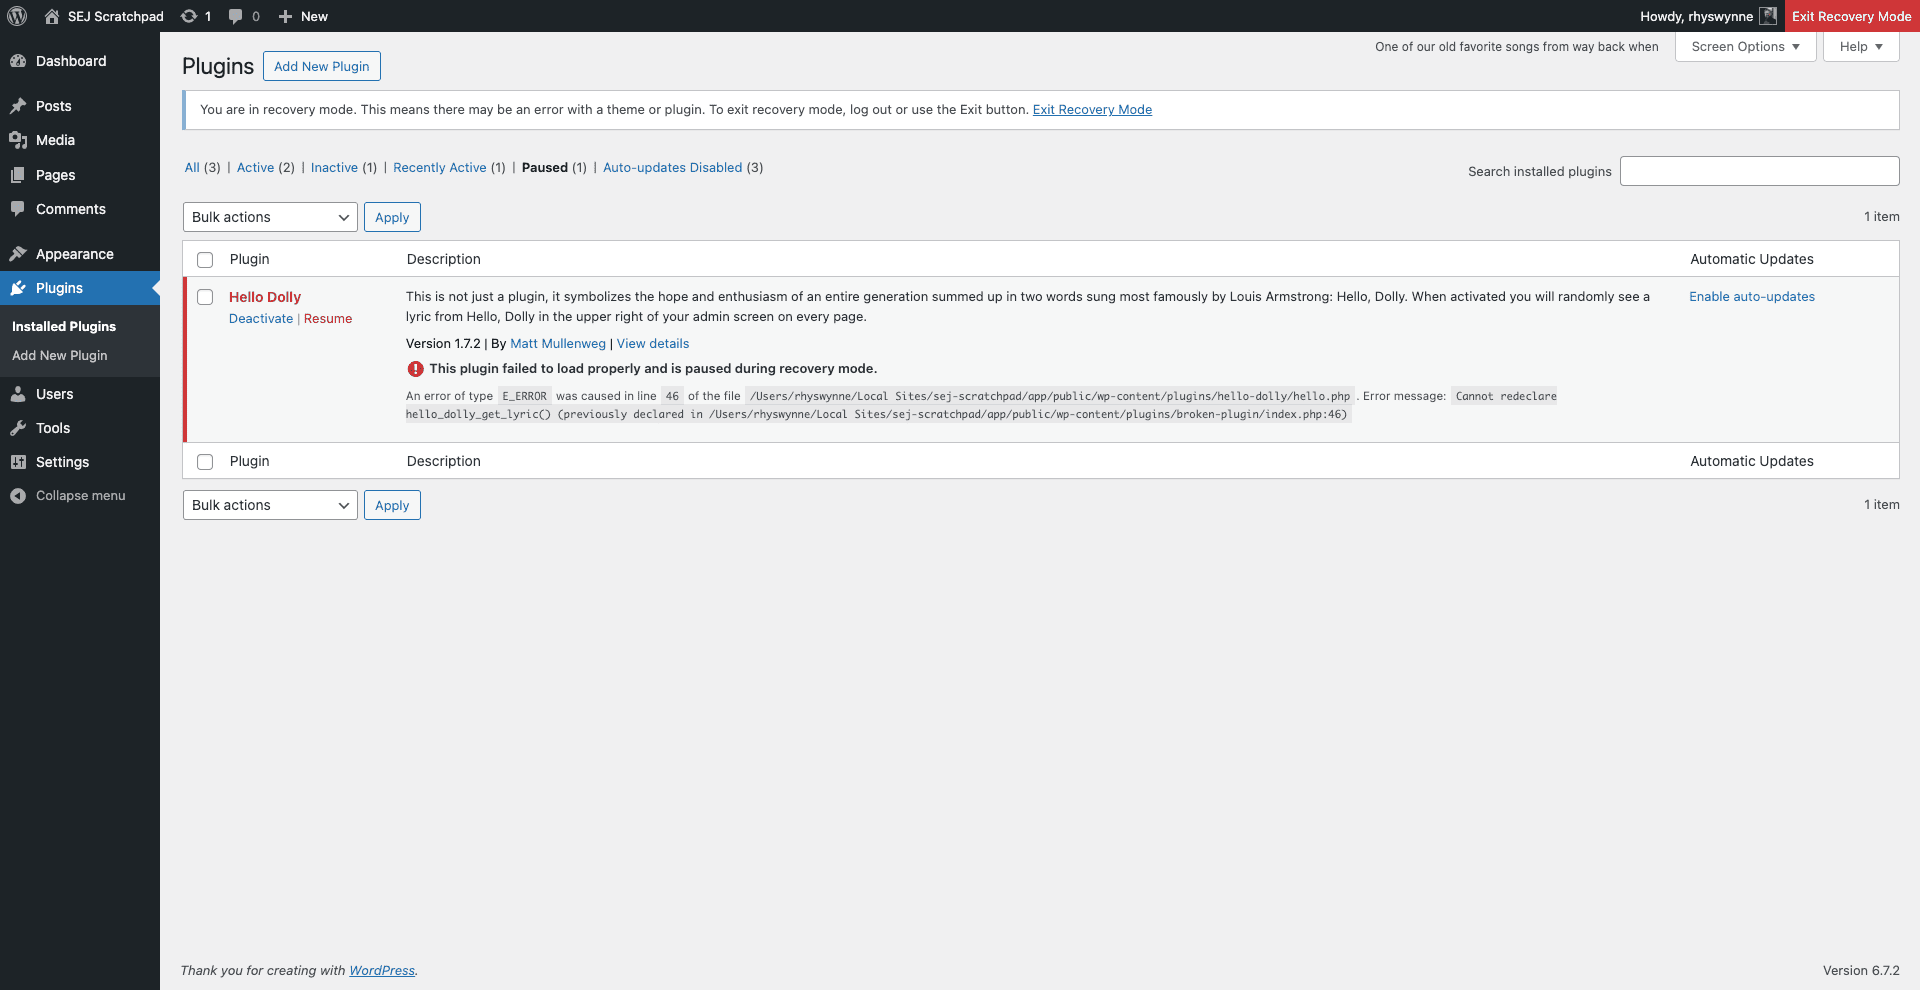
This will allow you to put the site into Recovery Mode. From there, you can log in, and it will identify the plugin that has the issue, and you can deactivate it.

WordPress recovery mode with the plugin conflict highlighting Hello Dolly as where the conflict lies.WordPress recovery mode with the plugin conflict highlighting Hello Dolly, as where the conflict lies. (Image from author, March 2025)

Check The Hosts’ Log File

The first step would be to check the host’s log file.

Depending on the host, it may be easily visible in your host’s dashboard or from within cPanel, but if you only have a file browser, they tend to be put outside of the /public_html/ or /www/ (which are publicly available). Usually, one level up in a file called /logs/ tends to be where it’s located.

Should you find the file (it should have a name like error_log), download it and search for any Fatal Error within the document, maybe towards the bottom.

Within the error message, you should have a couple of file locations that will dictate where the file issues occur.

No Logs? You May Need To Activate Them

If you have FTP/SFTP access to the site but no logs, you may need to activate them.

Within the root directory of WordPress, add the following lines to the wp-config.php file.

define( 'WP_DEBUG', true );
define( 'WP_DEBUG_LOG', true );
define( 'WP_DEBUG_DISPLAY', false );
@ini_set( 'display_errors', 0 );

This will create a file debug.log within the wp-content/ folder. From there, you can see the errors in this file.

Security Tip: The debug.log will be publicly visible, so once you’ve fixed the issue, remove these lines from wp-config.php and delete the debug.log file.

Resolving These Plugin Conflicts

Whichever method you use, your logs should produce lines like this below:-

Fatal error: Cannot redeclare hello_dolly_get_lyric() (previously declared in/wp-content/plugins/broken-plugin/index.php:17) in /wp-content/plugins/hello-dolly/hello.php on line 46

Each element means:

  • “Fatal Error” determines the error. A fatal error in PHP means that the site immediately stops working. You can get other errors or warnings.
  • “Cannot redeclare hello_dolly_get_lyric()” is the fatal error. In this case, there are two PHP functions with the same name (hello_dolly_get_lyric()). This is the basis of the plugin conflict.
  • “/wp-content/plugins/hello-dolly/hello.php on line 46” tells you where this error occurs. While the line number isn’t important (unless you’re coding yourself), it does tell you the plugin where the plugin error occurs – in this case, “hello-dolly”.

The next step is to manually change the plugin.

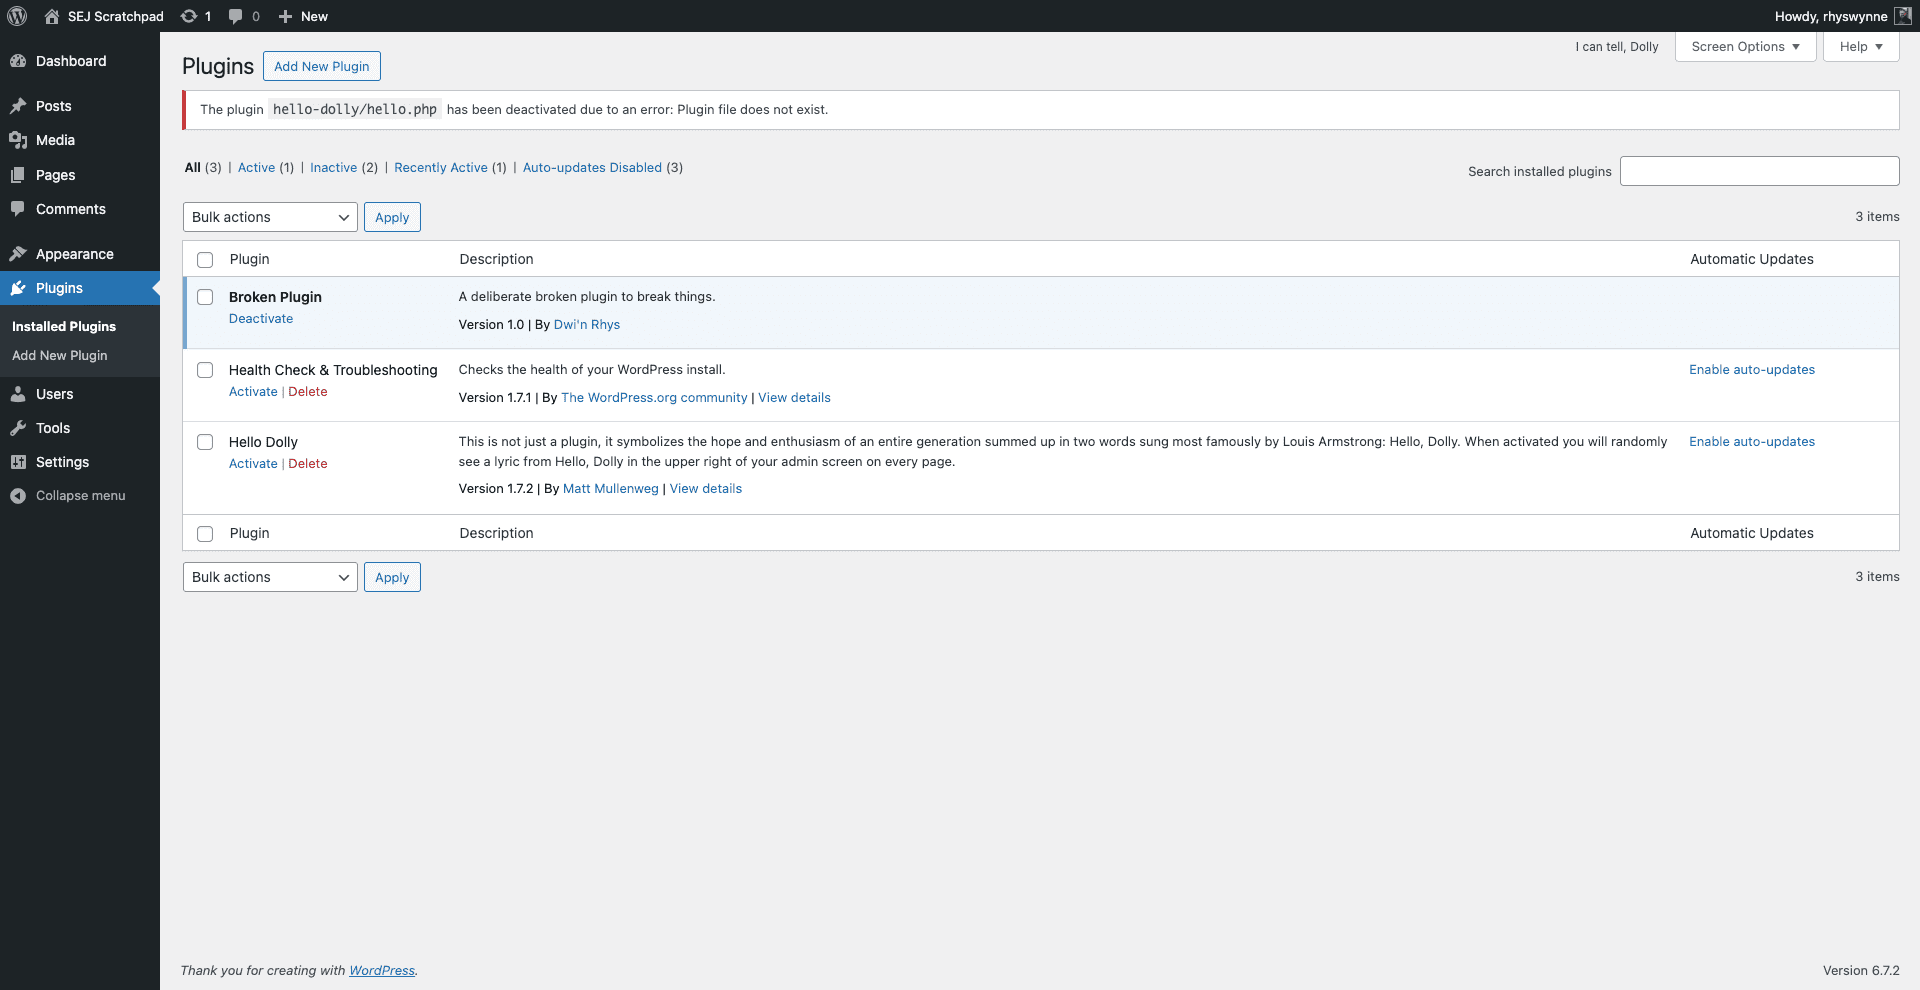
In your chosen FTP programme or file manager, go to the plugin folder within WordPress – /wp-content/plugins/ in this case – and rename the plugin folder (in this case, change “hello-dolly” to “broken-hello-dolly”). This will deactivate the plugin when you next log into WordPress.

The plugin The plugin “Hello Dolly” has been deactivated due to it not existing. In reality, it’s been renamed so WordPress can’t find it. (Image from author, March 2025)

It’s a good idea not to delete the WordPress plugin if you can prevent it. This will force the deactivation of the plugin in question.

From there, you can investigate the two plugins and identify why the two functions are called twice.

For Developers: Good Practice Can Prevent Plugin Conflicts

If you are a developer building WordPress sites, following good practice can prevent plugin conflicts.

Here are some tips for preventing your plugin or WordPress sites from having plugin conflicts with other plugins out there:

  1. If you are not using PHP Namespaces, then I’d recommend naming your classes or functions with a prefix. Something like plugin_name_function_name can prevent similar functionality from having the same function name. Try to make them unique (so don’t use wp_ as a prefix).
  2. Using function_exists around your functions to prevent your functions from loading if they already exist.
  3. If you are importing functionality, using class_exists can check to see if the class has already been loaded.
  4. Loading your functionality late, so naming your plugin folder with a late alphabet letter is useful. Not every developer follows the same approach as you!
  5. If you are building on one site, make sure your server setup is the same (or as close to being the same) as the live environment.

You’re never going to completely guarantee your plugin or theme doesn’t conflict with the millions of plugins that exist in the WordPress space.

However, by following the above steps, you can minimize conflict as much as possible, and simple changes to your code writing can prevent a world of debugging hell later.

More Resources:


Featured Image: Whiskerz/Shutterstock

WordPress Plugin Extends Yoast SEO via @sejournal, @martinibuster

The Progress Planner WordPress plugin has announced a new integration with Yoast SEO, enabling users to take full advantage of Yoast’s features to maximize website search performance.

Progress Planner Plugin

Progress Planner is developed by the same people who created Yoast SEO, ensuring that both plugins work perfectly together. The main functionality of the plugin is to help WordPress users maintain their website so that it performs at its best. The new functionalities extends the usefulness of Progress Planner as it now encompasses SEO.

The new functionality offers personalized suggestions of how to set Yoast SEO plugin for maximum performance.

According to the Progress Planner announcement:

“Progress Planner’s assistant, Ravi, will provide smart recommendations, guiding users to their next best task. Progress Planner will check whether Yoast SEO users have properly configured the settings of their plugins and will help and motivate users to make corrections.”

This is a brand new functionality and many others are planned.

Read more about the Progress Planner’s Yoast integration:

Level up your SEO-game: Progress Planner’s new integration with Yoast

Download the plugin at the official WordPress.org plugin repository: Progress Planner

Featured Image by Shutterstock/Krakenimages.com

WordPress Contributor Cutbacks Cause Core Development To Stall via @sejournal, @martinibuster

WordPress project leaders recently discussed how to proceed due to concern that organizations have dramatically cut back on the number of hours donated to contributing to WordPress. They decided that WordPress 6.8 would be the final major release of 2025 and that minor core releases will continue as needed.

While no formal commitment was made to future major releases after 2025, it kind of implies that future major releases are limited to one per year as long as the current contributor levels remain at this low level.

However that’s not for certain and it went unstated and prompted one of the contributors to ask the question in one of the comments:

“Is the new release cadence one major release a year now, or is that just for this year?

If getting users to wait a year for major updates, can I suggest some work towards an open road map so people can at least see what they are waiting for and in an ideal world, where resources are limited, vote on said features to help prioritise what the community wants from WordPress.”

Gutenberg & Core Trac Tickets Remain Flat

Gutenberg and Core Trac ticket volumes remained flat for the past six months, which means that the total number of tickets (number of unresolved issues) remains essentially the same, signalling stagnation in development as opposed to forward momentum.

New feature development in Gutenberg has declined sharply since January, which means that the creation of new blocks, capabilities, and user experience improvements has also slowed. This is cause for concern because a drop in new feature development indicates that the editor is not gaining new capabilities as quickly as it was in previous months, resulting in fewer enhancements, fewer innovations, and potentially less progress toward the long-term goals of the block editor project.

Work On Release Automation

One of the benefits discussed for slowing down the pace of development is that it frees up time to work on release automation, which means automating parts of the development. What exactly that means is not documented.

This is what the documentation says about it in the context of a benefit of slowing down the pace of development:

“Allows for work to further automate release processes, making future releases quicker and less manual.”

Focus On Canonical WordPress Plugins

It was decided that focusing on WordPress.org developed plugins, called canonical plugins, offered a path forward to improving core and adding features to it outside of contributions to the core itself. The canonical plugins discussed are Preferred Languages, 2FA (two-factor authentication), and Performance tools.

A long-running issue about the canonical plugins discussed at the meeting is the lack of user feedback about their canonical plugins, noting that the main source of feedback is when something breaks. The only other user feedback metric they have to work with is active installations, which doesn’t tell them anything about how users interact with a canonical plugin feature or how they feel about its usefulness and usability.

The documentation notes:

“First is the need for better means to collect user feedback. Active installs is currently the only metric available, but doesn’t provide enough value. Does a user actually interact with the feature? In what ways? Do they feel it’s valuable? Feedback is mainly received from users when something breaks. There was agreement to explore telemetry and ways to establish meaningful feedback loops within canonical plugins.”

Another issue with canonical plugins is that they’re not widely promoted and apparently many people don’t even know about them, partly because there’s no clear way for users to discover and  access them.

They wrote:

“The second improvement needed is promotion. It’s often not widely known that canonical plugins exist or that they are officially maintained. Different ways to raise awareness about canonical plugins will be explored, including posts on the WordPress.org News blog, mentioning them in presentations such as State of the Word, and possibly the currently barren Tools page in the WordPress admin.”

That issue was echoed in the comments section by core contributors:

“Can you post a link so I can view all the canonical plugins please?

Is it the random selection under the dotorg user account?
https://profiles.wordpress.org/wordpressdotorg/#content-plugins

Or is it the six plugins listed as ‘beta’?

https://wordpress.org/plugins/browse/beta/”

“Also agree with the other commenters and the post that canonical plugins are woefully under promoted. As a developer and WordPress professional they are rarely on my radar until I stumble upon them. Is there even a link to them in the repository where we can view them all?”

Backlog Management

Contributors were encouraged to continue to work on clearing the backlog of around 13,000 tickets (open issues or feature requests) in both the Core Track and Gutenberg repository. Minor releases can continue with bugfixes.

Final Decisions

The final decisions made are that WordPress 6.8 will be the final major release of 2025. Gutenberg plugin releases will continue every two weeks and minor core releases will continue throughout the year, as needed, with a more relaxed pace for including enhancements. However, the rule of “no new files in minor releases” will still be followed. The project will begin quarterly contributor strategy calls to keep discussions going and adapt as needed.

Read the official documentation of the meeting:

Dotorg Core Committers Check In

Featured Image by Shutterstock/Tithi Luadthong

How to create a 301 redirect in WordPress

Do you need to create a 301 redirect in your WordPress site? You’ve come to the right place! We’ll show you how to set up 301 redirects using three methods. Do you know if you need to use a redirect or whether a 301 redirect is right? No worries, we’ll explain that, too.

Redirects in a nutshell

The name ‘redirect’ says it all: It sends visitors traveling from a specific page to an alternative one instead. Or, if there’s no alternative, an HTTP header (similar to redirects) can make that clear to users and search engines. It’s like registering a change of address when you move house. What if an old friend visits your old home to visit you? A redirect is like a front door note telling your visitors where you live now. Any time you change a URL or delete a page, you should think about redirects.

Different redirects serve different purposes. Since this post is all about 301 redirects, let’s look at some situations where you might need to use one.

When should you use a 301 redirect?

A 301 redirect should be used when:

  • You’ve permanently deleted a page on your site, but you have another similar page you want to send users to instead
  • You’ve changed the URL of a page that was already published
  • You’re moving your site to a new domain
  • You’re changing your URL structure, e.g. changing from HTTP to HTTPS, or removing ‘www’ from the start of your URL

These are some of the more common reasons for using a 301 redirect, but other situations require redirecting, too. And besides that, there are other redirects and HTTP headers you can use in other situations. For instance, if you permanently delete a page and there is no suitable replacement or substitute you can send users to, then a 410 redirect is what you need to use. We have another post where you can read more about which redirects to use in which situations.

Option 1: Create a 301 redirect on the server

To set up a 301 redirect using .htaccess for the given example URLs, you need to add a specific line to your site’s .htaccess file, which is located in the root directory of your WordPress installation. Here’s how you can do it:

  1. Access your server. Access your site’s files using an FTP client or your web host’s file manager. You can also access and edit your .htaccess file from inside the Yoast SEO tools section.
  2. Locate the .htaccess file: The .htaccess file is usually in the root directory of your WordPress installation.
  3. Edit the .htaccess file: Open the .htaccess file with a text editor.
  4. Add the redirect rule: Insert the following line at the end of the file to create the redirect. This rule indicates that requests to /page-1 should be permanently redirected to /page-2.
Redirect 301 /page-1 /page-2
  1. Save changes: If you use an FTP client, save your changes to the .htaccess file and upload them back to your server.

Using this rule, any request to https://example.com/page-1 will be permanently redirected to https://example.com/page-2. The 301 status code indicates to search engines and browsers that the redirect is permanent. Note that this approach assumes the URLs follow the format /page-1 and /page-2 without additional subdirectories. You can adjust the path if your URLs are different.

These configurations can become unmaintainable over time, especially if you’re an avid blogger trying to improve your posts’ SEO. You must also log in to your server over FTP, edit the files, and re-upload them whenever you add a new redirect. That’s why, generally speaking, this method is not considered the way to go.

Option 2: Create a 301 redirect with Cloudflare

Most of us already use Cloudflare in one form or another, so you know that it offers a wide array of tools to help our websites perform. For instance, it comes with a Rules feature where you can set various options related to your website cache. You can also find various redirect options here; this will help you guide up redirects for everything from HTTP to HTTPS to single redirects for individual pages.

It’s easy to set up redirects through Cloudflare. Here’s how that works:

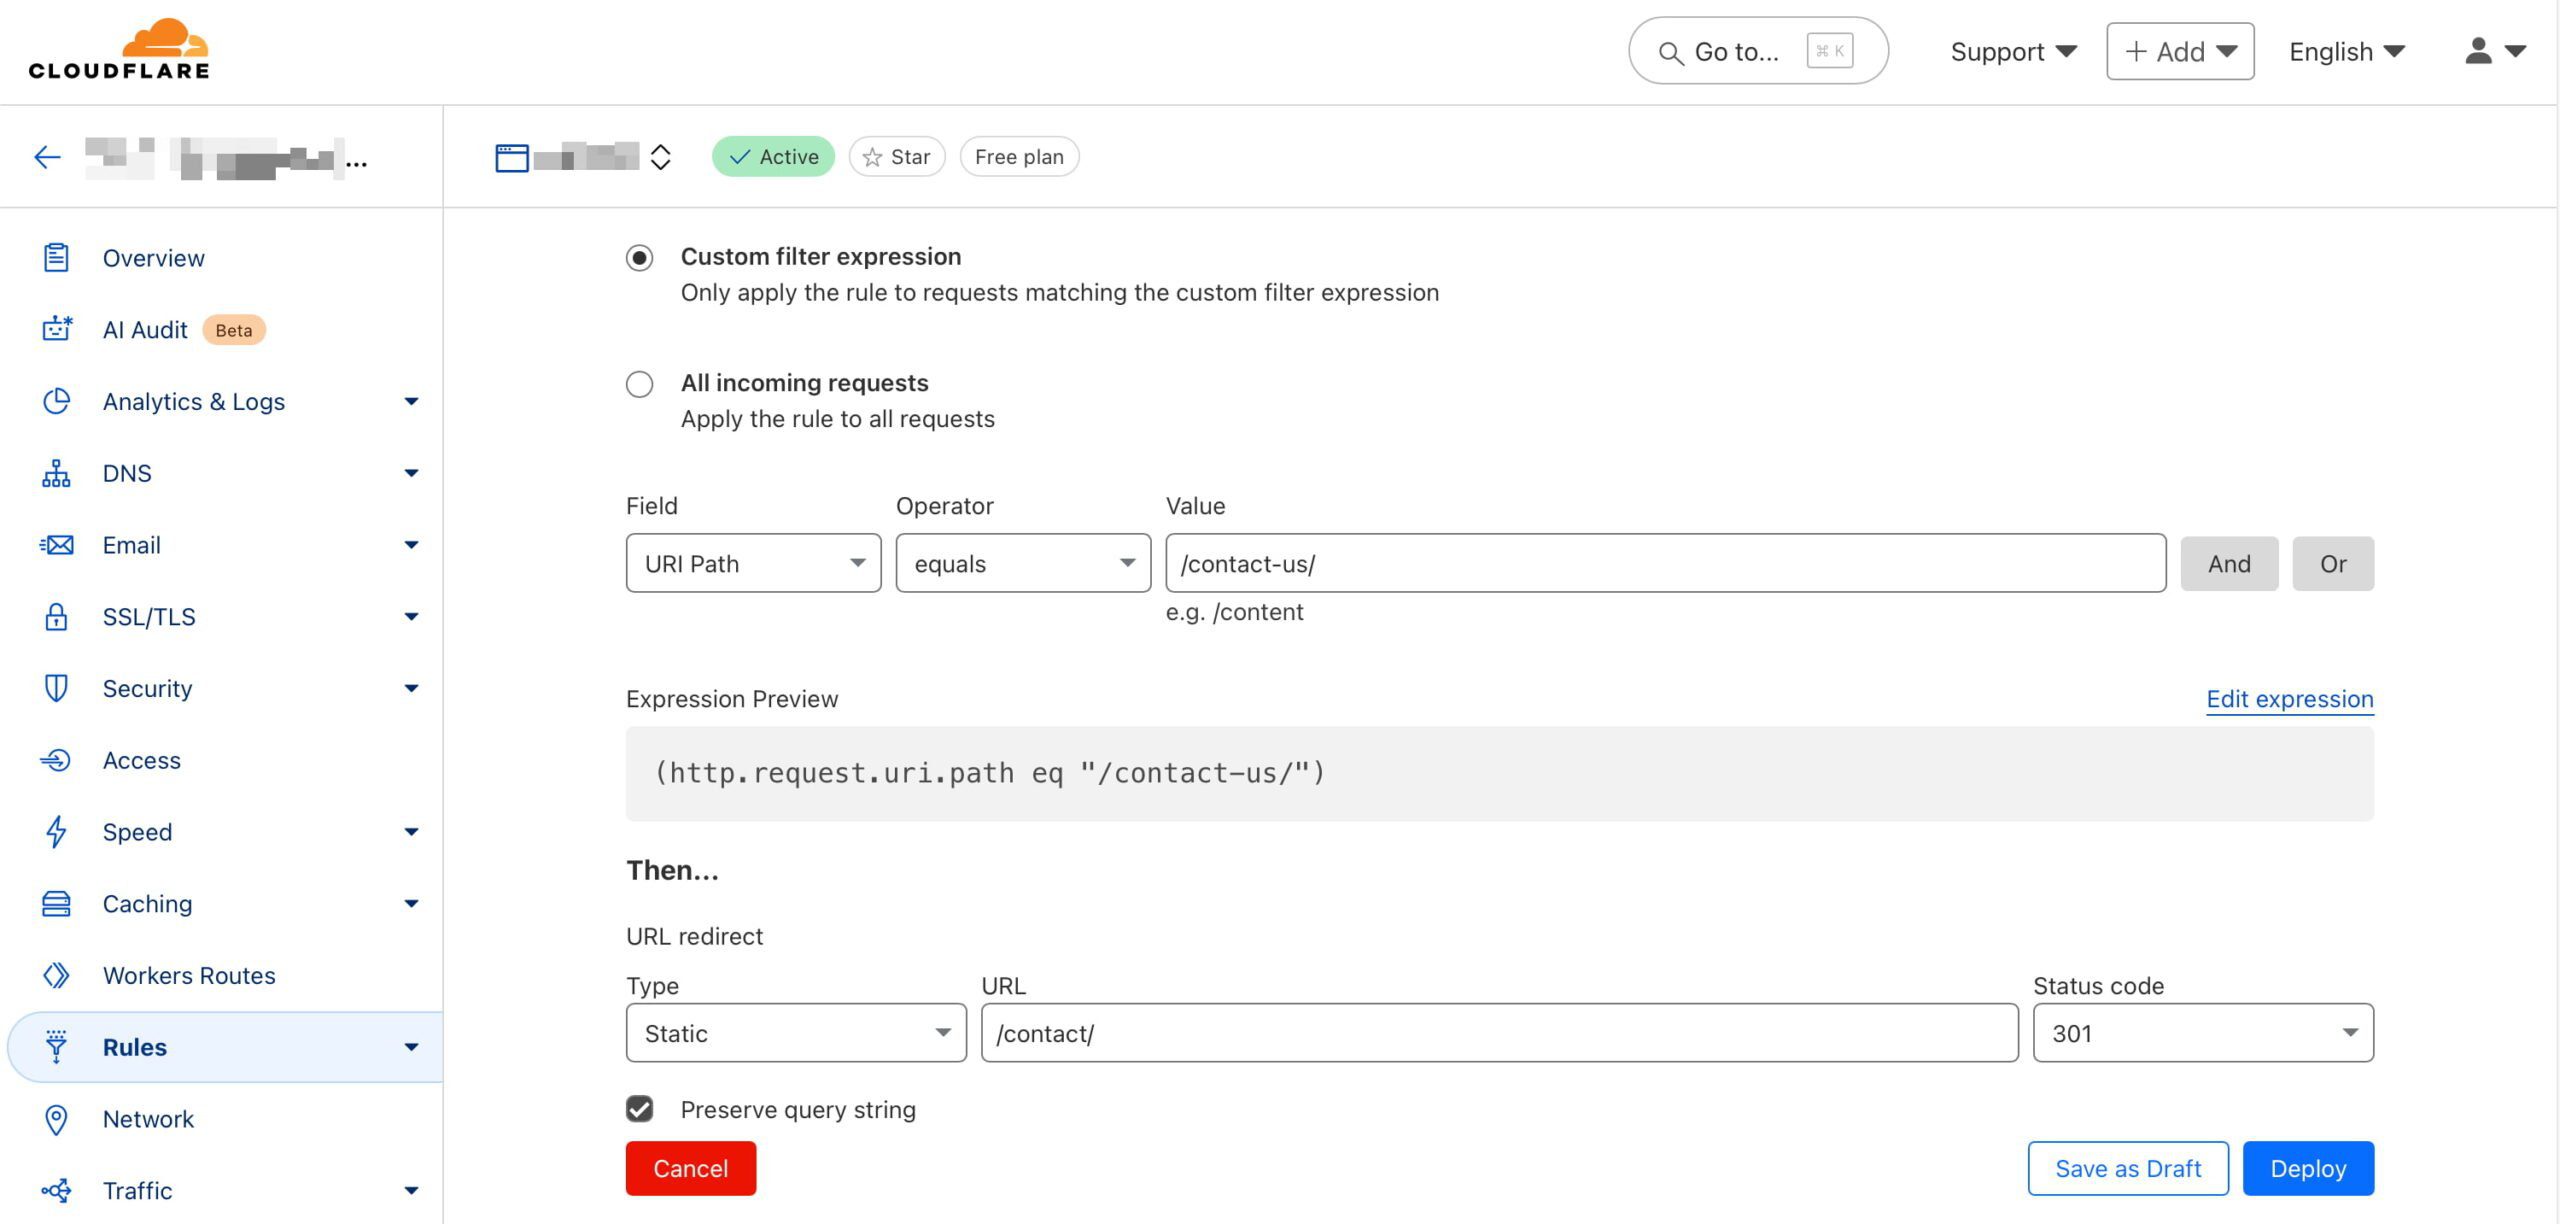
  1. Log into your Cloudflare account: Go to the Cloudflare dashboard and select your account and domain. Then, select Rules and Overview.
  2. Create a redirect rule: Select Create rule and then choose Redirect Rule. In the Rule name field, you might name it something like Redirect Page 1 to Page 2.
  3. Define the matching criteria: Set a wildcard pattern and set the Request URL to https://example.com/page-1. This means any traffic to example.com/page-1 will be matched for redirection
  4. Set the redirect parameters:
    • Target URL: Enter https://example.com/page-2 as the redirect destination.
    • Status code: Select 301 to indicate a permanent redirect.
    • Preserve query string: Decide based on your preference; enable this option if the original URL’s query string should be retained. When you choose to preserve the query string in a redirect, you keep any additional parameters that may be included in the original URL when redirecting to the new URL. Preserving the query string is often useful for tracking purposes, like retaining analytics or advertising parameters, ensuring that useful data isn’t lost during redirection.
  5. Deploy the rule:
    Click Deploy to save and activate the redirect.

Now, whenever someone visits https://example.com/page-1, they will be redirected to https://example.com/page-2 with a 301 status code, indicating a permanent move.

You can efficiently manage traffic without touching your server configuration by setting up redirects via Cloudflare. It provides flexibility for using simple patterns or more complex URL structures.

Cloudflare offers essential tools to manage the performance of your website

Option 3: Create a 301 redirect the easy way with Yoast SEO

Our Yoast SEO Premium plugin offers you a helping hand when it comes to creating these redirects. Our built-in redirect manager assists you whenever you change the URL of a post, page, or any taxonomies that may result in a possible 404 if you don’t properly redirect visitors. In addition, we also offer you an interface to edit or remove these redirects at a later point in time. The plugin also tells you when you’re about to create a redirect that will result in a redirect loop. This looping is something you want to avoid at all costs.

Here’s how you can set up a 301 redirect using Yoast SEO Premium in WordPress:

  1. Access the Yoast SEO settings: Log into your WordPress admin area and navigate to the Yoast SEO section.
  2. Open the Redirect Manager: Go to the Redirects feature in Yoast SEO Premium.
  3. Add a new redirect: Follow the steps below to create a new rule.
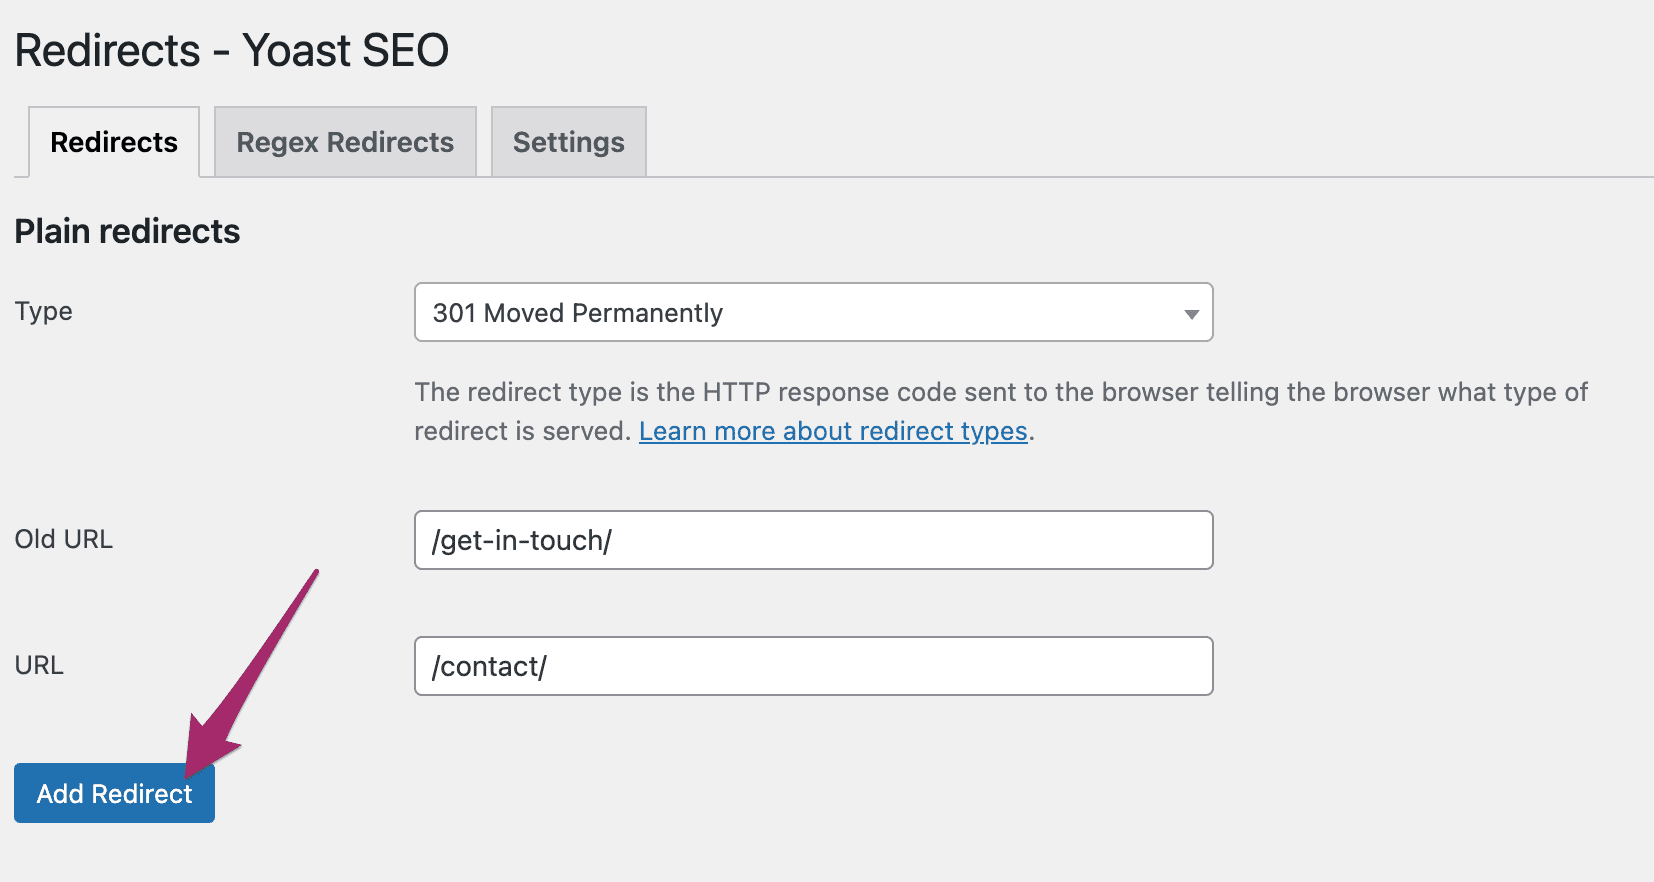
    • In the Old URL field, enter /page-1 as the source path.
    • In the New URL field, enter the destination /page-2 as the complete new URL.
    • Choose a 301 (Moved Permanently) from the list of redirect types.
  4. Save the Redirect: Click Add redirect, and Yoast SEO will handle the redirection.

Yoast SEO Premium also offers an option to automatically redirect deleted content. When you delete a page or post, Yoast SEO prompts you to set up a redirect to avoid broken links. This ensures visitors and search engines won’t encounter 404 errors and are smoothly directed to a relevant page.

These features are part of Yoast SEO Premium, designed to make managing redirects straightforward without manually altering code or server settings. They keep your site user-friendly and help maintain SEO performance by preventing dead links.

Adding a redirect with Yoast SEO Premium is very easy

Conclusion

Understanding how to set up 301 redirects is essential for maintaining your website’s integrity and user experience. Whether you choose Cloudflare, Yoast SEO Premium, or the .htaccess method, each approach offers a simple solution to guide visitors to the right place, preventing 404 errors and keeping your SEO rankings intact. Smoothly transitioning traffic from old links to new ones enhances usability and search visibility. Choose the best method that suits your needs and keeps your website running smoothly.

Read more: How to properly delete pages from your site »

Kinsta WordPress Updater Prevents Failed Plugin Updates via @sejournal, @martinibuster

WordPress hosting provider Kinsta announced an automated plugin updater that detects and recovers from bad updates by rolling back the plugin to its previous state and preventing downtime from affecting website performance. Failed plugin updates are prevented from going live and publishers are immediately notified.

Kinsta shared that a scan of users indicated that the average WordPress installation has 21 active WordPress plugins, suggesting that the average WordPress site is becoming increasingly complex.

That kind of plugin usage means that time spent updating and troubleshooting issues can take up a greater amount of time. Plugins don’t always function well with each other which can lead to updating issues. Kinsta’s new Automatic Updates solves that issue by completely automating plugin updates which will assure that all plugins are up to date.

Keeping WordPress Plugins Updated Is A Security Issue

Outdated plugins can quickly escalate into a nightmare scenario due to vulnerabilities which in turn can have a profound negative effect on search performance. An effective plan for updating plugin is essential for every WordPress-powered website.

According to Kinsta:

“Nothing confirms the need for automatic updates like finding plugins and themes that are not just out of date but also dangerously vulnerable to security breaches”

Advanced Configuration Options

The new plugin updater enables users to choose update days and time windows and can choose custom URLs for testing. False positives can be reduced by hiding dynamic elements. Sensitivity settings allow users to be able to set how strictly visual differences are flagged, further decreasing false positives.

All plugin updates are logged and can be reviewed by users, including before and after screenshots. Users can be emailed for both successful and unsuccessful updates.

The new service costs $3/month for each environment where the service is active, with zero limits to the amount of managed plugins and themes that are monitored.

Read more at Kinsta:

Kinsta Automatic Updates: Hands-free WordPress plugin and theme management

Featured Image by Shutterstock/Krakenimages.com

A Beginner’s Guide To Elementor Editor For WordPress via @sejournal, @martinibuster

Elementor Editor is the world’s most popular WordPress page builder plugin. It currently has a market share of 17% and is used by 12% of all websites.

It simplifies website creation using four core components: templates for the overall layout, blocks for page sections, widgets for individual elements, and custom code.

Users can create attractive websites with no coding knowledge, while developers have the flexibility to add custom JavaScript and CSS.

What Is Elementor Editor?

Commonly referred to as Elementor, the company name is Elementor, and the Editor is one of its products.

Elementor Editor is a user-friendly drag-and-drop page builder plugin for WordPress that enables anyone to create beautiful websites without knowing any code.

Its intuitive interface enables users to design webpages by dragging widgets – such as images, buttons, or text – into sections of a page where needed.

For developers, Elementor Editor supports custom CSS to create even more unique designs.

However, coding knowledge isn’t required, as Elementor provides extensive customization options, enabling users to build truly unique website layouts.

How Website Design Works In Elementor Editor

Creating a website with Elementor Editor revolves around four basic elements:

1. Templates

Templates speed up the creation of webpages and websites, serving as a starting point for designing pages with predefined layouts.

Templates define the overall structure of a page or site-wide elements like headers and footers that appear across the website.

2. Blocks

Blocks are pre-designed sections of a webpage that can be dragged and dropped into the layout.

They represent different areas of a page, such as a hero section or testimonial area, and are identified by their layout or design purpose.

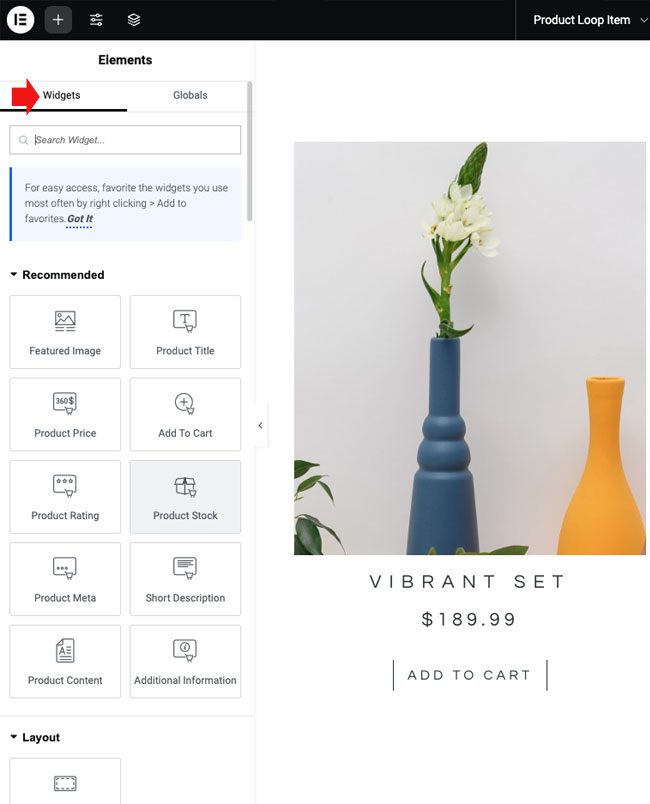
3. Widgets

Widgets are individual design elements that provide specific content or functionality, such as images, text, or forms.

Widgets are combined to create blocks, which fit into the overall layout defined by a template.

4. Custom Code

The Custom Code feature enables advanced users to add styling changes like custom fonts, animations, and spacing adjustments using CSS and JavaScript to modify page structure, trigger events, and create dynamic behaviors beyond Elementor Editor’s built-in options.

Screenshot of Elementor Custom Code, March 2025

How Elementor Page Design Elements Work Together

The three elements for building a website with Elementor follow a clear hierarchy: Templates > Blocks > Widgets.

  • Templates: Templates define the overall layout of a page or site-wide elements like headers and footers that appear across the website. Templates are made up of blocks, which are the pre-designed sections within the layout.
  • Blocks: Blocks are pre-designed sections of a webpage, such as a hero section or testimonial area. They are identified by their layout or design purpose and are composed of widgets, which can be combined in various ways to create specific types of blocks.
  • Widgets: Widgets are individual elements that provide specific content or functionality, such as images, buttons, or forms. These widgets are used within blocks, which in turn fit into the layout defined by a template.
Screenshot of Elementor Theme Builder, March 2025

1. Templates

Templates are the most general level of design in Elementor, providing pre-designed full-page layouts or site-wide page elements like headers and footers.

They control the overall design of webpages and can be customized using blocks and widgets to fit specific needs.

Templates represent the overall layout of a page, while blocks are pre-designed sections of content (like testimonials or pricing tables) that can be added to the layout.

When you start with a template, it often includes multiple blocks as part of its design. Users can drag and drop additional blocks into a template to customize the layout and enhance its functionality.

How Templates Fit Into The Elementor Editor Workflow

Templates fit into the workflow of designing a website in Elementor by providing a starting point for building pages.

Users can select a pre-designed template that matches their needs, then customize it by rearranging, replacing, or editing the blocks it contains.

Templates allow users to save time while ensuring consistency across the website, as they define the structure and design of individual pages or site-wide elements like headers and footers.

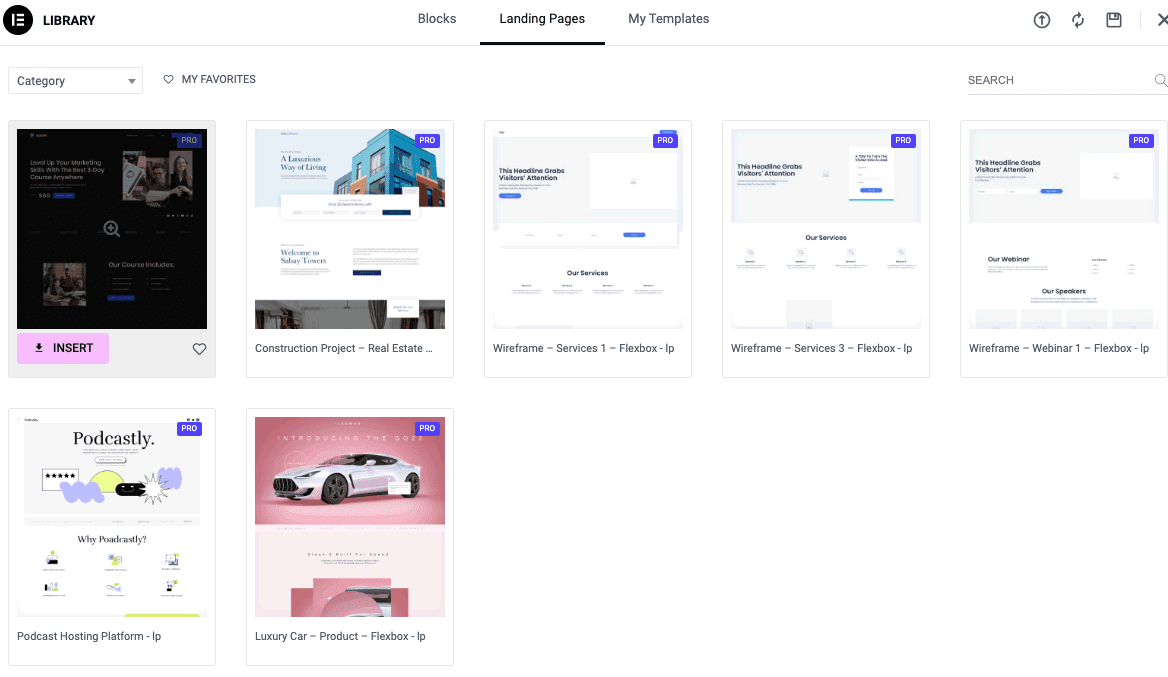
Screenshot of Landing Page Template Library, March 2025

2. Blocks

A block is a pre-designed combination of widgets, such as a pairing of a Media Widget with a Text Widget.

The block’s layout determines how the widgets are positioned, including how they line up with each other, how much space each takes up, and the gaps between them.

These details ensure that the block’s design is both functional and visually appealing.

Blocks are a part of the workflow of designing a webpage. For example, if you need a contact form in a specific section of a template, you can drag a predesigned contact form block and insert it.

The contact form block itself is made of widgets. A custom template is created by replacing similar blocks, modifying them, or adding entirely new blocks to add new functionality to a webpage.

Elementor offers a wide variety of pre-designed blocks to fit different design needs, such as:

  • About.
  • Call to Action.
  • Clients/Friends.
  • Contacts.
  • Countdown.
  • FAQ.
  • Features.
  • Footer.
  • Forms.
  • Header.
  • Portfolio/Gallery.
  • Price.
  • Progress Bar.
  • Services.
  • Subscribe.
  • Team.
  • Testimonials.

How Blocks Fit Into The Elementor Workflow

Blocks fit into the workflow of designing a webpage in Elementor by acting as ready-to-use sections that structure specific parts of a page.

Each block is composed of widgets that define its content and functionality.

Users can customize a template by replacing similar blocks, modifying their content, or adding entirely new blocks to improve a web page’s functionality.

3. Widgets Page Building System

In Elementor, templates consist of blocks, and blocks are built from widgets.

Widgets are the smallest design elements in Elementor Editor, providing specific functions (like buttons and forms) or types of content (such as images, headings, and text).

Widgets correspond to individual components of a webpage, defining the page’s structure and functionality.

For example, a contact section might include a heading widget, a text widget, and a contact form widget.

How Widgets Fit Into The Elementor Workflow

Widgets fit into the workflow as the smallest parts of pre-designed or custom blocks.

Users can modify widgets within a block or combine them to create entirely new custom blocks. These custom blocks, in turn, can be assembled to form a custom template.

Animation of Single Post Design Editor

4. Custom Code

Custom code enables users to apply styling and interactive elements beyond Elementor Editor’s built-in tools.

Unlike templates, blocks, and widgets, which offer predefined structures, custom code provides direct control over design and functionality.

CSS allows for fine-tuning layouts, typography, and animations. JavaScript adds dynamic effects, such as scrolling animations or hover-based interactions. HTML integrates third-party tools, like external forms or tracking scripts, into the page.

Custom code is useful when Elementor Editor’s built-in settings aren’t enough, offering additional flexibility for refining designs to achieve greater specificity, complexity, and control over design and functionalities.

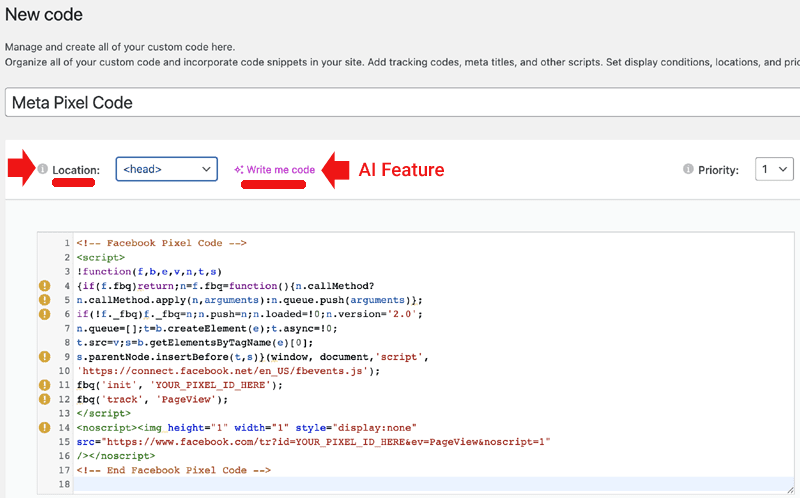
Users can also add code to the head section of a website to load style sheets, scripts, or tracking codes site-wide.

How Custom Code Fits Into The Elementor Editor Workflow

Custom code fits into the Elementor Editor workflow by enabling users to refine styling, add interactivity, and add complexity that’s not available through standard templates, blocks, and widgets.

Users can apply CSS through Elementor Editor’s Custom Code feature to make site-wide styling adjustments without modifying individual elements.

JavaScript can add dynamic behaviors, such as sticky navigation or hover-triggered animations. HTML embeds external content, such as custom forms or tracking scripts.

For site-wide modifications, Elementor Pro enables global custom code application, ensuring changes remain consistent across multiple pages.

Users can also add code to the head section to load style sheets and scripts before page content.

Custom code provides flexibility where blocks and widgets do not, allowing users to fine-tune their designs while keeping the workflow structured.

Elementor Editor AI

Elementor Editor’s AI enables users to generate and refine text directly within the text widget.

Users can access the AI text writer by clicking a pink “Write with AI” link.

AI-generated content is suggested based on context and can be adjusted by simplifying, expanding, shortening, or fixing grammar.

Users can also modify the tone or translate text into multiple languages.

Elementor Editor’s AI generating a heading.

Adding Custom Code With Elementor AI

Elementor Editor’s custom code feature also offers AI to enable users to generate and apply custom code without manually writing CSS, JavaScript, or HTML.

For element-specific styling, Elementor AI can generate custom CSS for effects like hover animations, sticky headers, or text transformations. The AI-generated code includes an explanation of its function, helping users understand its impact before applying it.

While Elementor Editor’s AI streamlines coding, users are responsible for checking the generated code to ensure it works as intended.

How Much It Costs

Elementor Editor is available in a free version that’s useful on its own, but upgrading to the premium paid levels unlocks a wider range of design options.

The Editor is surprisingly affordable, considering the value it provides and its extensive capabilities.

The descriptively named Essential tier costs under $60/year. The next step up, called Advanced Solo, costs less than $80/year. Both tiers offer licenses for the use of one website.

The main difference between the two tiers is that the advanced version offers ecommerce features, the ability to add custom code, and can be used in a collaborative manner with the Collaborative Notes feature.

The upper tiers offer the same capabilities but with licenses that allow deployment on more websites.

Elementor Editor Democratizes Professional Website Design

Elementor Editor is a versatile WordPress page builder that helps users design websites using three easy-to-understand elements: templates, blocks, and widgets.

Templates control the overall layout of a page, blocks are pre-designed sections of a template layout, and widgets are granular design elements that fit into blocks, corresponding to specific content types (like text and images) and functionality (like forms and buttons).

Together, these elements form the basis of an intuitive workflow that democratizes web design, enabling users to create attractive websites like a pro.

More Resources:


Featured Image: Ico Maker/Shutterstock

WordPress Backup Plugin Vulnerability Affects 5+ Million Websites via @sejournal, @martinibuster

A high-severity vulnerability was discovered and patched in the All-in-One WP Migration and Backup plugin, which has over five million installations. The vulnerability requires no user authentication, making it easier for an attacker to compromise a website, but this is mitigated by a restricted attack method.

The vulnerability was assigned a severity rating of 7.5 (High), which is below the highest severity level, labeled Critical.

Unauthenticated PHP Object Injection

The vulnerability is called an unauthenticated PHP object injection. But it’s less severe than a typical Unauthenticated PHP Object Injection where an attacker could directly exploit the vulnerability. This specific vulnerability requires that a user with administrator level credentials export and restore a backup with the plugin in order to trigger the exploit.

The way this kind of vulnerability works is that the WordPress plugin processes potentially malicious data during backup restoration without properly verifying it. But because there’s a narrow attack opportunity, it makes exploiting it less straightforward.

Nevertheless, if the right conditions are met, an attacker can delete files, access sensitive information, and run malicious code.

According to a report by Wordfence:

“The All-in-One WP Migration and Backup plugin for WordPress is vulnerable to PHP Object Injection in all versions up to, and including, 7.89 via deserialization of untrusted input in the ‘replace_serialized_values’ function.

This makes it possible for unauthenticated attackers to inject a PHP Object. No known POP chain is present in the vulnerable software. If a POP chain is present via an additional plugin or theme installed on the target system, it could allow the attacker to delete arbitrary files, retrieve sensitive data, or execute code. An administrator must export and restore a backup in order to trigger the exploit.”

The vulnerability affects versions up to and including 7.89. Users of the plugin are recommended to update it to the latest version which at the time of writing is 7.90.

Read the Wordfence vulnerability advisory:

All in One WP Migration <= 7.89 – Unauthenticated PHP Object Injection

How To Improve Speed And Performance For A WordPress Site via @sejournal, @alexmoss

I love WordPress, but it isn’t perfect out of the box.

Themes and plugin choices are more important than ever as some can hamper the site’s performance.

You can do many things to improve any WordPress site, and this post will cover just some of these optimizations that you can (hopefully) take action on immediately.

Choose A Reputable Web Hosting Company

Choosing a bad host can be harmful to a site’s performance.

While hosting on a shared server may seem the most cost-effective solution, it definitely comes with its issues. Sharing that server with other (potentially) troublesome sites can monopolize shared resources to the detriment of your own.

Hosting doesn’t cost the earth. I would always advise that you choose a web host that not only has great hardware specifications (on a dedicated server if budgets allow) but also understands both WordPress and has strong technical support. And look for hosts with server-level caching.

Whether your site resides on a managed WordPress hosting platform, a LiteSpeed server, or scalable cloud hosting, it’s always worth doing your own research and comparing a few companies before deciding.

Also, consider how SEO-friendly that host is. WordPress has a hosting page with a handful of recommended companies.

Optimize Server Settings And Use CDNs

Once the site is hosted on the server, there are further optimizations you can apply at the server level.

Newer protocols like HTTP/3 and QUIC reduce latency, especially on mobile devices.

Cloudflare and LiteSpeed support this out of the box, but it is still worth checking with your server settings as well.

There are several CDNs available, but my recommendation has always been to use Cloudflare.

Their free plan offers many optimizations, including image polishing, caching and compression (enable tiered caching to further optimize those requests).

I also recommend their automatic platform optimization (APO) offering costing $5 per site, or free with any of their paid plans.

Within Cloudflare, I recommend caching everything except wp-admin and dynamic content, serving stale content while revalidating cache in the background and using their Web Application Firewall (WAF) services that help block attacks and limit crawlers.

Disable XML-RPC

There are several optimizations to remove and limit resources that are enabled by default in WordPress core.

One good recommendations here would be to disable XML-RPC if it is not required:

Disable XML-RPC

add_filter('xmlrpc_enabled', '__return_false');

Implement Caching & Compression Techniques

In addition to server optimizations, you can implement further performance enhancements by adding caching and compression elements directly.

Using object caching such as Varnish or Redis can provide great results, as well as setting proper cache-control headers within.htaccess (Apache) or nginx.conf:


    Header set Cache-Control "max-age=31536000, public"

Optimize Asset Loading

When caching and compression are in place, you can then take further steps to defer JavaScript.

For example:

Also, try to have any scripts load asynchronously so that they don’t degrade initial page load times.

When it comes to CSS, it’s always good to remove any unused styles where possible, although I wouldn’t say this is the biggest priority compared to other recommendations in this post.

Also, try to preload and pre-connect fonts for text that appears above the fold (custom fonts for the text in the footer doesn’t need to be preloaded) and other external resources where possible.

Here is an example of how this can be done:

Close Other Performance Gaps

If you’re a perfectionist like me, there’s always room for more optimizations.

  • Enable lazy loading for images where possible and replace YouTube embeds with static image previews.
  • Use Screaming Frog to detect unnecessary redirects.
  • Close redirect loops and chains, which are reported within Semrush site audits. Update internal links to point directly to the final destination URL.
  • Reduce third-party requests where possible. For example, load Google Analytics or Google Fonts locally instead of via external scripts.
  • Disable unused social media widgets and embeds.

Choose The Right Themes & Plugins

So, you have your hosting account set up and your WordPress site installed.

However, the abundance of choices you have when it comes to themes and plugins makes it hard to decide and choose trusted developers. This is a challenge that has always been present, and I have been writing about it since 2013 at least.

When  choosing both themes and plugins, consider the following when doing so:

  • Is the theme compatible with the most recent versions of WordPress?
  • Does it adhere to WordPress best practices for theme and plugin development? You can check this using the Theme Check plugin for themes and the Plugin Check for plugins.
  • Does the author of the theme have developer E-E-A-T? Can you trust them?
  • Ensure there isn’t too much code bloat. The more a theme is generalized to the masses (e.g., “all-in-one themes for any business”), the more it will have to be developed to accommodate the widest of audiences. The more bespoke the theme, (presumably) the less of a chance of code bloat.
  • Read reviews and investigate support offerings. For themes and plugins offered within WordPress’s own repo, some reviews and ratings are always helpful to inform your decisions.

Most themes offer live previews, so it’s worth running those URLs through speed testing tools such as PageSpeed Insights, Web Page Test, and Chrome DevTools.

Apply Some WordPress-Specific Optimizations

Still not done with my perfectionism! Here are some recommendations on WordPress.

The WP Heartbeat API can create unnecessary AJAX requests. Reduce its frequency or disable it:

add_action( 'init', function() {
    wp_deregister_script('heartbeat');
});

You can also limit post-revisions and revision time intervals in wp-config.php:

define('WP_POST_REVISIONS', 5);
define('AUTOSAVE_INTERVAL', 300); // 5 minutes

Disabling unused Gutenberg block CSS is also recommended if not needed:

add_filter('use_block_editor_for_post', '__return_false');

Use Recommended Plugins

With so many plugins available today, it seems daunting to know which ones are the best and most trusted.

Of course, “it depends” comes into play again, but generally, I advise using as few plugins as possible.

If you can solve some issues away from a plugin (e.g., server-level), then do that first.

Depending on what optimizations you may have set up elsewhere, some of these plugins may be unnecessary to install, but if not, it’s always good to know preferable options.

  • Caching and compression: Autoptimize, W3 Total Cache, or Jetpack alongside WP Super Cache and Jetpack Boost.
  • Preloading: instant.page is a great recommendation here. Uses one line of code that you can implement or they offer a WordPress plugin that does the same.
  • Script deferring: Some plugins above offer this, but I personally use WP Meteor.
  • Image optimization: TinyPNG or Smush for image compression, WebP express for serving WebP images over PNG/JPG/EPS. For further optimization, use Edge Images for utilizing edge transformation services to markup.
  • SEO: While not directly connected to improving speed, Yoast SEO optimizes a site’s visibility performance [disclosure, I work for Yoast]. Most of these features provided in the free version help with this, but things such as IndexNow are included within Premium. However, if you want to enable IndexNow without Premium, Bing offers its own plugin.

When installing any plugin, it’s always good to look at all settings properly and disable anything that is unnecessary to save more processing time and reduce code bloat.

To take this to the next level, you may also want to install Plugin Organizer, which allows you to set conditions for plugins to load only within relevant pages/areas of the site.

Monitor Your Server

Lastly, it’s always good to have a good monitoring system, such as New Relic, on the server.

This system allows you to diagnose and fix any issues that may be hampering the site or server’s performance, as well as reduce further unnecessary server load by disabling non-essential PHP modules.

You can also set up logging for slow queries in MySQL:

SET GLOBAL slow_query_log = 'ON';
SET GLOBAL long_query_time = 1;

I also recommend the Query Monitor plugin. Or, installing Blackfire to pick up inefficient code snippets which cause slow server response time. It is a paid too, but highly recommended for enterprise level.

Error logs are always your friend, too, when diagnosing other issues.

WordPress also offers debug mode, which is extremely useful for diagnosing potential problems by adding the following in wp-config.php:

Note, this should never be enabled on a live production site as it may expose sensitive information. Use on staging only.

// Enable WP_DEBUG mode
define( 'WP_DEBUG', true );

// Enable Debug logging to the /wp-content/debug.log file
define( 'WP_DEBUG_LOG', true );

Conclusion: Enhance WordPress Performance While Preserving Functionality

As you can see, there is a lot one can do to improve a WordPress site, and it’s important to do so from multiple angles.

Do as much as you can above, ensuring the site functions as it should.

Test everything first to ensure everything you need is correctly implemented and doesn’t hamper other things on the site (e.g., sometimes caching or compressing JavaScript can create irregularities or stop some site elements from working) or make other conflicts. And then deploy!

More Resources:


Featured Image: Gorodenkoff/Shutterstock

Mullenweg Considers Delaying WordPress Releases Through 2027 via @sejournal, @martinibuster

A leaked WordPress Slack chat shows that Matt Mullenweg is considering limiting future WordPress releases to just one per year from now through 2027 and insists that the only way to get Automattic to contribute more is to pressure WP Engine to drop their lawsuit. One WordPress developer who read that message characterized it as blackmail.

WordPress Core Development

Mullenweg’s Automattic already reduced their contributions to core, prompting a WordPress developer attending WordCamp Asia 2025 to plead with Matt Mullenweg to increase Automattic’s contributions to WordPress because his and so many other businesses depend on WordPress. Mullenweg smiled and said no without actually saying the word no.

Automattic’s January 2025 statement about reducing contributions:

“…Automattic will reduce its sponsored contributions to the WordPress project. This is not a step we take lightly. It is a moment to regroup, rethink, and strategically plan how Automatticians can continue contributing in ways that secure the future of WordPress for generations to come. Automatticians who contributed to core will instead focus on for-profit projects within Automattic, such as WordPress.com, Pressable, WPVIP, Jetpack, and WooCommerce. Members of the “community” have said that working on these sorts of things should count as a contribution to WordPress.

As part of this reset, Automattic will match its volunteering pledge with those made by WP Engine and other players in the ecosystem, or about 45 hours a week that qualify under the Five For the Future program as benefitting the entire community and not just a single company. These hours will likely go towards security and critical updates.

We’ve made the decision to reallocate resources due to the lawsuits from WP Engine. This legal action diverts significant time and energy that could otherwise be directed toward supporting WordPress’s growth and health. We remain hopeful that WP Engine will reconsider this legal attack, allowing us to refocus our efforts on contributions that benefit the broader WordPress ecosystem.

WP Engine’s historically slim contributions underscore the imbalance that must be addressed for the health of WordPress. We believe in fairness and shared responsibility, and we hope this move encourages greater participation across all organizations that benefit from WordPress.”

Leaked Slack Post

The post on Slack blamed WP Engine for the slowdown and encourages others to put pressure on WP Engine to drop the suit.

The following is a leaked quote of Mullenweg’s post on the WordPress Slack channel, as posted in the Dynamic WordPress Facebook Group (must join the Facebook group to read the post) by a reliable source:

“Would like to put together a Zoom for core committers to discuss future release schedule, hopefully bringing together some of the conversations happening the past 6 weeks:
6.8 includes a lot of “overhang” contributions from Automatticians, including 890+ enhancements and bug fixes in Gutenberg.

I’d like to make sure we get extra testing on 6.8 from web hosts, especially if they can upgrade perhaps their company blogs or something, employee sites, etc to make sure upgrades and everything work well in all environments and with the most popular plugins without regressions.
The Chromecast update issues today (https://x.com/james_dunthorne/status/1898871402049999126 )remind us how easily this can happen.

I’m willing to commit people to early roll-out to WP .com to provide widespread testing with hundreds of thousands of users. This is very resource-intensive, but has contributed a lot to making sure releases are stable before they deploy to the wider array of non-engaged web hosts in the past.

We should consider modifying the release schedule:Other corporate sponsors are protesting WPE’s actions by pulling back contributions, which I think will effect some of the other largest contributors after Automattic.

The court schedule in the WP Engine lawsuit against Automattic, me, and WordPress .org ( https://cloudup.com/c33IWQHdNMj ) goes to jury trial in 2027. WPE appears to be unresponsive to public pressure to resolve things earlier. (As I said at WC Asia, I’m ready to end it yesterday.)

We are approaching 7.0 in two releases, which has an emotional valence and I’d rather not be purely maintenance. (Nor do I want to break our naming structure and do 6.10.)
One approach would be delaying 6.8 and making it the only release this year, 6.9 in 2026, and then aim for a 7.0 in late 2027 assuming a positive outcome of the jury trial.

FWIW I would estimate WPE is spending the equivalent of 60 engineers full-time salary at 250k/yr as plaintiffs / attackers, and Automattic a similar amount on defense. Imagine the project could do for democratizing publishing and competing against proprietary alternatives if that were going into core and community development.
Drop any other thoughts or agenda items you may have in this thread.”

Response to Mullenweg’s leaked post:

One Facebook user accused Mullenweg of trying to “blackmail” the WordPress community to pressure WP Engine (WPE). They wrote that the community is largely sympathetic to WPE than to Mullenweg. But in general Mullenweg’s statement was met with a shrug because they feel that this will give core contributors the chance to catch up on maintaining the core which to them is a greater priority than adding more features to Gutenberg which many of the developers in this group apparently don’t use.

One lone commenter in the Facebook discussion asked if anyone in the discussion had made a positive contribution to WordPress. At the time of writing, nobody had cared to respond.