What is an XML sitemap and why should you have one?

A good XML sitemap serves as a roadmap for your website, guiding Google to all your important pages. XML sitemaps can be beneficial for SEO, helping Google find your essential pages quickly, even if your internal linking isn’t perfect. This post explains what they are and how they help you rank better and get surfaced by AI agents.

Table of contents

Key takeaways

  • An XML sitemap is crucial for SEO, as it guides search engines to your important pages, improving crawl efficiency
  • XML sitemaps list essential URLs and provide metadata, helping search engines understand content and prioritize crawling
  • With Yoast SEO, you can automatically generate and manage XML sitemaps, keeping them up to date
  • XML sitemaps support faster indexing of new content and help discover orphan pages that aren’t linked elsewhere
  • Add your XML sitemap to Google Search Console to help Google find it quickly and monitor indexing status

What are XML sitemaps?

An XML sitemap is a file that lists a website’s essential pages, ensuring Google can find and crawl them. It also helps search engines understand your website structure and prioritize important content.

💡 Fun fact:

XML is not the only type of sitemap; there are several sitemap formats, each serving a slightly different purpose:

  • RSS, mRSS, and Atom 1.0 feeds: These are typically used for content that changes frequently, such as blogs or news sites. They automatically highlight recently updated content
  • Text sitemaps: The simplest format. These contain a plain list of URLs, one per line, without additional metadata

These are HTML sitemaps that are created for visitors, not search engines. They list and link to important pages in a clear, hierarchical structure to improve user navigation. An XML sitemap, however, is specifically designed for search engines.

XML sitemaps include additional metadata about each URL, helping search engines better understand your content. For example, it can indicate:

  • When a page was last meaningfully updated
  • How important is a URL relative to other URLs
  • Whether the page includes images or videos, using sitemap extensions

Search engines use this information to crawl your site more intelligently and efficiently, especially if your website is large, new, or has complex navigation.

Looking to expand your knowledge of technical SEO? We have a course in the Yoast SEO Academy focusing on crawlability and indexability. One of the topics we tackle is how to use XML sitemaps properly.

What does an XML sitemap look like?

An XML sitemap follows a standardized format. It is a text file written in Extensible Markup Language (XML) that search engines can easily read and process. As it follows a structured format, search engines like Google can quickly understand which URLs exist on your website and when they were last updated.

Here is a very simple example of an XML sitemap that contains a single URL:


https://www.yoast.com/wordpress-seo/
2024-01-01

Each URL in a sitemap is wrapped in specific XML tags that provide information about that page. Some of these tags are required, while others are optional but helpful for search engines.

Below is a breakdown of the most common XML sitemap tags:

Tag Requirement Description
<?xml> Mandatory Declares the XML version and character encoding used in the file.
Mandatory The container for the entire sitemap. It defines the sitemap protocol and holds all listed URLs.
Mandatory Represents a single URL entry in the sitemap. Each page must be enclosed within its own tag.
Mandatory Specifies the full canonical URL of the page you want search engines to crawl and index.
Optional Indicates the date when the page was last meaningfully updated, helping search engines know when to re-crawl the page.
Optional Suggests how frequently the content on the page is expected to change, such as daily, weekly, or monthly.
Optional Suggests the relative importance of a page compared to other pages on the same site, using a scale from 0.0 to 1.0.

Note: While sitemaps.org supports optional tags like and , Google and Bing generally ignore them. Google has officially discarded them. Instead, it prefers to signal (last modified) when content actually updates.

What is an XML sitemap index?

A sitemap index is a file that lists multiple XML sitemap files. Instead of containing individual page URLs, it acts as a directory that points search engines to several separate sitemaps.

This becomes useful when a website has a large number of URLs or when the site owner wants to organize sitemaps by content type. For example, a site may have separate sitemaps for pages, blog posts, products, or categories.

Here’s a breakdown of how XML sitemap and XML sitemap index differ:

Feature XML Sitemap XML Sitemap Index
Purpose Lists individual URLs on a website Lists multiple sitemap files
Content Contains page URLs and optional metadata Contains links to sitemap files
Use case Suitable for small or medium-sized sites Useful when a site has multiple sitemaps
Structure Uses and tags Uses and tags.

Search engines support sitemap limits. A single sitemap can contain up to 50,000 URLs or be up to 50 MB in size. If your website exceeds these limits, you can create multiple sitemaps and group them together using a sitemap index.

Submitting a sitemap index to search engines allows them to discover and process all your sitemaps from a single file.

In short, an XML sitemap helps search engines discover pages, while a sitemap index helps search engines discover multiple sitemaps.

Below is a simple example of what a sitemap index file looks like:

?xml version="1.0" encoding="UTF-8"?> 
 
 
https://www.example.com/sitemap-pages.xml 
2025-12-11 
 
 
https://www.example.com/sitemap-products.xml 
2025-12-11 


In this example, the sitemap index references two separate sitemaps. Each one can contain thousands of URLs. This structure helps search engines efficiently discover and crawl large websites.

Why do you need an XML sitemap?

Technically, you don’t need an XML sitemap. Search engines can often discover your pages through internal links and backlinks from other websites. However, having an XML sitemap is highly recommended because it helps search engines crawl and understand your site more efficiently.

Here are some key benefits of using an XML sitemap:

Improved crawl efficiency

Sitemaps help search engines like Google and Bing crawl large or complex websites more efficiently. By listing your important URLs in one place, you make it easier for crawlers to find and prioritize valuable pages.

Faster indexing of new content

When you update or add new pages to your site, including them in your sitemap helps search engines discover them sooner. This can lead to faster indexing, especially for websites that publish content frequently, such as blogs, news sites, or e-commerce stores with changing product listings.

Discovery of orphan pages

Orphan pages are pages that are not linked from other parts of your website. Because crawlers typically follow links to discover content, these pages can sometimes be missed. An XML sitemap can help ensure these pages are still discovered.

Additional metadata signals

XML sitemaps can include additional metadata about each URL, such as the tag. This information helps search engines understand when a page was last updated and whether it may need to be crawled again.

Support for specialized content

Sitemaps can also be extended to include specific types of content, such as images or videos. These specialized sitemaps help search engines better understand and surface media content in results like Google Images or video search.

Better understanding of site structure

A well-organized sitemap gives search engines a clearer overview of your website’s structure and the relationship between different sections or content types.

Indexing insights through Search Console

When you submit your sitemap to tools like Google Search Console, you can monitor how many URLs are discovered and indexed. This also helps you identify crawl issues or indexing errors.

Support for multilingual websites

For websites targeting multiple languages or regions, XML sitemaps can include alternate language versions of pages using hreflang annotations. This helps search engines serve the correct language version to users in different locations.

Yes, but indirectly. AI-powered search experiences like AI Overviews or Bing Copilot still rely on the traditional search index to discover and retrieve content. That means your pages usually need to be crawled and indexed first before they can appear in AI-generated answers.

This is where XML sitemaps still help. By listing your important URLs in one place, a sitemap makes it easier for search engines to discover and index your content. Keeping the value accurate can also help search engines prioritize recently updated pages, which is especially useful for AI systems that aim to surface fresh information.

In short, a sitemap won’t make your content appear in AI answers by itself. But it helps ensure your pages are discoverable, indexed, and up to date, which increases their chances of being used in AI-powered search results.

Adding XML sitemaps to your site with Yoast

Because XML sitemaps play an important role in helping search engines discover and crawl your content, Yoast SEO automatically generates XML sitemaps for your website. This feature is available in both the free and premium versions (Yoast SEO Premium, Yoast WooCommerce SEO, and Yoast SEO AI+) of the plugin.

A smarter analysis in Yoast SEO Premium

Yoast SEO Premium has a smart content analysis that helps you take your content to the next level!

Instead of requiring you to manually create or maintain sitemap files, Yoast SEO handles everything automatically. As you publish, update, or remove content, the plugin updates your sitemap index and the individual sitemaps in real time. This ensures search engines always have an up-to-date overview of the pages you want them to crawl and index.

Yoast SEO also organizes your sitemaps intelligently. Rather than placing every URL in a single file, the plugin creates a sitemap index that groups separate sitemaps for different content types, such as posts, pages, and other public content types, with just one click.

Read more: XML sitemaps in the Yoast SEO plugin

Another important advantage is that Yoast SEO only includes content that should actually appear in search results. Pages set to noindex are automatically excluded from the XML sitemap. This helps keep your sitemap clean and focused on the URLs that matter for SEO.

Controlling what appears in your sitemap

While the plugin automatically manages sitemaps, you still have full control over which content is included.

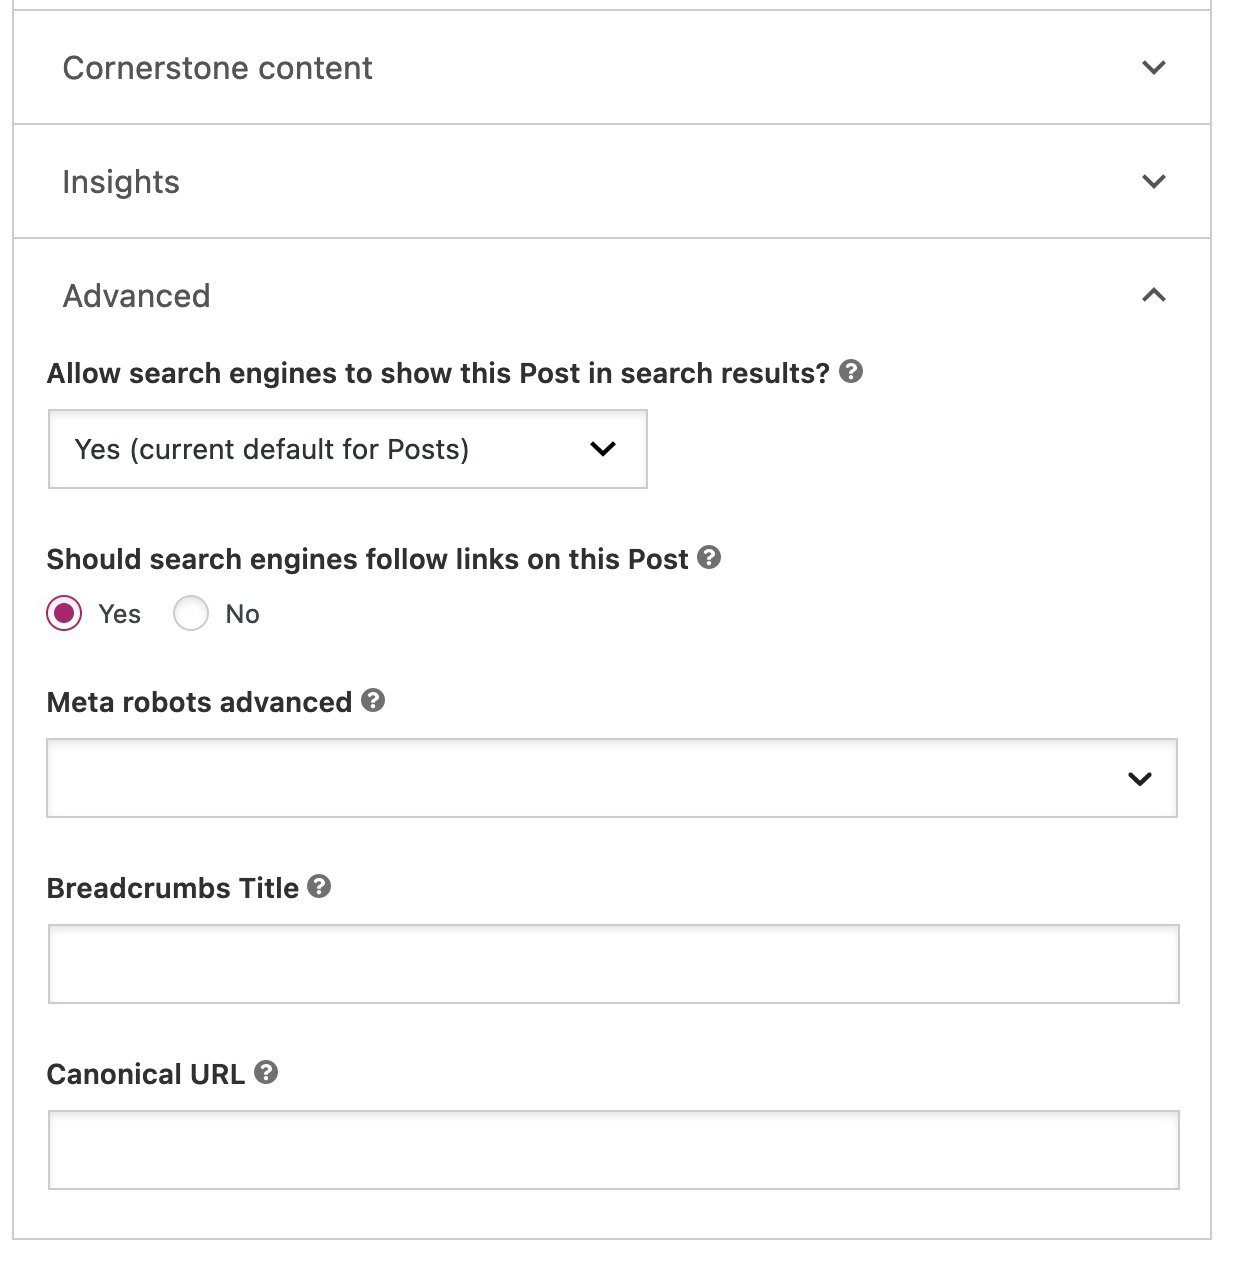
For example, if you don’t want a specific post or page to appear in search results, you can change the setting “Allow search engines to show this content in search results?” in the Yoast SEO sidebar under the Advanced tab. When this option is set to No, the content will be marked as noindex and automatically excluded from the XML sitemap. When set to Yes, the content remains eligible to appear in search results and is included in the sitemap.

This makes it easy to keep your sitemap focused on the pages you actually want search engines to crawl and index. In some cases, developers can further customize sitemap behavior. For example, filters can be used to limit the number of URLs per sitemap or to programmatically exclude certain content types.

Because all of this happens automatically, most website owners never need to manage sitemap files manually. Yoast SEO keeps your XML sitemap clean, up to date, and optimized for search engines as your site grows.

Read more: How to exclude content from the sitemap

Make Google find your sitemap

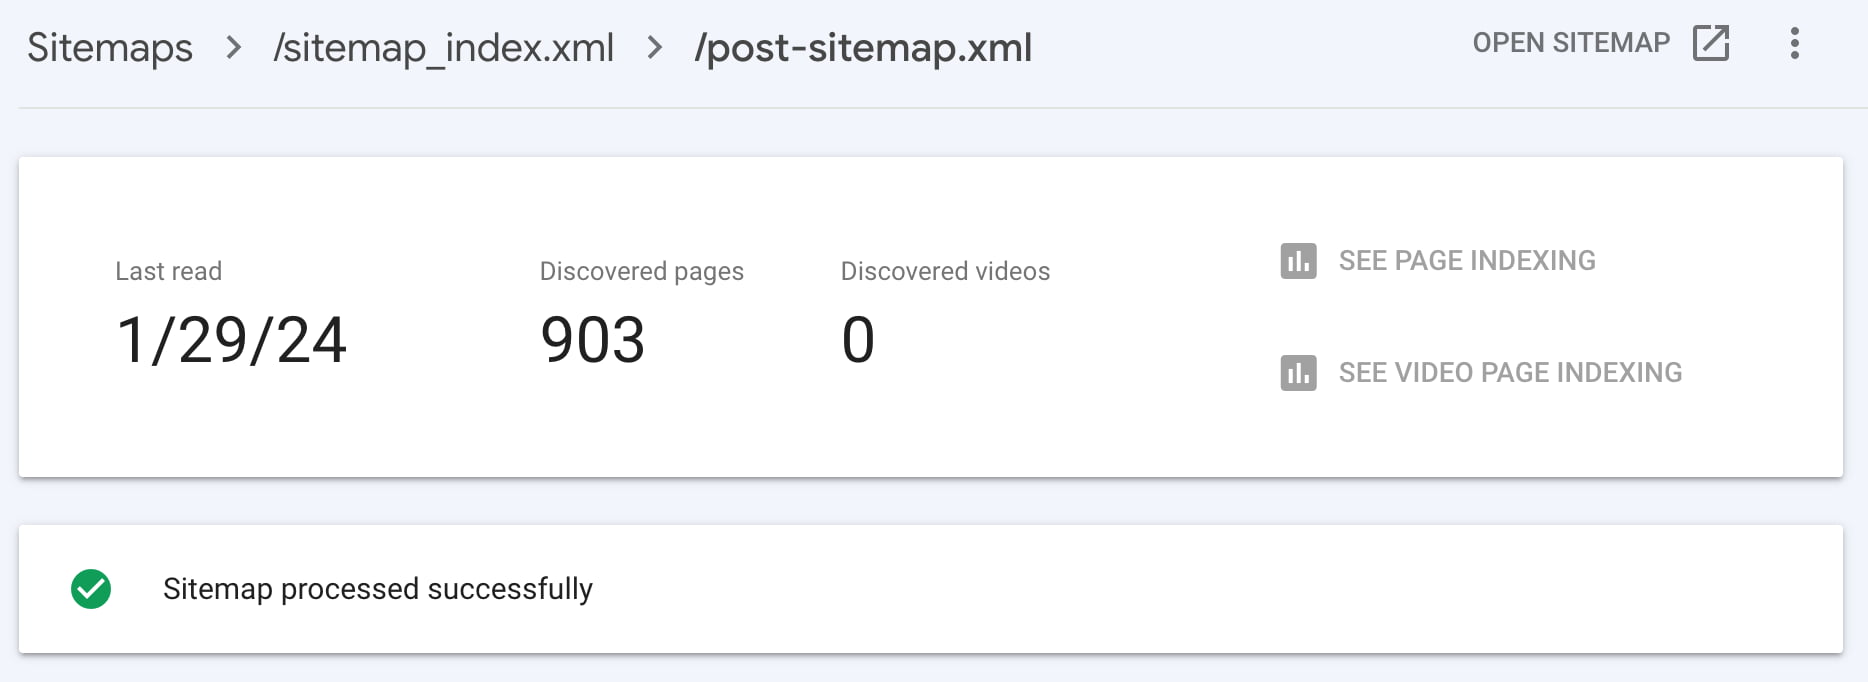
If you want Google to find your XML sitemap quicker, you’ll need to add it to your Google Search Console account. You can find your sitemaps in the ‘Sitemaps’ section. If not, you can add your sitemap at the top of the page.

Adding your sitemap helps check whether Google has indexed all pages in it. We recommend investigating this further if there is a significant difference between the ‘submitted’ and ‘indexed’ counts for a particular sitemap. Maybe there’s an error that prevents some pages from indexing? Another option is to add more links pointing to content that has not yet been indexed.

Google search console sitemap
Google correctly processed all URLs in a post sitemap

What websites need an XML sitemap?

Google’s documentation says sitemaps are beneficial for “really large websites,” “websites with large archives,” “new websites with just a few external links to them,” and “websites which use rich media content.” According to Google, proper internal linking should allow it to find all your content easily. Unfortunately, many sites do not properly link their content logically.

While we agree that these websites will benefit the most from having one, at Yoast, we think XML sitemaps benefit every website. As the web grows, it’s getting harder and harder to index sites properly. That’s why you should provide search engines with every available option to have it found. In addition, XML sitemaps make search engine crawling more efficient.

Every website needs Google to find essential pages easily and know when they were last updated. That’s why this feature is included in the Yoast SEO plugin.

Which pages should be in your XML sitemap?

How do you decide which pages to include in your XML sitemap? Always start by thinking of the relevance of a URL: when a visitor lands on a particular URL, is it a good result? Do you want visitors to land on that URL? If not, it probably shouldn’t be in it. However, if you don’t want that URL to appear in the search results, you must add a ‘noindex’ tag. Leaving it out of your sitemap doesn’t mean Google won’t index the URL. If Google can find it by following links, Google can index the URL.

Example: A new blog

For example, you are starting a new blog. Of course, you want to ensure your target audience can find your blog posts in the search results. So, it’s a good idea to immediately include your posts in your XML sitemap. It’s safe to assume that most of your pages will also be relevant results for your visitors. However, a thank you page that people will see after they’ve subscribed to your newsletter is not something you want to appear in the search results. In this case, you don’t want to exclude all pages from your sitemap, only this one.

Let’s stay with the example of the new blog. In addition to your blog posts, you create some categories and tags. These categories and tags will have archive pages that list all posts in that specific category or tag. However, initially, there might not be enough content to fill these archive pages, making them ‘thin content’.

For example, tag archives that show just one post are not that valuable to visitors yet. You can exclude them from the sitemap when starting your blog and include them once you have enough posts. You can even exclude all your tag pages or category pages simultaneously using Yoast SEO.

However, this kind of page could also be excellent ranking material. So, if you think: well, yes, this tag page is a bit ‘thin’ right now, but it could be a great landing page, then enrich it with additional information and images. And don’t exclude it from your sitemap in this case.

Frequently asked questions about XML sitemaps

There are a lot of questions regarding XML sitemaps, so we’ve answered a couple in the FAQ below:

What happens when Google Search Console says an XML sitemap has errors?

An invalid or improperly read XML sitemap usually indicates a specific error that needs investigation. Check the reported issue to understand what is causing the problem. Make sure the sitemap has been submitted through the search engine’s webmaster tools. When the sitemap is marked as invalid, review the listed errors and apply the appropriate fixes for each one.

How can I check whether a website has an XML sitemap?

In most cases, you can find out if sites have an XML sitemap by adding sitemap.xml to the root domain. So, that would be example.com/sitemap.xml. If a site has Yoast SEO installed, you’ll notice that it’s redirected to example.com/sitemap_index.xml. sitemap_index.xml is the base sitemap that collects all the sitemaps on your site into a single page.

How can I update an XML sitemap?

There are ways to create and update your sitemaps by hand, but you shouldn’t. Also, there are static generators that let you generate a sitemap whenever you want. But, again, this process would need to repeat itself every time you add or update content. The best way to do this is by simply using Yoast SEO. Turn on the XML sitemap in Yoast SEO, and all your updates will be applied automatically.

Can I use in my XML sitemap?

In the past, people believed that adding the attribute to sitemaps would signal to Google that specific URLs should be prioritized. Unfortunately, it doesn’t do anything, as Google has often said it doesn’t use this attribute to read or prioritize content in sitemaps.

Check your own XML sitemap!

Now you know how important it is to have an XML sitemap: it can help your site’s SEO. If you add the correct URLs, Google can easily access your most important pages and posts. Google will also find updated content easily, so it knows when a URL needs to be crawled again. Lastly, adding your XML sitemap to Google Search Console helps Google find it quickly and lets you check for sitemap errors.

So check your XML sitemap and find out if you’re doing it right!

What is Site Kit by Google? A guide for WordPress users

Site Kit by Google is a free WordPress plugin that connects your site to important tools like Analytics, Search Console, and Ads. After installing, it’s easy to verify your accounts, after which you see data in your dashboard. That data is nice to have, but it has limits, especially if you need detailed reports.

Table of contents

What is Site Kit by Google and why use it?

Site Kit by Google is a fundamental analytics tool that helps you answer questions like:

  • How many people are visiting your site?
  • What page do they land on first?
  • Which keywords did they search to find you?
  • Are your ads earning clicks?

With Site Kit, Google puts the data right into WordPress, so you don’t need to go digging around different platforms to seek your data. The tool gets its data straight from each service, and shows the most important data in clear graphs, tables, and a flexible, customizable Key Metrics widget. 

Who is it for? (and when it’s not enough)

But Site Kit is not the analytics tool to rule them all in WordPress land. It covers the basics well, but it won’t work for everyone’s goals. What it does do is make it incredibly easy to set up and run various Google Analytics accounts. 

Site Kit by Google works well for:

  • WordPress users who want to track basic performance
  • People who prefer not to use extra plugins or code
  • Site owners who manage everything themselves

But it may feel limited if you:

  • Run ads at scale and need conversion-level insight
  • Use custom events or eCommerce tracking
  • Want to control every aspect of your website’s scripts and tags

It covers the basics well, but it’s not built for advanced setups.

What does it look like?

After installing and connecting Site Kit, you’ll find a new menu item in your WordPress dashboard. Clicking this will lead you to the dashboard where most of the statistics and settings live. You’ll also notice a new drop-down menu when you visit posts on your site. Thanks to this drop-down, you can quickly see statistics for this specific article without having to open Analytics.

Overview dashboard

The Dashboard gives you an overview of how your site is performing. Of course, depending on what services you connect your site to, you might see something like this:

  • Traffic and engagement insights from Google Analytics 
  • Clicks and impressions from search traffic provided by Search Console
  • An overview of the top-performing pages
  • Earnings from Ads or AdSense, if you run ads, that is
  • Site speed performance powered by PageSpeed Insights 
  • An overview of how different groups compare, for instance, new vs. returning visitors

Some sections also show trend indicators like arrows or percentage changes compared to the previous period. This will help you spot trends and act upon them. Click on any source to open a more detailed view in the corresponding Google tool.

Part of the Site Kit dashboard showing various stats and the Key Metrics widget at the top

Key Metrics widget

You can set up the Key Metrics section the way you want. Site Kit will ask you a couple of questions about your site’s goals and what you want to focus on. Then, it will suggest metrics to show at the top of the dashboard. You can choose which blocks you want to see, such as top converting traffic sources, new visitors, recent trending pages, and much more. 

Admin bar stats

After Site Kit is active, you’ll also see a small dropdown at the top of your WordPress admin bar when you’re viewing your site. Click it, and you’ll get a mini-report showing page-specific stats, including search impressions, clicks, and traffic over time.

Site Kit will help you quickly find out how your content is doing, straight from the WordPress admin bar

What Google services can you connect?

Once installed, you can connect the following tools. Two of them — Search Console and Google Analytics 4 — are enabled during the initial setup. You can connect:

  • Google Analytics 4
  • Search Console
  • AdSense 
  • Reader Revenue Manager
  • Google Ads
  • Tag Manager

Google Analytics 4 (GA4)

Site Kit will add your GA4 tag automatically, after which it shows data such as:

  • The number of visitors
  • Sources of sessions (organic search, direct, referral)
  • Average engagement rate
  • Session durations

The data shown is summarized, so if you want custom reports or event tracking, you need to open GA4. 

a new dashoard in site kit showing the difference in interaction between various visitor groups
Visitor grouping is the newest addition to Site Kit by Google

Google Search Console

After installing and connecting, you’ll get some key data from Search Console right inside your WordPress dashboard:

  • The queries people searched to find your site
  • Number of clicks and impressions
  • Unique visitors from search
  • Page-level performance in search

This kind of data is very helpful for content optimization purposes and to inform your SEO strategy. 

AdSense/Ads (monetization)

If you use Google’s systems to run ads, Site Kit can show data on ad impressions, top-earning pages, and estimated revenue from auto ads, for instance. Simply connect the services to see the data. Remember that it doesn’t replace the AdSense dashboards, but it does give you quick insights.

Reader Revenue Manager

Reader Revenue Manager is a Google tool for adding subscription and contribution options to your website. It’s designed for publishers and content creators who want to monetize their content through reader support, such as recurring memberships or one-time donations.

With Site Kit, you can connect Reader Revenue Manager to your WordPress site in just a few clicks. Once linked, it adds the necessary code to your site automatically, so you don’t need to add tags or install it manually. This feature is optional in Site Kit and is mostly used by publishers offering paywalled or premium content.

PageSpeed Insights

Site Kit runs a PageSpeed test directly inside WordPress. In the PageSpeed Insights section, you’ll see both lab data and field data. Lab data is based on simulated testing in a controlled environment and helps you identify performance issues during development. Field data, on the other hand, reflects how real users experience your site across different devices and network conditions. Together, they provide a balanced view of how your pages perform.

The report shows load performance scores, data on Core Web Vitals (like LCP and CLS). It also gives suggestions for improving speed. But it only tests your homepage and doesn’t include custom settings. For full reports, you can still visit PageSpeed Insights separately.

Tag Manager

You can link a Google Tag Manager container through Site Kit. This lets you manage third-party scripts (like Facebook Pixel or custom tracking tags) from one place. The plugin doesn’t give you a full interface for editing tags — you’ll do that inside the Tag Manager platform.

Managing Analytics in Site Kit by Google

For most site owners or managers, Analytics and Search Console are the most important Google tools. Site Kit makes it easy to set those two services up properly. Of course, you can also use existing accounts.

Enhanced measurement support

GA4 also has Enhanced Measurement, which tracks scrolls, outbound links, file downloads, and other actions automatically. If you activate these in your GA4 property, Site Kit can track them. Unfortunately, it’s not possible to choose which ones to turn on from inside WordPress; you need to go into your GA4 settings for that. 

Event tracking and tag insertion

Site Kit doesn’t support event setup or tracking reports inside the WordPress dashboard. If you need full control over events, you have to use GA4 directly or use Tag Manager to set up the custom events.

Limitations of Analytics in Site Kit

You’ll probably understand by now that Site Kit is not a replacement for GA4 — it’s a neat tool that gives quick insights and nothing more. You don’t get access to funnel reports, attribution models, or filters. You can’t edit events or see predictive metrics, and there’s no support for GA4 audiences or Google Analytics 360.

What’s Enhanced Conversion tracking?

With Enhanced Conversions, you can connect Google Ads clicks to leads or form submissions. This improves the reporting of these events when users are on different devices or block cookies. After setting this up, Site Kit will detect form submissions and pass the data to Google Ads.

Site Kit currently supports some of the most popular WordPress contact form plugins, such as Contact Form 7, WPForms, and Ninja Forms. However, if you use an unsupported custom form, Site Kit can’t automatically add enhanced conversions. 

Again, Site Kit has many limitations in this area. For instance, it doesn’t support purchase-based eCommerce conversions or offline conversions. It also doesn’t support pixel-level tracking, third-party forms, popups, and embedded forms. So, it’s specifically designed for simple lead form submissions. 

Key Metrics widget for quick performance insights

Key Metrics are a very valuable addition as they give quick insights into data of your choosing. They’re quick to understand but not very in-depth. For key strategy decisions, you’re going to need more data.

This widget pulls together important GA4 and Search Console data into a block on your dashboard. You can choose which metrics to show and reorder them. To change your selection, click the Change metrics button in the corner of the Key Metrics section. You can also rerun the question from the Site Kit admin settings.

Each metric includes a figure and a trend comparison from the previous period. For example, you may see engagement is “up 6%” compared to the last 28 days. Click any of them to open the full source report in GA4 or Search Console.

The widget has limitations. It doesn’t show custom events or real-time reporting, campaign attribution breakdowns, or GA4-specific collections like audiences or conversions. The widget and Site Kit, in general, are for broad insights, not advanced analytics. 

The Site Kit Key Metrics widget shows various data that you can tailor to your needs and goals

Is Site Kit by Google enough for your goals?

Site Kit is a good starting point for most WordPress users. It brings together valuable Google data without having to do much work. But whether it’s enough depends on whether you need to get from your analytics and tracking tools. 

SEO and content insights

Site Kit is not an SEO plugin like Yoast SEO. However, you can get data from Search Console that will help you understand how people find your website in the search results. With this, you’ll form an understanding of which content works well and how your site performs in the search results. 

However, as mentioned, it’s not an SEO plugin, so you need to install a tool like Yoast SEO to do much of the heavy lifting. Plugins like these help with most SEO tasks, like fixing technical issues, adding structured data, and improving your content. 

Monetization

If you’re running ads, Site Kit shows basic ad metrics like impressions, estimated earnings, and top-earning pages. It helps you monitor your ads without having to log into another app. 

It doesn’t support advanced ad setups, and you can’t manually place ads. It’s also not possible to optimize layouts based on behavior or run A/B tests to find the best ad format. If you’re working with multiple ad networks, you’ll need a tool that can do a lot more than Site Kit.

Marketing analytics

For reporting basics, Site Kit will do just fine. You can see trends in users, sessions, referral sources, and engagement time — all brought to you by Google Analytics 4. 

However, Site Kit doesn’t give access to campaign statistics, UTM tracking, or event-based funnels. It also doesn’t offer the option to set goals or segment traffic by behavior. For these kinds of insights, you need to dive straight into GA4 or use a more in-depth reporting tool. If you run marketing campaigns, track conversions, or use CRM tools, Site Kit won’t provide enough data. 

eCommerce and advanced use cases

For eCommerce, Site Kit won’t cut it. It doesn’t integrate with WooCommerce and doesn’t offer a revenue tracking option. It also doesn’t have access to carts, products, transactions, or customer behavior. There’s no way to measure things like average order value or conversion rates. 

For advanced eCommerce tracking, you need to set this up in GA4 directly or use other methods to access this data. Site Kit doesn’t support this at all. 

Should you use Site Kit by Google?

Site Kit is a good option if you want a free tool to view traffic, search, and performance statistics without having to set up a bunch of tools. It’s very easy to use and useful enough for small websites. 

If you’re running a huge publication or an online store, need to track custom campaigns, or manage a large number of ad accounts, Site Kit won’t cut it. That’s not to say it’s useless for those cases. One of its biggest draws is that it makes setting up GA4, Search Console, Ads, and Tag Manager accounts incredibly easy. It’s a great starting point to build your analytic toolkit upon.

What is ‘Crawled – currently not indexed’ in Search Console?

Google Search Console (GSC) is a powerful tool for site owners. It helps you monitor and maintain your site’s presence in the SERPs. One of the common issues you might encounter is the “Crawled — currently not indexed” status. This message means that Google has crawled your page but hasn’t indexed it. As a result, your page won’t appear in search results, which can affect your site’s traffic.

It is important to understand why this happens and how to fix it. Here, we’ll explain the “Crawled — currently not indexed” status and provide tips to help you improve your site’s indexing and visibility.

What is “Crawled – Currently Not Indexed” in GSC?

The “Crawled — currently not indexed” status in Search Console means that Google has crawled your page but has not indexed it. This status indicates that while Google knows your page exists, it hasn’t added it to its search index. As a result, the page won’t appear in the SERPs.

This status can occur for several reasons. It might be due to content quality, technical issues, or even Google’s indexing process. Understanding why this happens is the first step in resolving the issue. By addressing the factors that lead to this status, you can improve your chances of getting your pages indexed and visible in search results.

An example of a site with many Crawled – currently not indexed errors in Google Search Console

But first…

Before we continue, you must understand the crawling and indexing process. In short, before your content can appear in search engine results, it goes through three key stages: crawling, indexing, and ranking.

Crawling

Search engines use automated bots called crawlers or spiders to discover new and updated pages. These bots follow links from known pages to new ones, exploring and recording the web’s content.

Indexing

After crawling, the search engine processes and stores the information it finds. It analyzes the content, keywords, and usability and then adds valuable pages to its index.

Ranking

When a user searches, the search engine retrieves relevant pages from its index and ranks them based on relevance, authority, and user experience. Higher-ranked pages appear at the top of search results, attracting more traffic.

If you have that error message, the process stalls during indexing. For reasons unknown, your content does not move on to the ranking phase.

Reasons why this happens

Many factors can cause the “Crawled – currently not indexed” status in Google Search Console. Google may determine your content isn’t valuable or unique enough to be indexed. Duplicate content or thin content with little value can lead to this status.

Technical problems can also prevent Google from indexing your pages. These issues might include server errors, incorrect robots.txt configuration, or the presence of noindex tags. A poorly organized website can make it difficult for Google to understand and index your content. The lack of a clear hierarchy and insufficient internal linking can contribute to this problem.

Sometimes, Google simply needs more time to index new or recently updated content. This is especially true for new websites or pages. Addressing these factors can improve your chances of getting your pages indexed and appearing in search results.

Google’s changing indexing priorities

There’s another aspect to all of this. Due to the vast amount of content generated daily, Google has become more critical and uses fewer resources to process new pages. With the rise of generative AI, there’s a significant overlap in content, leading Google to be more selective about what it indexes. The recent updates, including the Helpful Content Update and the March 2024 Core Update, reflect this shift.

This means you might mean you need to ask yourself the following question:

Why should Google even index your page?

Given the vast amount of similar content out there, Google needs a compelling reason to index your page. Here’s why your content should stand out:

  • Originality: Unique content that offers new insights or information is more likely to be indexed.
  • Value: Content that genuinely helps or informs users will be prioritized.
  • Quality: Google’s algorithms favor high-quality, well-written content with good structure and readability.

Tips to fix “Crawled – Currently Not Indexed”

Improving content quality, resolving technical issues, and optimizing your website’s structure is essential to address the “Crawled – currently not indexed” status.

Fix your content

Ensure your content is original and provides value to your audience. Avoid duplicate content. Cover topics thoroughly to offer in-depth information that meets user needs. Make your content as engaging and informative as possible.

Make sure your robots.txt file is not blocking Google from crawling your pages. Use Search Console to test your robots.txt file. If you want your pages indexed, verify that they do not have noindex tags. Use the Inspect URL tool in GSC to check. Resolve any 5xx server errors that may prevent Google from accessing your pages. Regularly monitor server logs for issues. Optimize crawling with Yoast SEOs tailored tools.

Improve your site structure

Organize your website with a clear structure, using categories and subcategories to help Google understand the relationships between your pages. Use internal links to connect related content and help Google navigate your site more effectively. Implement breadcrumb navigation to improve site structure and user experience.

Generate an XML sitemap that lists all the important pages on your website. This helps Google discover and crawl your pages more efficiently. Upload the XML sitemap Yoast SEO generates for your site to Search Console. This ensures that Google knows all your pages and can crawl them more easily.

Patience, please

Understand that indexing can take time, especially for new websites. Be patient and monitor your indexing status regularly. Regularly check Google Search Console for any issues related to crawling and indexing. Address any warnings or errors promptly. Keep track of changes you make to your site and monitor their impact on indexing and search visibility.

Additional best practices

Consider these additional SEO best practices to improve your indexing chances and enhance your site’s performance.

Add content regularly to keep your site relevant and valuable. Fresh content can attract more visitors and encourage Google to crawl your site more frequently. In addition, you should periodically review and update older content to ensure it remains accurate and useful.

Try to improve engagement on your site. Engaged users can signal to Google that your content is valuable. Promote your content on social media to increase visibility and drive traffic. Social signals can indirectly influence your SEO.

Ensure your site performs well on mobile devices. Google’s indexing processes work from a mobile perspective, so a good mobile user experience is crucial. Optimize your site’s loading speed. Faster pages provide a better user experience and can improve your search rankings.

Write guest posts for reputable websites in your niche. Quality backlinks from authoritative sites can boost your own site’s credibility. Create valuable content that others want to link to. Natural backlinks can improve your site’s authority and indexing.

Addressing the “Crawled – currently not indexed” status

Addressing the “Crawled – currently not indexed” status in Google Search Console is necessary if you want to improve your site’s visibility. Understanding the reasons behind this status and implementing practical solutions can enhance your chances of getting indexed.

Focus on improving content quality, resolving technical issues, and optimizing your website’s structure. Regularly update your content, engage with users, and monitor your site’s performance. These efforts will help you maintain a solid online presence and ensure your content reaches your audience.

Coming up next!