What Is Schema Markup & Why Is It Important For SEO? via @sejournal, @ChuckPrice518
Schema.org is a collection of vocabulary (or schemas) used to apply structured data markup to web pages and content. Correctly applying schema can improve SEO outcomes through rich snippets.
Structured data markup is translated by platforms such as Google and Microsoft to provide enhanced rich results (or rich snippets) in search engine results pages or emails. For example, you can markup your ecommerce product pages with variants schema to help Google understand product variations.
Schema.org is an independent project that has helped establish structured data consistency across the internet. It began collaborating with search engines such as Google, Yahoo, Bing, and Yandex back in 2011.
The Schema vocabulary can be applied to pages through encodings such as RDFa, Microdata, and JSON-LD. JSON-LD schema is preferred by Google as it is the easiest to apply and maintain.
Does Schema Markup Improve Your Search Rankings?
Schema is not a ranking factor.
However, your webpage becomes eligible for rich snippets in SERPs only when you use schema markup. This can enhance your search visibility and increase CTR on your webpage from search results.
Schema can also be used to build a knowledge graph of entities and topics. Using semantic markup in this way aligns your website with how AI algorithms categorize entities, assisting search engines in understanding your website and content.
The information provided by structured data can provide context to an otherwise ambiguous webpage. It can also help you clarify entities with multiple potential meanings.
According to Schema.org:
“Most webmasters are familiar with HTML tags on their pages. Usually, HTML tags tell the browser how to display the information included in the tag. For example,
Avatar
tells the browser to display the text string “Avatar” in a heading 1 format.
However, the HTML tag doesn’t give any information about what that text string means—“Avatar” could refer to the hugely successful 3D movie, or it could refer to a type of profile picture—and this can make it more difficult for search engines to intelligently display relevant content to a user.”
This means that search engines should have additional information to help them figure out what the webpage is about.
You can even link your entities directly to sites like Wikipedia or Google’s knowledge graph to build explicit connections. Using Schema this way can have positive SEO results, according to Martha van Berkel, CEO of Schema App:
“At Schema App, we’ve tested how entity linking can impact SEO. We found that disambiguating entities like places resulted in pages performing better on [near me] and other location-based search queries.
Our experiments also showed that entity linking can help pages show up for more relevant non-branded search queries, increasing click-through rates to the pages.
Here’s an example of entity linking. If your page talks about “Paris”, it can be confusing to search engines because there are several cities in the world named Paris.
If you are talking about the city of Paris in Ontario, Canada, you can use the sameAs property to link the Paris entity on your site to the known Paris, Ontario entity on Wikipedia, Wikidata, and Google’s Knowledge Graph.”
By helping search engines understand content, you are assisting them in saving resources (especially important when you have a large website with millions of pages) and increasing the chances for your content to be interpreted properly and ranked well. While this may not be a ranking factor directly, Schema helps your SEO efforts by giving search engines the best chance of interpreting your content correctly, giving users the best chance of discovering it.
What Is Schema Markup Used For?
Listed above are some of the most popular uses of schema, which are supported by Google and other search engines.
You may have an object type that has a schema.org definition but is not supported by search engines.
In such cases, it is advised to implement them, as search engines may start supporting them in the future, and you may benefit from them as you already have that implementation.
Types Of Schema Encoding: JSON-LD, Microdata, & RDFa
There are three primary formats for encoding schema markup:
- JSON-LD.
- Microdata.
- RDFa.
Google recommends JSON-LD as the preferred format for structured data. Microdata is still supported, but JSON-LD schema is recommended.
In certain circumstances, it isn’t possible to implement JSON-LD schema due to website technical infrastructure limitations such as old content management systems). In these cases, the only option is to markup HTML via Microdata or RDFa.
You can now mix JSON-LD and Microdata formats by matching the @id attribute of JSON-LD schema with the itemid attribute of Microdata schema. This approach helps reduce the HTML size of your pages.
For example, in a FAQ section with extensive text, you can use Microdata for the content and JSON-LD for the structured data without duplicating the text, thus avoiding an increase in page size. We will dive deeper into this below in the article when discussing each type in detail.
1. JSON-LD Schema Format
JSON-LD encodes data using JSON, making it easy to integrate structured data into web pages. JSON-LD allows connecting different schema types using a graph with @ids, improving data integration and reducing redundancy.
Let’s look at an example. Let’s say that you own a store that sells high-quality routers. If you were to look at the source code of your homepage, you would likely see something like this:
TechHaven
The best routers you’ll find online!
Address:
459 Humpback Road
Rialto, Ca
Tel: 909 574 3903
Click here to view our best routers!
We’re open:
Mon-Sat 8am - 10:30pm
Sun: 2pm - 8pm
Once you dive into the code, you’ll want to find the portion of your webpage that discusses what your business offers. In this example, that data can be found between the two
The following JSON-LD formatted text will markup the information within that HTML fragment on your webpage, which you may want to include in your webpage’s
section.
This snippet of code defines your business as a store via the attribute"@type": "Store".
Then, it details its location, contact information, hours of operation from Monday to Saturday, and different operational hours for Sunday.
By structuring your webpage data this way, you provide critical information directly to search engines, which can improve how they index and display your site in search results. Just like adding tags in the initial HTML, inserting this JSON-LD script tells search engines specific aspects of your business.
Let’s review another example of WebPage schema connected with Organization and Author schemas via @id. JSON-LD is the format Google recommends and other search engines because it’s extremely flexible, and this is a great example.
In the example:
- Website links to the organization as the publisher with
@id. - The organization is described with detailed properties.
- WebPage links to the WebSite with
isPartOf. - NewsArticle links to the WebPage with
isPartOf, and back to the WebPage withmainEntityOfPage, and includes the author property via@id.
You can see how graph nodes are linked to each other using the"@id"attribute. This way, we inform Google that it is a webpage published by the publisher described in the schema.
The use of hashes (#) for IDs is optional. You should only ensure that different schema types don’t have the same ID by accident. Adding custom hashes (#) can be helpful, as it provides an extra layer of insurance that they will not be repeated.
You may wonder why we use"@id"to connect graph nodes. Can’t we just drop organization, author, and webpage schemas separately on the same page, and it is intuitive that those are connected?
The issue is that Google and other search engines cannot reliably interpret these connections unless explicitly linked using @id.
Adding to the graph additional schema types is as easy as constructing Lego bricks. Say we want to add an image to the schema:
{
   "@type": "ImageObject",
   "@id": "https://www.example.com/#post-image",
   "url": "https://www.example.com/example.png",
   "contentUrl": "https://www.example.com/example.png",
   "width": 2160,
   "height": 1215,
   "thumbnail": [
     {
        "@type": "ImageObject",
        "url": "https://example.com/4x3/photo.jpg",
        "width": 1620,
        "height": 1215
      },
      {
        "@type": "ImageObject",
        "url": "https://example.com/16x9/photo.jpg",
        "width": 1440,
        "height": 810
      },
      {
        "@type": "ImageObject",
        "url": "https://example.com/1x1/photo.jpg",
        "width": 1000,
        "height": 1000
      }
    ]
}
As you already know from the NewsArticle schema, you need to add it to the above schema graph as a parent node and link via @id.
As you do that, it will have this structure:
Quite easy, isn’t it? Now that you understand the main principle, you can build your own schema based on the content you have on your website.
And since we live in the age of AI, you may also want to use ChatGPT or other chatbots to help you build any schema you want.
2. Microdata Schema Format
Microdata is a set of tags that aims to make annotating HTML elements with machine-readable tags much easier.
However, the one downside to using Microdata is that you have to mark every individual item within the body of your webpage. As you can imagine, this can quickly get messy.
Take a look at this sample HTML code, which corresponds to the above JSON schema with NewsArticle:
Our Company
Example Company, also known as Example Co., is a leading innovator in the tech industry.
Founded in 2000, we have grown to a team of 200 dedicated employees.
Our slogan is: "Innovation at its best".
Contact us at +1-800-555-1212 for customer service.
Our Founder
Our founder, Jane Smith, is a pioneer in the tech industry.
About Us
This is the About Us page for Example Company.
Example News Headline
This is an example news article.
This is the full content of the example news article. It provides detailed information about the news event or topic covered in the article.
Author: John Doe. Connect with John on Twitter and LinkedIn.

If we convert the above JSON-LD schema into Microdata format, it will look like this:
Our Company
Example Company, also known as
Example Co., is a leading innovator in the tech industry.
Founded in
2000-01-01, we have grown to a team of
200 dedicated employees.
Our slogan is: Innovation at its best.
Contact us at
+1-800-555-1212 for
Customer Service.
https://www.example.com

About Us
This is the About Us page for Example Company.
https://www.example.com/about
Example News Headline
This is an example news article.
This is the full content of the example news article. It provides detailed information about the news event or topic covered in the article.
Author:
John Doe
Profile
Twitter
LinkedIn
This example shows how complicated it becomes compared to JSON-LD since the markup is spread over HTML. Let’s understand what is in the markup.
You can see
By adding this tag, we’re stating that the HTML code contained between the
Next, we have to identify what that item is by using the ‘itemtype’ attribute to identify the type of item (Person).
An item type comes in the form of a URL (such as https://schema.org/Person). Let’s say, for example, you have a product you may use http://schema.org/Product.
To make things easier, you can browse a list of item types here and view extensions to identify the specific entity you’re looking for. Keep in mind that this list is not all-encompassing but only includes ones that are supported by Google, so there is a possibility that you won’t find the item type for your specific niche.
It may look complicated, but Schema.org provides examples of how to use the different item types so you can see what the code is supposed to do.
Don’t worry; you won’t be left out in the cold trying to figure this out on your own!
If you’re still feeling a little intimidated by the code, Google’s Structured Data Markup Helper makes it super easy to tag your webpages.
To use this amazing tool, just select your item type, paste in the URL of the target page or the content you want to target, and then highlight the different elements so that you can tag them.
3. RDFa Schema Format
RDFa is an acronym for Resource Description Framework in Attributes. Essentially, RDFa is an extension to HTML5 designed to aid users in marking up structured data.
RDFa isn’t much different from Microdata. RDFa tags incorporate the preexisting HTML code in the body of your webpage. For familiarity, we’ll look at the same code above.
The HTML for the same JSON-LD news article will look like:
vocab="https://schema.org/" typeof="WebSite" resource="https://www.example.com/#website">
Our Company
Example Company, also known as
Example Co., is a leading innovator in the tech industry.
Founded in
2000-01-01, we have grown to a team of
200 dedicated employees.
Our slogan is: Innovation at its best.
Contact us at
+1-800-555-1212 for
Customer Service.
https://www.example.com
About Us
This is the About Us page for Example Company.
https://www.example.com/about
Example News Headline
This is an example news article.
This is the full content of the example news article. It provides detailed information about the news event or topic covered in the article.
Author:
John Doe
Profile
Twitter
LinkedIn
Unlike Microdata, which uses a URL to identify types, RDFa uses one or more words to classify types.
If you wish to identify a property further, use the ‘typeof’ attribute.
Let’s compare JSON-LD, Microdata, and RDFa side by side. The @type attribute of JSON-LD is equivalent to the itemtype attribute of Microdata format and the typeof attribute in RDFa. Furthermore, the propertyName of JSON-LD attribute would be the equivalent of the itemprop and property attributes.
| Attribute Name | JSON-LD | Microdata | RDFa |
|---|---|---|---|
| Type | @type | itemtype | typeof |
| ID | @id | itemid | resource |
| Property | propertyName | itemprop | property |
| Name | name | itemprop=”name” | property=”name” |
| Description | description | itemprop=”description” | property=”description” |
For further explanation, you can visit Schema.org to check lists and view examples. You can find which kinds of elements are defined as properties and which are defined as types.
To help, every page on Schema.org provides examples of how to apply tags properly. Of course, you can also fall back on Google’s Structured Data Testing Tool.
4. Mixing Different Formats Of Structured Data With JSON-LD
If you use JSON-LD schema but certain parts of pages aren’t compatible with it, you can mix schema formats by linking them via @id.
For example, if you have live blogging on the website and a JSON-LD schema, including all live blogging items in the JSON schema would mean having the same content twice on the page, which may increase HTML size and affect First Contentful Paint and Largest Contentful Paint page speed metrics.
You can solve this either by generating JSON-LD dynamically with JavaScript when the page loads or by marking up HTML tags of live blogging via the Microdata format, then linking to your JSON-LD schema in the head section via “@id“.
Here is an example of how to do it.
Say we have this HTML with Microdata markup with itemid="https://www.example.com/live-blog-page/#live-blog"
  Live Blog Headline
  Explore the biggest announcements from DevDay


        1:45 PM ET Nov 6, 2023


    OpenAI is taking the first step in gradual deployment of GPTs – tailored ChatGPT for a specific purpose – for safety purposes.


    1:44 PM ET Nov 6, 2023


      ChatGPT now uses GPT-4 turbo with current knowledge.
      It also knows which tool to choose for a task with GPT-4 All Tools.


     1:43 PM ET Nov 6, 2023


    Microsoft CEO Satya Nadella joined Altman to announce deeper partnership with OpenAI to help developers bring more AI advancements.
We can link to it from the sample JSON-LD example we had like this:
If you copy and paste HTML and JSON examples underneath in the schema validator tool, you will see that they are validating properly.
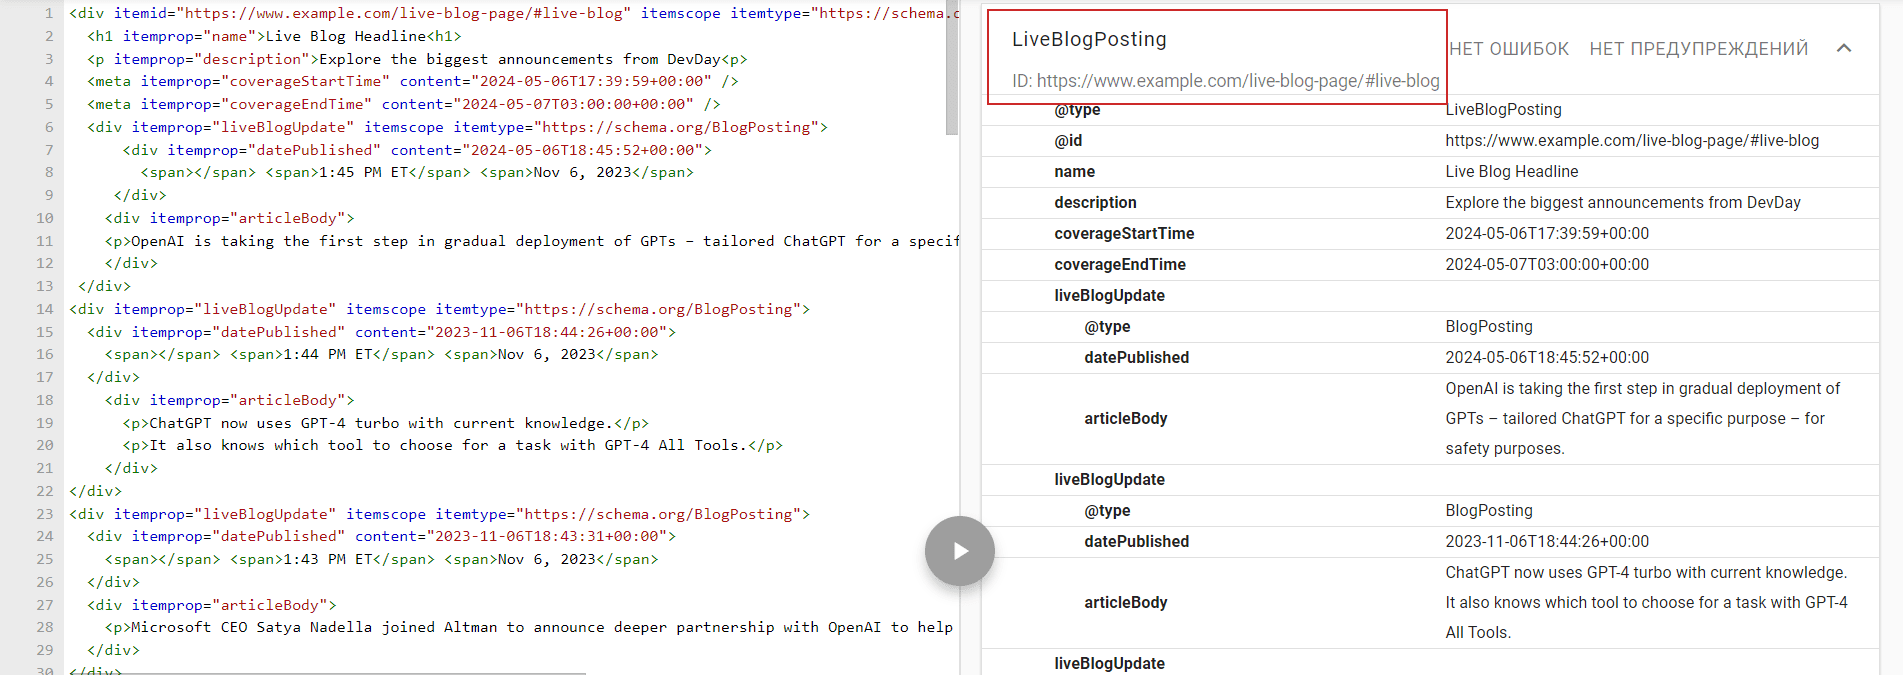 The schema validator does validate the above example.
The SEO Impact Of Structured Data
This article explored the different schema encoding types and all the nuances regarding structured data implementation.
Schema is much easier to apply than it seems, and it’s a best practice you must incorporate into your webpages. While you won’t receive a direct boost in your SEO rankings for implementing Schema, it can:
- Make your pages eligible to appear in rich results.
- Ensure your pages get seen by the right users more often.
- Avoid confusion and ambiguity.
The work may seem tedious. However, given time and effort, properly implementing Schema markup is good for your website and can lead to better user journeys through the accuracy of information you’re supplying to search engines.
Image Credits
Featured Image: Paulo Bobita
Screenshot taken by author
Read more: