If you’re a CMO, I feel your pain. For years, decades even, brand visibility has largely been an SEO arms race against your competitors. And then along comes ChatGPT, Perplexity, and Claude, not to mention Google’s new AI-powered search features: AI Mode and AI Overviews. Suddenly, you’ve also got to factor in your brand’s visibility in AI-generated responses as well.
Unfortunately, the technical shortcuts that helped your brand adapt quickly and stay competitive over the years have most likely left you with various legacy issues. This accumulated technical SEO debt could potentially devastate your AI visibility.
Of course, every legacy issue or technical problem will have a solution. But your biggest challenge in addressing your technical SEO debt isn’t complexity or incompetence; it’s assumption.
Assumptions are the white ants in your search strategy, hollowing out the team’s tactics and best efforts. Everything might still seem structurally sound on the surface because all the damage is happening inside the walls of the house, or between the lines of your SEO goals and workflows. But then comes that horrific day when someone inadvertently applies a little extra pressure in the wrong spot and the whole lot caves in.
The new demands of AI search are applying that pressure right now. How solid is your technical SEO?
Strong Search Rankings ≠ AI Visibility
One of the most dangerous assumptions you can make is thinking that, because your site ranks well enough in Google, the technical foundations must be sound. So, if the search engines have no problem crawling your site and indexing your content, the same should also be true for AI, right?
Wrong.
Okay, there are actually a couple of assumptions in there. But that’s often the way: One assumption provides the misleading context that leads to others, and the white ants start chewing your walls.
Let’s deal with that second assumption first: If your site ranks well in Google, it should enjoy similar visibility in AI.
We recently compared Ahrefs data for two major accommodation websites: Airbnb and Vrbo.
When we look at non-branded search, both websites have seen a downward trend since July. The most recent data point we have (Oct. 13-15, 2025) has Airbnb showing up in ~916,304 searches and Vrbo showing up in ~615,497. That’s a ratio of roughly 3:2.
Image from author, October 2025
But when we look at estimated ChatGPT mentions (September 2025), Airbnb has ~8,636, while Vrbo has only ~1,573. That’s a ratio of ~11:2.
Image from author, October 2025
I should add a caveat at this point that any AI-related datasets are early and modeled, so should be taken as indicative rather than absolute. However, the data suggests Vrbo appears far less in AI answers (and ChatGPT in particular) than you’d expect if there was any correlation with search rankings.
Because of Vrbo’s presence in Google’s organic search results, it does have a modest presence in Google’s AI Overviews and AI Mode. That’s because Google’s AI features still largely draw on the same search infrastructure.
And that’s the key issue here: Search engines aren’t the only ones sending crawlers to your website. And you can’t assume AI crawlers work in the same way.
AI Search Magnifies Your Technical SEO Debt
So, what about that first assumption: If your site ranks fine in Google, any technical debt must be negligible.
Google’s search infrastructure is highly sophisticated, taking in a much wider array of signals than AI crawlers currently do. The cumulative effect of all these signals can mask or compensate for small amounts of technical debt.
For example, a page with well-optimized copy, strong schema markup, and decent authority might still rank higher than a competitor’s, even if your page loads slightly slower.
Most AI crawlers don’t work that way. They strip away code, formatting, and schema markup to ingest only the raw text. With fewer other signals to balance things out, anything that hinders the crawler’s ability to access your content will have a greater impact on your AI visibility. There’s nowhere for your technical debt to hide.
The Need For Speed
Let’s look at just one of the most common forms of technical SEO debt: page speed.
Sub-optimal page speed rarely has a single cause. It’s usually down to a combination of factors – bloated code, inefficient CSS, large JavaScript bundles, oversized images and media files, poor infrastructure, and more – with each instance adding just a little more drag on how quickly the page loads in a typical browser.
Yes, we could be talking fractions of a second here and there, but the accumulation of issues can have a negative impact on the user experience. This is why faster websites will generally rank higher; Google treats page speed as a direct ranking factor in search.
Page speed also appears to be a significant factor in how often content appears in Google’s new AI Mode.
Dan Taylor recently crunched the data on 2,138 websites appearing as citations in AI Mode responses to see if there was any correlation between how often they were cited and their LCP and CLA scores. What he found was a clear drop-off in AI Mode citations for websites with slower load times.
Image from author, October 2025
Image from author, October 2025
We also looked at another popular method website owners use to assess page speed: Google’s PageSpeed Insights (PSI) tool. This aggregates a bunch of metrics, including the above two alongside many more, to generate an overall score out of 100. However, we found no correlation between PSI scores and citations in AI Mode.
So, while PageSpeed Insights can give you handy diagnostic information, identifying the various issues impacting your load times, your site’s Core Web Vitals are a more reliable indicator of how quickly and efficiently site visitors and crawlers can access your content.
I know what you’re thinking: This data is confined to Google’s AI Mode. It doesn’t tell us anything about whether the same is true for visibility in other AI platforms.
We currently lack any publicly available data to test the same theory for other agentic assistant tools such as ChatGPT, but the clues are all there.
Crawling Comes At A Cost
Back in July, OpenAI’s Sam Altman told Axios that ChatGPT receives 2.5 billion user prompts every day. For comparison, SparkToro estimates Google serves ~16.4 billion search queries per day.
The large language model (LLM) powering each AI platform responds to a prompt in two ways:
Drawing on its large pool of training data.
Sending out bots or crawlers to verify and supplement the information with data from additional sources in real time.
ChatGPT’s real-time crawler is called ChatGPT-User. At the time of writing, the previous seven days saw ChatGPT-User visit the SALT.agency website ~6,000 times. In the same period, Google’s search crawler, Googlebot, accessed our website ~2,500 times.
Handling billions of prompts each day consumes a huge amount of processing power. OpenAI estimates that its current expansion plans will require 10 gigawatts of power, which is roughly the output of 10 nuclear reactors.
Each one of those 6,000 crawls of the SALT website drew on these computational resources. However, a slow or inefficient website forces the crawler to burn even more of those resources.
As the volume of prompts continues to grow, the cumulative cost of all this crawling will only get bigger. At some point, the AI platforms will have no choice but to improve the cost efficiency of their crawlers (if they haven’t already), shunning those websites requiring more resources to crawl in favor of those which are quick and easy to access and read.
Why should ChatGPT waste resources crawling slow websites when it can extract the same or similar information from more efficient sites with far less hassle?
Is Your Site Already Invisible To AI?
All the above assumes the AI crawler can access your website in the first place. As it turns out, even that isn’t guaranteed.
In July this year, Cloudflare (one of the world’s largest content delivery networks) started blocking AI crawlers by default. This decision potentially impacts the AI visibility of millions of websites.
Cloudflare first gave website owners the ability to block AI crawlers in September 2024, and more than 1 million customers chose to do just that. The new pay-per-crawl feature takes this a step further, allowing paid users of Cloudflare to choose which crawlers they will allow and on what terms.
However, the difference now is that blocking AI crawlers is no longer opt-in. If you want your website and content to be visible in AI, you need to opt out; assuming you’re aware of the changes, of course.
If your site runs on Cloudflare infrastructure and you haven’t explicitly checked your settings recently, there’s a decent chance your website might now be invisible to ChatGPT, Claude, and Perplexity. Not because your content isn’t good enough. Not because your technical SEO is poor. But because a third-party platform made an infrastructure decision that directly impacts your visibility, and you might not even know it happened.
This is the uncomfortable reality CMOs need to face: You can’t assume what works today will work tomorrow. You can’t even assume that decisions affecting your AI visibility will always happen within your organisation.
And when a change like this does happen, you absolutely can’t assume someone else is handling it.
Who Is Responsible?
Most technical SEO issues will have a solution, but you’ve got to be aware of the problem in the first place. That requires two things:
Someone responsible for identifying and highlighting these issues.
Someone with the necessary skills and expertise to fix them.
Spelled out like this, my point might seem a tad patronizing. But be honest, could you name the person(s) responsible for these in your organization? Who would you say is responsible for proactively and autonomously identifying and raising Cloudflare’s new pay-per-crawl policy with you? And would they agree with your expectation if you asked them?
Oh, and don’t cop out by claiming the responsibility lies with your external SEO partners. Agencies might proactively advise clients whenever there’s “a major disturbance in the Force,” such as a pending Google update. But does your contract with them include monitoring every aspect of your infrastructure, including third-party services? And does this responsibility extend to improving your AI visibility on top of the usual SEO activities? Unless this is explicitly spelled out, there’s no reason to assume they’re actively ensuring all the various AI crawlers can access your site.
In short, most technical SEO debt happens because everyone assumes it’s someone else’s job.
The CMO assumes it’s the developer’s responsibility. It’s all code, right? The developers should know the website needs to rank in search and be visible in AI. Surely, they’ll implement technical SEO best practice by default.
But developers aren’t technical SEO experts in exactly the same way they’re not web designers or UX specialists. They’ll build what they’re briefed to build. They’ll prioritize what you tell them to prioritize.
As a result, the dev team assumes it’s up to the SEO team to flag any new technical changes. But the SEO team assumes all is well because last quarter’s technical audit, based on the same list of checks they’ve relied on for years, didn’t identify anything amiss. And everybody assumes that, if there were going to be any issues with AI visibility, someone else would have raised it by now.
This confusion all helps technical debt to accumulate, unseen and unchecked.
The best time to prevent white ants from eating the walls in your home is before you know they’re there. Wait until the problems are obvious, and the expense of fixing all the damage will far outweigh the costs of an initial inspection and a few precautionary measures.
In the same way, don’t wait until it becomes obvious that your brand’s visibility in AI is compromised. Perform the necessary inspections now. Identify and fix any technical issues now that might cause issues for AI crawlers.
A big part of this will be strong communication between your teams, with accountabilities that make clear who is responsible for monitoring and actioning each factor contributing to your overall visibility in AI.
If you don’t, any investment and effort your team puts into optimizing brand content for AI could be wasted.
Stop assuming tomorrow will work like today. Technical SEO debt will impact your AI visibility. That’s not up for debate. The real question is whether you’ll proactively address your technical SEO debt now or wait until the assumptions cause your online visibility to crumble.
Google updated its review snippet documentation to clarify that each review or rating in structured data should point to one clear target, reducing ambiguity.
Google updated its review snippet docs to clarify how review targets should be specified
You should avoid attaching the same review or rating to multiple different entities
A quick audit of templates and plugins can catch confusing nesting.
Did you know that even a one-second delay in page loading speed can cause up to 11% fewer page views? That’s right, you might have the best content strategy and a solid plan to drive traffic, but visitors won’t stay long if your site lags. Page speed is one of the biggest factors in keeping users engaged and converting.
In this guide, we’ll uncover the most common causes of slow websites and explore proven ways to boost website performance. Whether your site feels sluggish or you simply want to make it faster, these insights will help you identify what’s holding it back and how to fix it.
Table of contents
What do we mean by ‘website performance’ and why is it important for you?
Website performance is all about how efficiently your site loads and responds when someone visits it. It’s not just about how fast a page appears; it’s about how smoothly users can interact with your content across devices, browsers, and locations. In simple terms, it’s the overall quality of your site’s experience that should feel fast, responsive, and effortless to use.
When your page loading speed is optimized, you’re not only improving the user experience but also setting the foundation for long-term website performance.
Here’s why it matters for every website owner:
Fast-loading sites have higher conversion rates and lower bounce rates
Attention spans are notoriously short. As the internet gets faster, they’re getting shorter still. Numerous studies have found a clear link between the time it takes a page to load and the percentage of visitors who become impatient while waiting.
By offering a fast site, you encourage your visitors to stay longer. Not to mention, you’re helping them complete their checkout journey more quickly. That helps improve your conversion rate and build trust and brand loyalty. Think of all the times you’ve been cursing the screen because you had to wait for a page to load or were running in circles because the user experience was atrocious. It happens so often, don’t be that site.
A fast page improves user experience
Google understands that the time it takes for a page to load is vital to the overall user experience. Waiting for content to appear, the inability to interact with a page, and even noticing delays create friction.
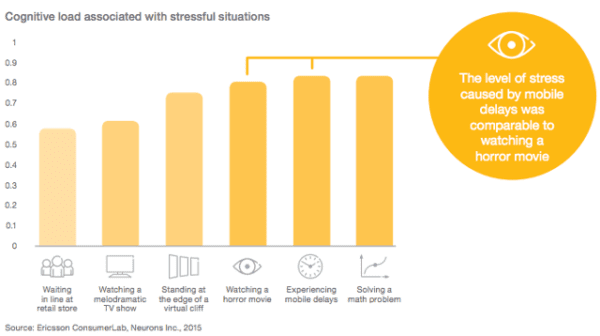
That friction costs time, money, and your visitor’s experience. Research shows that the level of stress from waiting for slow mobile results can be more stressful than watching a horror movie. Surely not, you say? That’s what the fine folks at Ericsson Research found a few years back.
Ericsson Mobility Report MWC Edition, February 2016
Improving your site speed across the board means making people happy. They’ll enjoy using your site, make more purchases, and return more frequently. This means that Google will view your site as a great search result because you are delivering high-quality content. Eventually, you might get a nice ranking boost.
Frustration hurts your users and hurts your rankings
It’s not just Google – research from every corner of the web on all aspects of consumer behavior shows that speed has a significant impact on outcomes.
Nearly 70% of consumers say that page speed impacts their willingness to buy (unbounce)
20% of users abandon their cart if the transaction process is too slow (radware.com)
The BBC found that they lost an additional 10% of users for every additional second their site took to load
These costs and site abandonment happen because users dislike being frustrated. Poor experiences lead them to leave, visit other websites, and switch to competitors. Google easily tracks these behaviors (through bounces back to search engine results pages, short visits, and other signals) and is a strong indicator that the page shouldn’t be ranking where it is.
Google needs fast sites
Speed isn’t only good for users – it’s good for Google, too. Slow websites are often inefficient. They may load too many large files, haven’t optimized their media, or fail to utilize modern technologies to serve their page. That means that Google has to consume more bandwidth, allocate more resources, and spend more money.
Across the whole web, every millisecond they can save, and every byte they don’t have to process, adds up quickly. And quite often, simple changes to configuration, processes, or code can make websites much faster with no drawbacks. That may be why Google is so vocal about its education on performance.
A faster web is better for users and significantly reduces Google’s operating costs. Either way, that means that they’re going to continue rewarding fast(er) sites.
Improving page speed helps to improve crawling for search engines
Modern sites are incredibly wieldy, and untangling that mess can make a big difference. The larger your site is, the greater the impact page speed optimizations will have. That not only impacts user experience and conversion rates but also affects crawl budget and crawl rate.
When a Googlebot comes around and crawls your webpage, it crawls the HTML file. Any resources referenced in the file, like images, CSS, and JavaScript, will be fetched separately. The more files you have and the heavier they are, the longer it will take for the Googlebot to go through them.
On the flip side, the more time Google spends on crawling a page and its files, the less time and resources Google has to dedicate to other pages. That means Google may miss out on other important pages and content on your site.
Optimizing your website and content for speed will provide a good user experience for your visitors and help Googlebots better crawl your site. They can come around more often and accomplish more.
Page speed is a ranking factor
Google has repeatedly said that a fast site helps you rank better. It’s no surprise, then, that Google has been measuring the speed of your site and using that information in its ranking algorithms since 2010.
In 2018, Google launched the so-called ‘Speed Update,’ making page speed a ranking factor for mobile searches. Google emphasized that it would only affect the slowest sites and that fast sites would not receive a boost; however, they are evaluating website performance across the board.
In 2021, Google announced the page experience algorithm update, demonstrating that page speed and user experience are intertwined. Core Web Vitals clearly state that speed is an essential ranking factor. The update also gave site owners metrics and standards to work with.
Of course, Google still wants to serve searchers the most relevant information, even if the page experience is somewhat lacking. Creating high-quality content remains the most effective way to achieve a high ranking. However, Google also states that page experience signals become more important when many pages with relevant content compete for visibility in the search results.
Google mobile-first index
Another significant factor in page speed for ranking is Google’s mobile-first approach to indexing content. That means Google uses the mobile version of your pages for indexing and ranking. This approach makes sense as we increasingly rely on mobile devices to access the internet. In recent research, Semrush found out that 66% of all website visits come from mobile devices.
To compete for a spot in the search results, your mobile page needs to meet Core Web Vitals standards and other page experience signals. And this is not easy at all. Pages on mobile take longer to load compared to their desktop counterparts, while attention span stays the same. People might be more patient on mobile devices, but not significantly so.
Take a look at some statistics:
The average website loading time is 2.5 seconds on desktop and 8.6 seconds on mobile, based on an analysis of the top 100 web pages worldwide (tooltester)
The average mobile web page takes 15.3 seconds to load (thinkwithgoogle)
On average, webpages on mobile take 70.9% longer to load than on desktop (tooltester)
A loading speed of 10 seconds increases the probability of a mobile site visitor bouncing by 123% compared to a one-second loading speed (thinkwithgoogle)
All the more reasons to optimize your website and content if your goal is to win a spot in the SERP.
Understanding the web page loading process
When you click a link or type a URL and press Enter, your browser initiates a series of steps to load the web page. It might seem like magic, but behind the scenes, there’s a lot happening in just a few seconds. Understanding this process can help you see what affects your page loading speed and what you can do to boost website performance.
The process of loading a page can be divided into three key stages:
Network stage
This is where the connection begins. When someone visits your site, their browser looks up your domain name and connects to your server. This process, known as DNS lookup and TCP connection, enables data to travel between your website and the visitor’s device.
You don’t have much direct control over this stage, but technologies like content delivery networks (CDNs) and smart routing can make a big difference, especially if you serve visitors from around the world. For local websites, optimizing your hosting setup can still help improve overall page loading speed.
Server response stage
Once the connection is established, the visitor’s browser sends a request to your server asking for the web page and its content. This is when your server processes that request and sends back the necessary files.
The quality of your hosting, server configuration, and even your website’s theme or plugins all influence how quickly your server responds. A slow response is one of the most common issues with slow websites, so investing in a solid hosting environment is crucial if you want to boost your website’s performance.
One popular choice is Bluehost, which offers reliable infrastructure, SSD storage, and built-in CDN support, making it a go-to hosting solution for many website owners.
Browser rendering stage
Now it’s time for the browser to put everything together. It retrieves data from your server and begins displaying it by loading images, processing CSS and JavaScript, and rendering all visible elements.
Browsers typically load content in order, starting with what’s visible at the top (above the fold) and then proceeding down the page. That’s why optimizing the content at the top helps users interact with your site sooner. Even if the entire page isn’t fully loaded yet, a quick initial render can make it feel fast and keep users engaged.
Key causes that are causing your website to slow down
While you can’t control the quality of your visitors’ internet connection, most slow website issues come from within your own setup. Let’s examine the key areas that may be hindering your site’s performance and explore how to address them to enhance your website’s performance.
Your hosting service
Your hosting plays a big role in your website’s performance because it’s where your site lives. The speed and stability of your host determine how quickly your site responds to visitors. Factors such as server configuration, uptime, and infrastructure all impact this performance.
Choosing a reliable host eliminates one major factor that affects speed optimization. Bluehost, for example, offers robust servers, reliable uptime, and built-in performance tools, making it a go-to hosting choice for anyone serious about speed and stability.
Your website theme
Themes define how your website looks and feels, but they also impact its loading speed. Some themes are designed with clean, lightweight code that’s optimized for performance, while others are heavy with animations and complex design elements. To boost website performance, opt for a theme that prioritizes simplicity, efficiency, and clean coding.
Large file size
From your HTML and CSS files to heavy JavaScript, large file sizes can slow down your website. Modern websites often rely heavily on JavaScript for dynamic effects, but overusing it can cause your pages to load slowly, especially on mobile devices. Reducing file sizes, compressing assets, and minimizing unnecessary scripts can significantly improve the perceived speed of your pages.
Badly written code
Poorly optimized code can cause a range of issues, from JavaScript errors to broken layouts. Messy or redundant code makes it harder for browsers to load your site efficiently. Cleaning up your code and ensuring it’s well-structured helps improve both performance and maintainability.
Images and videos
Unoptimized images and large video files are among the biggest causes of slow websites. Heavy media files increase your page weight, which directly impacts loading times. If your header image or hero banner is too large, it can delay the appearance of the main content. Optimizing your media files through compression, resizing, and Image SEO can dramatically improve your website’s speed.
Too many plugins and widgets
Plugins are what make WordPress so flexible, but adding too many can slow down your site. Each plugin adds extra code that your browser needs to process. Unused or outdated plugins can also conflict with your theme or other extensions, further reducing performance. Audit your plugins regularly and only keep the ones that truly add value.
Absence of a CDN
A content delivery network (CDN) helps your website load faster for users worldwide. It stores copies of your site’s static content, such as images and CSS files, across multiple servers located in different regions. This means that users access your site from the nearest available server, reducing loading time. If your audience is global, using a CDN is one of the easiest ways to boost website performance.
Redirects
Redirects are useful for managing URLs and maintaining SEO, but too many can slow down your site. Each redirect adds an extra step before reaching the final page. While a few redirects won’t hurt, long redirect chains can significantly affect performance. Whenever possible, try to link directly to the final URL to maintain consistent page loading speed.
For WordPress users, the redirect manager feature in Yoast SEO Premium makes handling URL changes effortless and performance-friendly. You can pick from redirect types such as 301, 302, 307, 410, and 451 right from the dashboard. Since server-side redirects tend to load faster than PHP-based ones, Yoast lets you choose the type your stack supports, allowing you to avoid slow website causes and boost website performance.
A smarter analysis in Yoast SEO Premium
Yoast SEO Premium has a smart content analysis that helps you take your content to the next level!
How to measure page speed and diagnose performance issues
Before you can improve your website performance, you need to know how well (or poorly) your pages are performing. Measuring your page speed helps you identify what’s slowing down your website and provides a direction for optimization.
What is page speed, really?
Page speed refers to how quickly your website’s content loads and becomes usable. But it’s not as simple as saying, ‘My website loads in 4 seconds.’ Think of it as how fast a visitor can start interacting with your site.
A page might appear to load quickly, but still feel slow if buttons, videos, or images take time to respond. That’s why website performance isn’t defined by one single metric — it’s about the overall user experience.
Did you know?
There is a difference between page speed and site speed. Page speed measures how fast a single page loads, while site speed reflects your website’s overall performance. Since every page behaves differently, measuring site speed is a more challenging task. Simply put, if most pages on your website perform well in terms of Core Web Vitals, it is considered fast.
Core metrics that define website performance
Core Web Vitals are Google’s standard for evaluating how real users experience your website. These metrics focus on the three most important aspects of page experience: loading performance, interactivity, and visual stability. Improving them helps both your search visibility and your user satisfaction.
Largest Contentful Paint (LCP): Measures how long it takes for the main content on your page to load. Aim for LCP within 2.5 seconds for a smooth loading experience
Interaction to Next Paint (INP): Replaces the older First Input Delay metric and measures how quickly your site responds to user interactions like taps, clicks, or key presses. An INP score under 200 milliseconds ensures your site feels responsive and intuitive
Cumulative Layout Shift (CLS): Tracks how stable your content remains while loading. Elements shifting on screen can frustrate users, so keep CLS below 0.1 for a stable visual experience
How to interpret and improve your scores
Perfection is not the target. Progress and user comfort are what count. If you notice issues in your Core Web Vitals report, here are some practical steps:
If your LCP is slow: Compress images, serve modern formats like WebP, use lazy loading, or upgrade hosting to reduce load times
If your INP score is high: Reduce heavy JavaScript execution, minimize unused scripts, and avoid main thread blocking
If your CLS score is poor: Set defined width and height for images, videos, and ad containers so the layout does not jump around while loading
If your TTFB is high: Time to First Byte is not a Core Web Vital, but it still impacts loading speed. Improve server performance, use caching, and consider a CDN
Remember that even small improvements create a noticeable difference. Faster load times, stable layouts, and quicker interactions directly contribute to a smoother experience that users appreciate and search engines reward.
Tools to measure and analyze your website’s performance
Here are some powerful tools that help you measure, analyze, and improve your page loading speed:
Google PageSpeed Insights
Google PageSpeed Insights is a free tool from Google that provides both lab data (simulated results) and field data (real-world user experiences). It evaluates your page’s Core Web Vitals, highlights problem areas, and even offers suggestions under ‘Opportunities’ to improve load times.
Google Search Console (Page Experience Report)
The ‘Page Experience’ section gives you an overview of how your URLs perform for both mobile and desktop users. It groups URLs that fail Core Web Vitals, helping you identify whether you need to improve LCP, FID, or CLS scores.
Lighthouse (in Chrome DevTools)
Lighthouse is a built-in auditing tool in Chrome that measures page speed, accessibility, SEO, and best practices. It’s great for developers who want deeper insights into what’s affecting site performance.
WebPageTest
WebPage Test lets you test how your website performs across various networks, locations, and devices. Its ‘waterfall’ view shows exactly when each asset on your site loads, perfect for spotting slow resources or scripts that delay rendering.
Chrome Developer Tools (Network tab)
If you’re hands-on, Chrome DevTools is your real-time lab. Open your site, press F12, and monitor how each resource loads. It’s perfect for debugging and understanding what’s happening behind the scenes.
A quick checklist for diagnosing performance issues
Use this checklist whenever you’re analyzing your website performance:
Run your URL through PageSpeed Insights for Core Web Vitals data
Check your Page Experience report in Google Search Console
Use Lighthouse for a detailed technical audit
Review your WebPageTest waterfall to spot bottlenecks
Monitor your server performance (ask your host or use plugins like Query Monitor)
Re-test after every major update or plugin installation
Speed up, but with purpose
As Mahatma Gandhi once said, ‘There is more to life than increasing its speed.’ The same goes for your website. While optimizing speed is vital for better engagement, search rankings, and conversions, it is equally important to focus on creating an experience that feels effortless and meaningful to your visitors. A truly high-performing website strikes a balance between speed, usability, accessibility, and user intent.
When your pages load quickly, your content reads clearly, and your navigation feels intuitive, you create more than just a fast site; you create a space where visitors want to stay, explore, and connect.
Edwin is an experienced strategic content specialist. Before joining Yoast, he worked for a top-tier web design magazine, where he developed a keen understanding of how to create great content.
Google Search now supports organization-level shipping policy markup, giving ecommerce websites a code-based way to surface delivery costs and transit times in Search and knowledge panels.
When you add ShippingService structured data, Google can display shipping information next to your products.
What’s New
Google added documentation describing ShippingService, which lets you define costs and delivery windows by product weight, dimensions, order value, or destination.
A standard policy lives under Organization via the hasShippingService property; product-specific overrides use OfferShippingDetails under Offer and support a smaller set of fields.
Implementation
Google recommends placing shipping policy markup on a single page.
Each ShippingService includes one or more ShippingConditions objects that specify when rates apply. If several apply to a product, Google uses the lowest cost and shows the associated speed. Fixed fees can be set with MonetaryAmount, and percentage-based fees with ShippingRateSettings. Transit times use ServicePeriod and can include businessDays and handling cutoff times.
Destination granularity supports country codes (ISO 3166-1), optional region codes (US, Australia, Japan only), and postal codes in the US, Canada, and Australia. Don’t provide both a region and postal code for the same condition.
If you combine markup with other Google shipping configurations, Google applies an order of precedence.
For example, when both markup and Search Console shipping settings are present, Google will use the Search Console settings. Google also notes that Content API for Shopping is the strongest source in this hierarchy.
Why This Matters
This gives you a markup-only path to publish shipping policies that Search can read, which may help keep details current even before products appear in feeds. If you already manage delivery settings in Merchant Center or Search Console, you can keep doing that; just be aware those sources can override page markup when both exist.
Looking Ahead
As with other rich results, your markup must follow Google’s structured data policies, Search Essentials, and the technical guidelines in the doc for it to be eligible for use in Search.
Google treats the portion of a URL after the domain name as case-sensitive. Thus Google could index both domain.com/example and domain.com/EXAMPLE but combine domain.com/example and DOMAIN.com/example.
This matters because content management systems typically generate URLs from page titles and often retain capitalization, resulting in three problems for search engine optimization:
Duplicate content. Google may index both versions of the URL if they serve the same content.
Link equity splitting. Capitalized URLs with lowercase inbound links can split link equity, hurting the ranking of the primary version.
Internal errors. Sites hosted on Linux servers (such as Shopify and, often, WooCommerce) will display a 404 error page for capitalized URL characters when users enter lowercase versions.
Most web crawlers (and Search Console) do not offer case-sensitive URL filters, making detection challenging. The best way to prevent them is to ensure your server redirects all versions of a URL to the desired version. Each of these could redirect to domain.com/url, for example:
domain.com/URL
domain.com/Url
domain.com/uRl
Some content management systems will automatically redirect, but always check to confirm. Enter the three URL versions above in your browser. If all load the same version (usually lowercase), no further action is required. If any result in an error page, fix immediately.
Depending on the CMS, plugins and apps can help set up cross-site redirection rules. Software engineer Brian Love’s guide explains how to enforce lowercase URLs.
Choosing URLs
For SEO, there is no URL rule as long as all versions redirect to the preferred version. I like lowercase URLs for simplicity and ease of cross-site redirect setup, although some users prefer capitalized URLs for readability, branding, and ad performance.
Cross-site URL consistency will not produce material ranking increases. But it will help Google understand your site structure, improve crawlability, and clarify what’s indexed.
This post was sponsored by TAC Marketing. The opinions expressed in this article are the sponsor’s own.
After years of trying to understand the black box that is Google search, SEO professionals have a seemingly even more opaque challenge these days – how to earn AI citations.
While at first glance inclusion in AI answers seems even more of a mystery than traditional SEO, there is good news. Once you know how to look for them, the AI engines do provide clues to what they consider valuable content.
This article will give you a step-by-step guide to discovering the content that AI engines value and provide a blueprint for optimizing your website for AI citations.
Take A Systematic Approach To AI Engine Optimization
The key to building an effective AI search optimization strategy begins with understanding the behavior of AI crawlers. By analyzing how these bots interact with your site, you can identify what content resonates with AI systems and develop a data-driven approach to optimization.
While Google remains dominant, AI-powered search engines like ChatGPT, Perplexity, and Claude are increasingly becoming go-to resources for users seeking quick, authoritative answers. These platforms don’t just generate responses from thin air – they rely on crawled web content to train their models and provide real-time information.
This presents both an opportunity and a challenge. The opportunity lies in positioning your content to be discovered and referenced by these AI systems. The challenge is understanding how to optimize for algorithms that operate differently from traditional search engines.
The Answer Is A Systematic Approach
Discover what content AI engines value based on their crawler behavior.
Traditional log file analysis.
SEO Bulk Admin AI Crawler monitoring.
Reverse engineer prompting.
Content analysis.
Technical analysis.
Building the blueprint.
What Are AI Crawlers & How To Use Them To Your Advantage
AI crawlers are automated bots deployed by AI companies to systematically browse and ingest web content. Unlike traditional search engine crawlers that primarily focus on ranking signals, AI crawlers gather content to train language models and populate knowledge bases.
Major AI crawlers include:
GPTBot (OpenAI’s ChatGPT).
PerplexityBot (Perplexity AI).
ClaudeBot (Anthropic’s Claude).
Googlebot crawlers (Google AI).
These crawlers impact your content strategy in two critical ways:
Training data collection.
Real-time information retrieval.
Training Data Collection
AI models are trained on vast datasets of web content. Pages that are crawled frequently may have a higher representation in training data, potentially increasing the likelihood of your content being referenced in AI responses.
Real-Time Information Retrieval
Some AI systems crawl websites in real-time to provide current information in their responses. This means fresh, crawlable content can directly influence AI-generated answers.
When ChatGPT responds to a query, for instance, it’s synthesizing information gathered by its underlying AI crawlers. Similarly, Perplexity AI, known for its ability to cite sources, actively crawls and processes web content to provide its answers. Claude also relies on extensive data collection to generate its intelligent responses.
The presence and activity of these AI crawlers on your site directly impact your visibility within these new AI ecosystems. They determine whether your content is considered a source, if it’s used to answer user questions, and ultimately, if you gain attribution or traffic from AI-driven search experiences.
Understanding which pages AI crawlers visit most frequently gives you insight into what content AI systems find valuable. This data becomes the foundation for optimizing your entire content strategy.
How To Track AI Crawler Activity: Find & Use Log File Analysis
The Easy Way: We use SEO Bulk Admin to analyze server log files for us.
However, there’s a manual way to do it, as well.
Server log analysis remains the standard for understanding crawler behavior. Your server logs contain detailed records of every bot visit, including AI crawlers that may not appear in traditional analytics platforms, which focus on user visits.
Essential Tools For Log File Analysis
Several enterprise-level tools can help you parse and analyze log files:
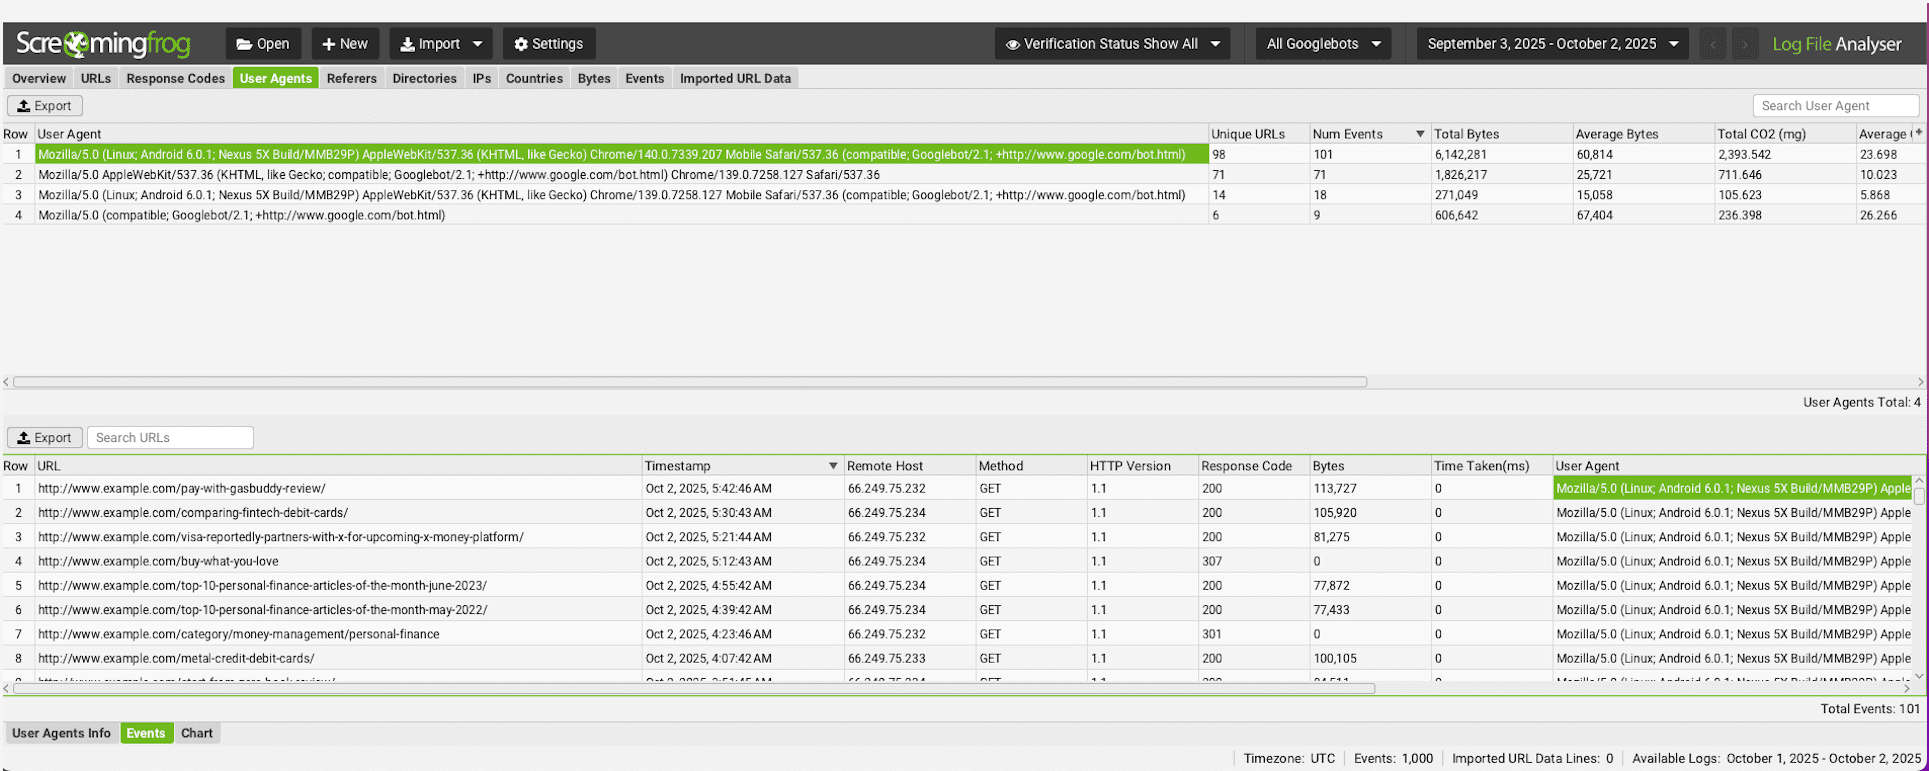
Screaming Frog Log File Analyser: Excellent for technical SEOs comfortable with data manipulation.
Botify: Enterprise solution with robust crawler analysis features.
Semrush: Offers log file analysis within its broader SEO suite.
Screenshot from Screaming Frog Log File Analyser, October 2025
The Complexity Challenge With Log File Analysis
The most granular way to understand which bots are visiting your site, what they’re accessing, and how frequently, is through server log file analysis.
Your web server automatically records every request made to your site, including those from crawlers. By parsing these logs, you can identify specific user-agents associated with AI crawlers.
Here’s how you can approach it:
Access Your Server Logs: Typically, these are found in your hosting control panel or directly on your server via SSH/FTP (e.g., Apache access logs, Nginx access logs).
Identify AI User-Agents: You’ll need to know the specific user-agent strings used by AI crawlers. While these can change, common ones include:
OpenAI (for ChatGPT, e.g., `ChatGPT-User` or variations)
Perplexity AI (e.g., `PerplexityBot`)
Anthropic (for Claude, though often less distinct or may use a general cloud provider UAs)
Other LLM-related bots (e.g., “GoogleBot” and `Google-Extended` for Google’s AI initiatives, potentially `Vercelbot` or other cloud infrastructure bots that LLMs might use for data fetching).
Parse and Analyze: This is where the previously mentioned log analyzer tools come into play. Upload your raw log files into the analyzer and start filtering the results to identify AI crawler and search bot activity. Alternatively, for those with technical expertise, Python scripts or tools like Splunk or Elasticsearch can be configured to parse logs, identify specific user-agents, and visualize the data.
While log file analysis provides the most comprehensive data, it comes with significant barriers for many SEOs:
Technical Depth: Requires server access, understanding of log formats, and data parsing skills.
Resource Intensive: Large sites generate massive log files that can be challenging to process.
Time Investment: Setting up proper analysis workflows takes considerable upfront effort.
Parsing Challenges: Distinguishing between different AI crawlers requires detailed user-agent knowledge.
For teams without dedicated technical resources, these barriers can make log file analysis impractical despite its value.
An Easier Way To Monitor AI Visits: SEO Bulk Admin
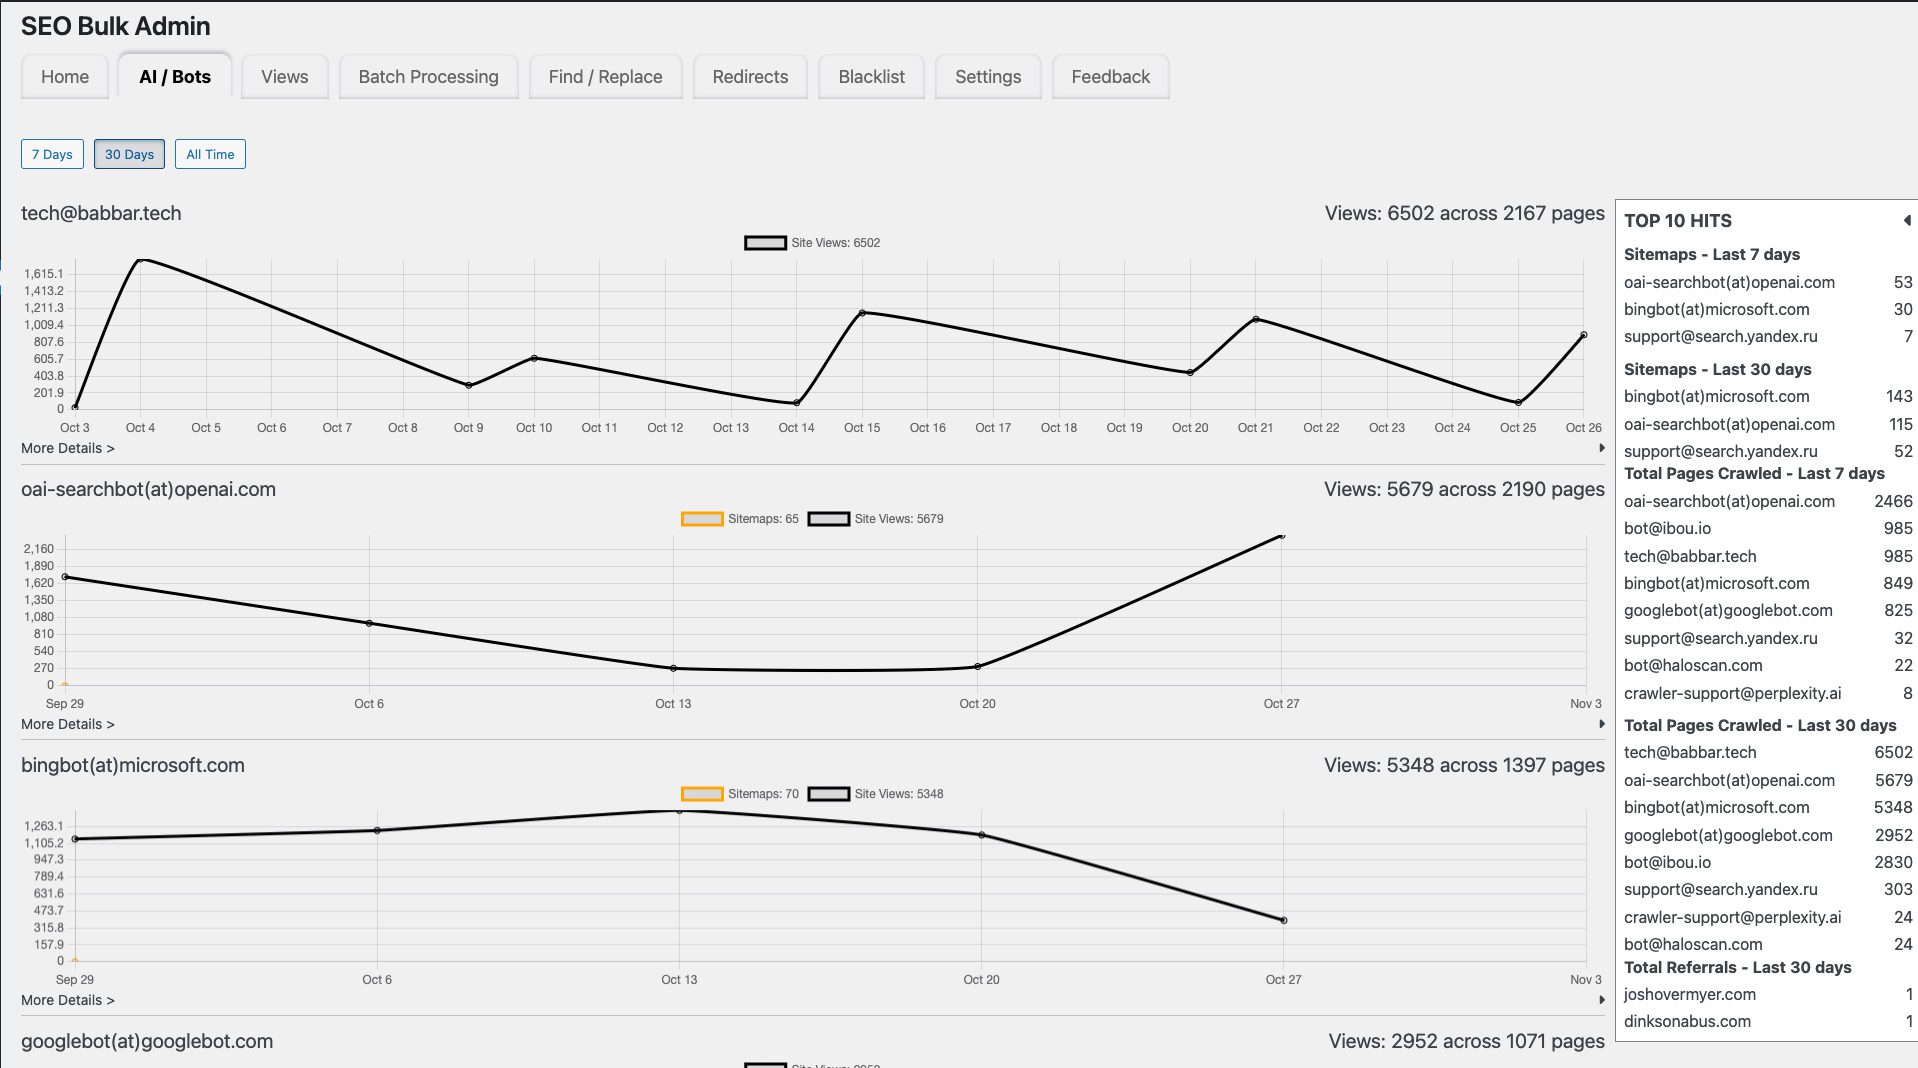
While log file analysis provides granular detail, its complexity can be a significant barrier for all but the most highly technical users. Fortunately, tools like SEO Bulk Admin can offer a streamlined alternative.
The SEO Bulk Admin WordPress plugin automatically tracks and reports AI crawler activity without requiring server log access or complex setup procedures. The tool provides:
Automated Detection: Recognizes major AI crawlers, including GPTBot, PerplexityBot, and ClaudeBot, without manual configuration.
User-Friendly Dashboard: Presents crawler data in an intuitive interface accessible to SEOs at all technical levels.
Real-Time Monitoring: Tracks AI bot visits as they happen, providing immediate insights into crawler behavior.
Page-Level Analysis: Shows which specific pages AI crawlers visit most frequently, enabling targeted optimization efforts.
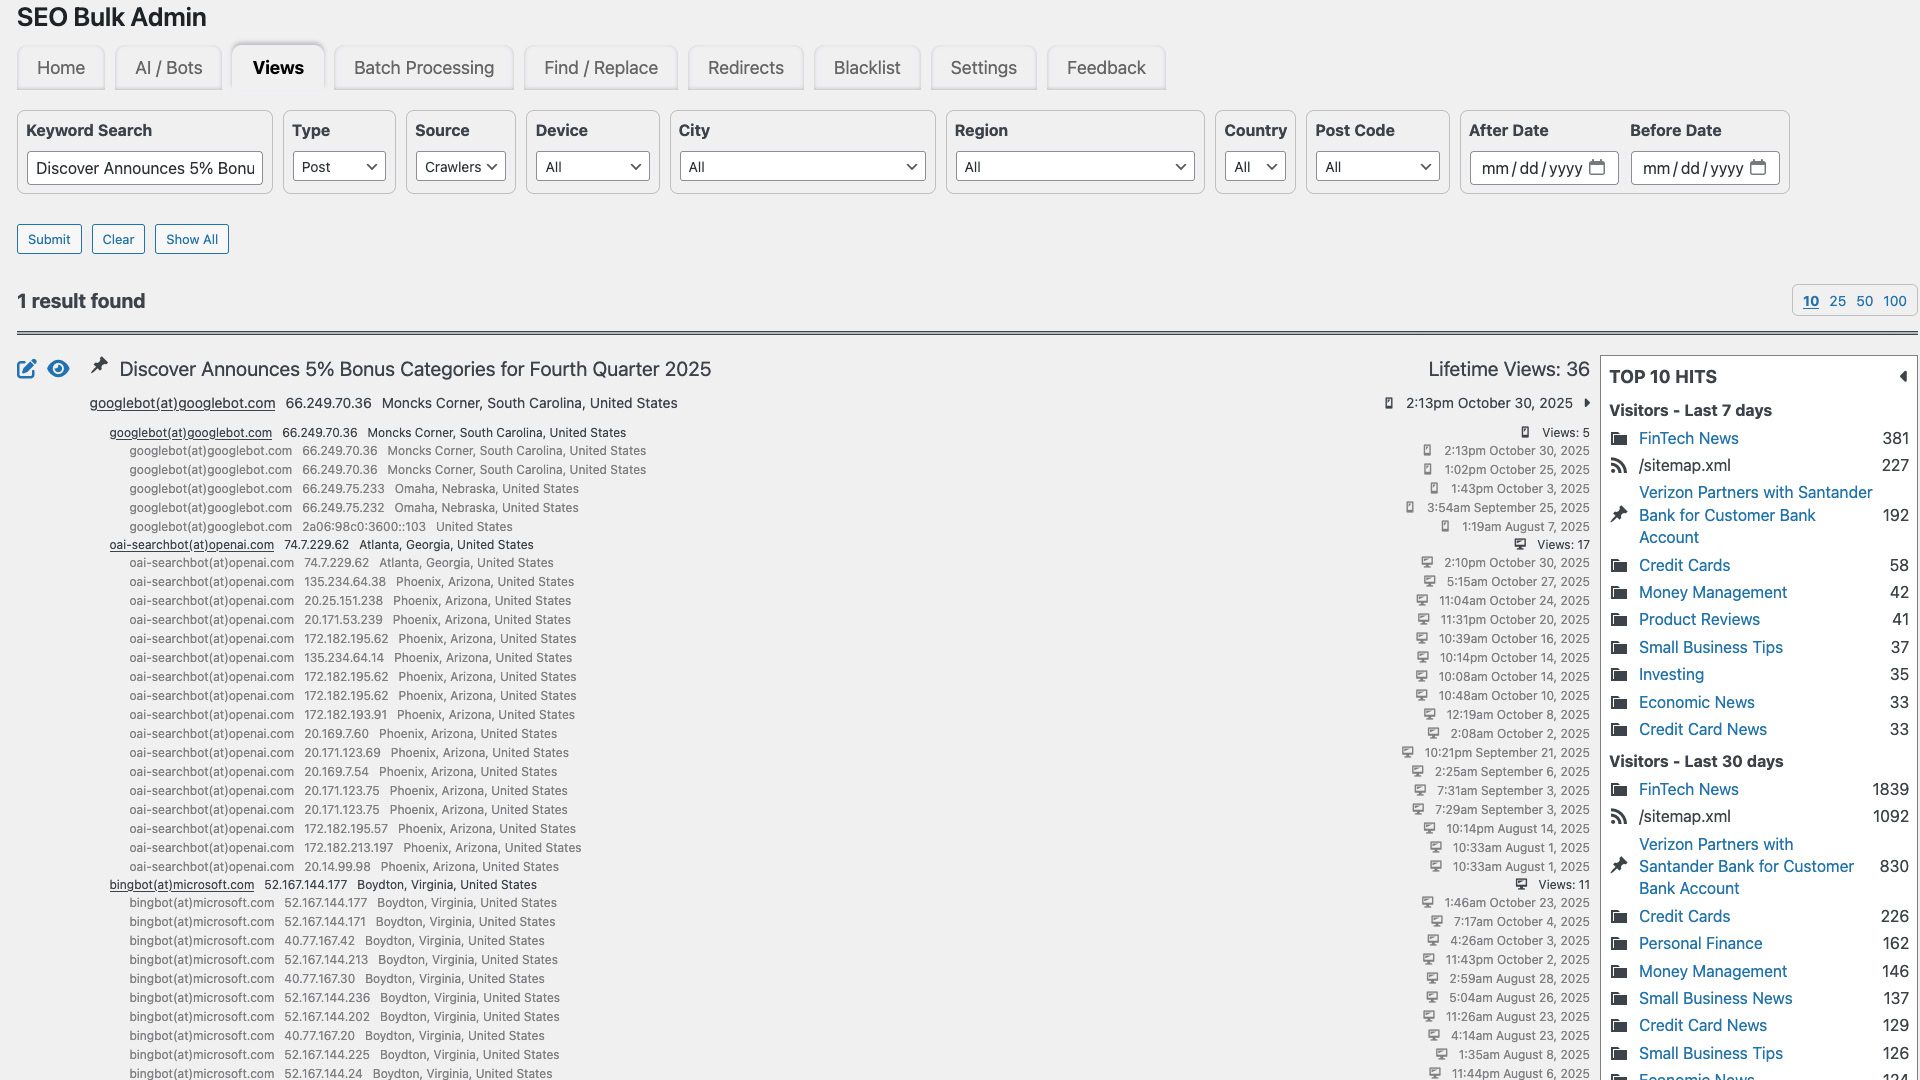
Screenshot of SEO Bulk Admin AI/Bots Activity, October 2025
This gives SEOs instant visibility into which pages are being accessed by AI engines – without needing to parse server logs or write scripts.
Screenshot of SEO Bulk Admin Page Level Crawler Activity, October 2025
Using AI Crawler Data To Improve Content Strategy
Once you’re tracking AI crawler activity, the real optimization work begins. AI crawler data reveals patterns that can transform your content strategy from guesswork into data-driven decision-making.
Here’s how to harness those insights:
1. Identify AI-Favored Content
High-frequency pages: Look for pages that AI crawlers visit most frequently. These are the pieces of content that these bots are consistently accessing, likely because they find them relevant, authoritative, or frequently updated on topics their users inquire about.
Specific content types: Are your “how-to” guides, definition pages, research summaries, or FAQ sections getting disproportionate AI crawler attention? This can reveal the type of information AI models are most hungry for.
2. Spot LLM-Favored Content Patterns
Structured data relevance: Are the highly-crawled pages also rich in structured data (Schema markup)? It’s an open debate, but some speculate that AI models often leverage structured data to extract information more efficiently and accurately.
Clarity and conciseness: AI models excel at processing clear, unambiguous language. Content that performs well with AI crawlers often features direct answers, brief paragraphs, and strong topic segmentation.
Authority and citations: Content that AI models deem reliable may be heavily cited or backed by credible sources. Track if your more authoritative pages are also attracting more AI bot visits.
3. Create A Blueprint From High-Performing Content
Reverse engineer success: For your top AI-crawled content, document its characteristics.
Keywords/Entities: Specific terms and entities frequently mentioned.
Structured data implementation: What schema types are used?
Internal linking patterns: How is this content connected to other relevant pages?
Upgrade underperformers: Apply these successful attributes to content that currently receives less AI crawler attention.
Refine content structure: Break down dense paragraphs, add more headings, and use bullet points for lists.
Inject structured data: Implement relevant Schema markup (e.g., `Q&A`, `HowTo`, `Article`, `FactCheck`) on pages lacking it.
Enhance clarity: Rewrite sections to achieve conciseness and directness, focusing on clearly answering potential user questions.
Expand Authority: Add references, link to authoritative sources, or update content with the latest insights.
Improve Internal Linking: Ensure that relevant underperforming pages are linked from your AI-favored content and vice versa, signaling topical clusters.
This short video walks you through the process of discovering what pages are crawled most often by AI crawlers and how to use that information to start your optimization strategy.
Here is the prompt used in the video:
You are an expert in AI-driven SEO and search engine crawling behavior analysis.
TASK: Analyze and explain why the URL [https://fioney.com/paying-taxes-with-a-credit-card-pros-cons-and-considerations/] was crawled 5 times in the last 30 days by the oai-searchbot(at)openai.com crawler, while [https://fioney.com/discover-bank-review/] was only crawled twice.
GOALS:
– Diagnose technical SEO factors that could increase crawl frequency (e.g., internal linking, freshness signals, sitemap priority, structured data, etc.)
– Compare content-level signals such as topical authority, link magnet potential, or alignment with LLM citation needs
– Evaluate how each page performs as a potential citation source (e.g., specificity, factual utility, unique insights)
– Identify which ranking and visibility signals may influence crawl prioritization by AI indexing engines like OpenAI’s
CONSTRAINTS:
– Do not guess user behavior; focus on algorithmic and content signals only
– Use bullet points or comparison table format
– No generic SEO advice; tailor output specifically to the URLs provided
– Consider recent LLM citation trends and helpful content system priorities
FORMAT:
– Part 1: Technical SEO comparison
– Part 2: Content-level comparison for AI citation worthiness
– Part 3: Actionable insights to increase crawl rate and citation potential for the less-visited URL
Output only the analysis, no commentary or summary.
By taking this data-driven approach, you move beyond guesswork and build an AI content strategy grounded in actual machine behavior on your site.
This iterative process of tracking, analyzing, and optimizing will ensure your content remains a valuable and discoverable resource for the evolving AI search landscape.
Final Thoughts On AI Optimization
Tracking and analyzing AI crawler behavior is no longer optional for SEOs seeking to remain competitive in the AI-driven search era.
By using log file analysis tools – or simplifying the process with SEO Bulk Admin – you can build a data-driven strategy that ensures your content is favored by AI engines.
Take a proactive approach by identifying trends in AI crawler activity, optimizing high-performing content, and applying best practices to underperforming pages.
With AI at the forefront of search evolution, it’s time to adapt and capitalize on new traffic opportunities from conversational search engines.
Google warned against relying on tool-generated scores for technical SEO audits.
Search Relations team member Martin Splitt outlined a three-step framework in a Search Central Lightning Talk that emphasizes site-specific context over standardized metrics.
The Three-Step Framework
Splitt outlined the core objective in the video:
“A technical audit, in my opinion, should make sure no technical issues prevent or interfere with crawling or indexing. It can use checklists and guidelines to do so, but it needs experience and expertise to adapt these guidelines and checklists to the site you audit.”
His recommended framework has three phases.
First, use tools and guidelines to identify potential issues. Second, create a report tailored to the specific site. Third, make recommendations based on actual site needs.
Understanding site technology comes before running diagnostic tools. Group findings by effort required and potential impact, Splitt said.
When 404s Are Normal
High 404 counts don’t always mean problems.
The red flag is unexplained rises without corresponding website changes.
Splitt explained:
“A high number of 404s, for instance, is expected if you removed a lot of content recently. That’s not a problem. It’s a normal consequence of that. But if you have an unexplained rise in 404 responses, though, that’s something you want to point out and investigate…”
Google Search Console’s Crawl Stats report shows whether 404 patterns match normal site maintenance or indicate technical issues.
Context Over Scores
Tools generate numerical scores that lack site-specific context.
Not everything tools flag carries equal weight. An international site needs hreflang auditing, while a single-language site doesn’t.
Splitt emphasized human judgment over automation:
“Please, please don’t follow your tools blindly. Make sure your findings are meaningful for the website in question and take the time to prioritize them for maximum impact.”
Talk to people who know the site and its technology. They’ll tell you if findings make sense.
Why This Matters
Generic checklists waste time on low-impact fixes while missing critical issues.
Tool scores may flag normal site behavior as problems. They assign priority to issues that don’t affect how search engines crawl your content.
Understanding when metrics reflect normal operations helps you focus audit resources where they matter. This applies whether you’re running internal audits or evaluating agency reports.
Looking Ahead
Audit platforms continue adding automated checks and scoring systems. This widens the gap between generic findings and actionable recommendations.
Google’s guidance reinforces that technical SEO requires expertise beyond tool automation.
Sites with international setups, large content archives, or frequent publishing benefit most from context-driven audits.
Google will deprecate practice problem structured data in January and clarifies Dataset markup is only for Dataset Search. Book actions remain supported.
Practice problem markup is being deprecated from Google Search in January.
Dataset structured data is for Dataset Search only; it isn’t used in Google Search.
Structured data helps search engines, Large Language Models (LLMs), AI assistants, and other tools understand your website. Using Schema.org and JSON-LD, you make your content clearer and easier to use across platforms. This guide explains what structured data is, why it matters today, and how you can set it up the right way.
Key takeaways
Structured data helps search engines and AI better understand your website, enhancing visibility and eligibility for rich results.
Using Schema.org and JSON-LD improves content clarity and connects different pieces of information graphically.
Implementing structured data today prepares your content for future technologies and AI applications.
Yoast SEO simplifies structured data implementation by automatically generating schema for various content types.
Focus on key elements like business details and products to maximize the impact of your structured data.
Table of contents
What is structured data?
Structured data is a way to tell computers exactly what’s on your web page. Using a standard set of tags from Schema.org, you can identify important details, like whether a page is about a product, a review, an article, an event, or something else.
This structured format helps search engines, AI assistants, LLMs, and other tools understand your content quickly and accurately. As a result, your site may qualify for special features in search results and can be recognized more easily by digital assistants or new AI applications.
Structured data is written in code, with JSON-LD being the most common format. Adding it to your pages gives your content a better chance to be found and understood, both now and as new technologies develop.
Below is a simple example of structured data using Schema.org in JSON-LD format. This is a basic schema for a product with review properties. This code tells search engines that the page is a product (Product). It provides the name and description of the product, pricing information, the URL, plus product ratings and reviews. This allows search engines to understand your products and present your content in search results.
Product Title
Why do you need structured data?
Structured data gives computers a clear map of what’s on your website. It spells out details about your products, reviews, events, and much more in a format that’s easy for search engines and other systems to process.
This clarity leads to better visibility in search, including features like star ratings, images, or additional links. But the impact reaches further now. Structured data also helps AI assistants, voice search tools, and new web platforms like chatbots powered by Large Language Models understand and represent your content with greater accuracy.
New standards, such as NLWeb (Natural Language Web) and MCP (Model Context Protocol), are emerging to help different systems share and interpret web content consistently. Adding structured data today not only gives your site an advantage in search but also prepares it for a future where your content will flow across more platforms and digital experiences.
The effort you put into structured data now sets up your content to be found, used, and displayed in many places where people search and explore online.
Is structured data important for SEO?
Structured data plays a key role in how your website appears in search results. It helps search engines understand and present your content with extra features, such as review stars, images, and additional links. These enhanced listings can catch attention and drive more clicks to your site.
While using structured data doesn’t directly increase your rankings, it does make your site eligible for these rich results. That alone can set you apart from competitors. As search engines evolve and adopt new standards, well-structured data ensures your content stays visible and accessible in the latest search features.
For SEO, structured data is about making your site stand out, improving user experience, and giving your content the best shot at being discovered, both now and as search technology changes.
Structured data can lead to rich results
By describing your site for search engines, you allow them to do exciting things with your content. Schema.org and its support are constantly developing, improving, and expanding. As structured data forms the basis for many new developments in the SEO world, there will be more shortly. Below is an overview of the rich search results available; examples are in Google’s Search Gallery.
Structured data type
Example use/description
Article
News, blog, or sports article
Breadcrumb
Navigation showing page position
Carousel
Gallery/list from one site (with Recipe, Course, Movie, Restaurant)
Course list
Lists of educational courses
Dataset
Large datasets (Google Dataset Search)
Discussion forum
User-generated forum content
Education Q&A
Education flashcard Q&As
Employer aggregate rating
Ratings about employers in job search results
Event
Concerts, festivals, and other events
FAQ
Frequently asked questions pages
Image metadata
Image creator, credit, and license details
Job posting
Listings for job openings
Local business
Business details: hours, directions, ratings
Math solver
Structured data for math problems
Movie
Lists of movies, movie details
Organization
About your company: name, logo, contact, etc.
Practice problem
Education practice problems for students
Product
Product listings with price, reviews, and more
Profile page
Info on a single person or organization
Q&A
Pages with a single question and answers
Recipe
Cooking recipes, steps, and ingredients
Review snippet
Short review/rating summaries
Software app
Ratings and details on apps or software
Speakable
Content for text-to-speech on Google Assistant
Subscription and paywalled content
Mark articles/content behind a paywall
Vacation rental
Details about vacation property listings
Video
Video info, segments, and live content
The rich results formerly known as rich snippets
You might have heard the term “rich snippets” before. Google now calls these enhancements “rich results.” Rich results are improved search listings that use structured data to show extra information, like images, reviews, product details, or FAQs, directly in search.
For example, a product page marked up with structured data can show its price, whether it’s in stock, and customer ratings right below the search listing, even before someone clicks. Here’s what that might look like:
Some listings offer extra information, like star ratings or product details
With rich results, users see helpful details up front—such as a product’s price, star ratings, or stock status. This can make your listing stand out and attract more clicks.
Keep in mind, valid structured data increases your chances of getting rich results, but display is controlled by Google’s systems and is never guaranteed.
Results like this often appear more prominently on mobile devices. Search listings with structured data can display key information, like product prices, ratings, recipes, or booking options, in a mobile-friendly format. Carousels, images, and quick actions are designed for tapping and swiping with your finger.
For example, searching for a recipe on your phone might bring up a swipeable carousel showing photos, cooking times, and ratings for each dish. Product searches can highlight prices, availability, and reviews right in the results, helping users make decisions faster.
Many people now use mobile search as their default search method. Well-implemented structured data not only improves your visibility on mobile but can also make your content easier for users to explore and act on from their phones. To stay visible and competitive, regularly check your markup and make sure it works smoothly on mobile devices.
Knowledge Graph Panel
A knowledge panel
The Knowledge Graph Panel shows key facts about businesses, organizations, or people beside search results on desktop and at the top on mobile. It can include your logo, business description, location, contact details, and social profiles.
Using structured data, especially Organization, LocalBusiness, or Person markup with current details, helps Google recognize and display your entity accurately. Include recommended fields like your official name, logo, social links (using sameAs), and contact info.
Entity verification is becoming more important. Claim your Knowledge Panel through Google, and make sure your information is consistent across your website, social media, and trusted directories. Major search engines and AI assistants use this entity data for results, summaries, and answers, not just in search but also in AI-powered interfaces and smart devices.
While Google decides who appears in the Knowledge Panel and what details are shown, reliable structured data, verified identity, and a clear online presence give you the best chance of being featured.
Different kinds of structured data
Schema.org includes many types of structured data. You don’t need to use them all, just focus on what matches your site’s content. For example:
If you sell products, use product schema
For restaurant or local business sites, use local business schema
Recipe sites should add recipe schema
Before adding structured data, decide which parts of your site you want to highlight. Check Google’s or other search engines’ documentation to see which types are supported and what details they require. This helps ensure you are using the markup that will actually make your content stand out in search and other platforms.
How Yoast SEO helps with structured data
Yoast SEO automatically adds structured data to your site using smart defaults, making it easier for search engines and platforms to understand your content. The plugin supports a wide range of content types, like articles, products, local businesses, and FAQs, without the need for manual schema coding.
With Yoast SEO, you can:
With a few clicks, set the right content type for each page (such as ContactPage, Product, or Article)
Use built-in WordPress blocks for FAQs and How-tos, which generate valid schema automatically
Link related entities across your site, such as authors, brands, and organizations, to help search engines see the big picture
Adjust schema details per page or post through the plugin’s settings
Yoast SEO also offers an extensible structured data platform. Developers can build on top of Yoast’s schema framework, add custom schema types, or connect other plugins. This helps advanced users or larger sites tailor their structured data for specific content, integrations, or new standards.
Yoast keeps pace with updates to structured data guidelines, so your markup stays aligned with what Google and other platforms support. This makes it easier to earn rich results and other search enhancements.
Yoast SEO helps you fine-tune your schema structured data settings per page
Which structured data types matter most?
When adding structured data, focus first on the types that have the biggest impact on visibility and features in Google Search. These forms of schema are widely supported, trigger rich results, and apply to most kinds of sites:
Most important structured data types
Article: For news sites, blogs, and sports publishers. Adding Article schema can enable rich results like Top Stories, article carousels, and visual enhancements
Product: Essential for ecommerce. Product schema helps show price, stock status, ratings, and reviews right in search. This type is key for online stores and retailers
Event: For concerts, webinars, exhibitions, or any scheduled events. Event schema can display dates, times, and locations directly in search results, making it easier for people to find and attend
Recipe: This is for food blogs and cooking sites. The recipe schema supports images, cooking times, ratings, and step-by-step instructions as rich results, giving your recipes extra prominence in search
FAQPage: For any page with frequently asked questions. This markup can expand your search listing with Q&A drop-downs, helping users get answers fast
QAPage: For online communities, forums, or support sites. QAPage schema helps surface full question-and-answer threads in search
ReviewSnippet: This markup is for feedback on products, books, businesses, or services. It can display star ratings and short excerpts, adding trust signals to your listings
LocalBusiness is vital for local shops, restaurants, and service providers. It supplies address, hours, and contact info, supporting your visibility in the map pack and Knowledge Panel
Organization: Use this to describe your brand or company with a logo, contact details, and social profiles. Organization schema feeds into Google’s Knowledge Panel and builds your online presence
Video: Mark up video content to enable video previews, structured timestamps (key moments), and improved video visibility
Breadcrumb: This feature shows your site’s structure within Google’s results, making navigation easier and your site look more reputable
Other valuable or sector-specific types:
Course: Highlight educational course listings and details for training providers or schools
JobPosting: Share open roles in job boards or company careers pages, making jobs discoverable in Google’s job search features
SoftwareApp: For software and app details, including ratings and download links
Movie: Used for movies and film listings, supporting carousels in entertainment searches and extra movie details
Dataset: Makes large sets of research or open data discoverable in Google Dataset Search
DiscussionForum: Surfaces user-generated threads in dedicated “Forums” search features
ProfilePage: Used for pages focused on an individual (author profiles, biographies) or organization
EmployerAggregateRating: Displays company ratings and reviews in job search results
PracticeProblem: For educational sites offering practice questions or test prep
VacationRental: Displays vacation property listings and details in travel results
Special or supporting types:
Person: This helps Google recognize and understand individual people for entity and Knowledge Panel purposes (it does not create a direct rich result)
Book: Can improve book search features, usually through review or product snippets
Speakable: Reserved for news sites and voice assistant features; limited support
Image metadata, Math Solver, Subscription/Paywalled content: Niche markups that help Google properly display, credit, or flag special content
Carousel: Used in combination with other types (like Recipe or Movie) to display a list or gallery format in results
When choosing which schema to add, always select types that match your site’s actual content. Refer to Google’s Search Gallery for the latest guidance and requirements for each type.
Adding the right structured data makes your pages eligible for rich results, enhances your visibility, and prepares your content for the next generation of search features and AI-powered platforms.
Voice search remains important, with a significant share of online queries now coming from voice-enabled devices. Structured data helps content be understood and, in some cases, selected as an answer for voice results.
The Speakable schema (for marking up sections meant to be read aloud by voice assistants) is still officially supported, but adoption is mostly limited to news content. Google and other assistants also use a broader mix of signals, like content clarity, authority, E-E-A-T, and traditional structured data, to power their spoken answers.
If you publish news or regularly answer concise, fact-based questions, consider using Speakable markup. For other content types, focus on structured data and well-organized, user-focused pages to improve your chances of being chosen by voice assistants. Voice search and voice assistants continue to draw on featured snippets, clear Q&A, and trusted sources.
Structured data uses Schema.org’s hierarchy. This vocabulary starts with broad types like Thing and narrows down to specific ones, such as Product, Movie, or LocalBusiness. Every type has its own properties, and more specific types inherit from their ancestors. For example, a Movie is a type of CreativeWork, which is a type of Thing.
When adding structured data, select the most specific type that fits your content. For a movie, this means using the Movie schema. For a local company, choose the type of business that best matches your offering under LocalBusiness.
Properties
Every Schema.org type includes a range of properties. While you can add many details, focus on the properties that Google or other search engines require or recommend for rich results. For example, a LocalBusiness should include your name, address, phone number, and, if possible, details such as opening hours, geo-coordinates, website, and reviews. You’ll find our Local SEO plugin (available in Yoast SEO Premium) very helpful if you need help with your local business markup.
Properties: name, address, phone, email, openingHours, geo, review, logo
The more complete and accurate your markup, the greater your chances of being displayed with enhanced features like Knowledge Panels or map results. For details on recommended properties, always check Google’s up-to-date structured data documentation.
In the local business example, you’ll see that Google lists several required properties, like your business’s NAP (Name and Phone) details. There are also recommended properties, like URLs, geo-coordinates, opening hours, etc. Try to fill out as many of these as possible because search engines will only give you the whole presentation you want.
Structured data should be a graph
When you add structured data to your site, you’re not just identifying individual items, but you’re building a data graph. A graph in this context is a web of connections between all the different elements on your site, such as articles, authors, organizations, products, and events. Each entity is linked to others with clear relationships. For instance, an article can be marked as written by a certain author, published by your organization, and referencing a specific product. These connections help search engines and AI systems see the bigger picture of how everything on your site fits together.
Creating a fully connected data graph removes ambiguity. It allows search engines to understand exactly who created content, what brand a product belongs to, or where and when an event takes place, rather than making assumptions based on scattered information. This detailed understanding increases the chances that your site will qualify for rich results, Knowledge Panels, and other enhanced features in search. As your website grows, a well-connected graph also makes it easier to add new content or expand into new areas, since everything slots into place in a way that search engines can quickly process and understand.
Yoast SEO builds a graph
With Yoast SEO, many of the key connections are generated automatically, giving your site a solid foundation. Still, understanding the importance of building a connected data graph helps you make better decisions when structuring your own content or customizing advanced schema. A thoughtful, well-linked graph sets your site up for today’s search features, while making it more adaptable for the future.
Your schema should be a well-formed graph for easier understanding by search engines and AI
Beyond search: AI, assistants, and interoperability
Structured data isn’t just about search results. It’s a map that helps AI assistants, knowledge graphs, and cross‑platform apps understand your content. It’s not just about showing a richer listing; it’s about enabling reliable AI interpretation and reuse across contexts.
Today, the primary payoff is still better search experiences. Tomorrow, AI systems and interoperable platforms will rely on clean, well‑defined data to summarize, reason about, and reuse your content. That shift makes data quality more important than ever.
Practical steps for today
Keep your structured data clean with a few simple habits. Use the same names for people, organizations, and products every time they appear across your site. Connect related information so search engines can see the links. For example, tie each article to its author or a product to its brand. Fill in all the key details for your main schema types and make sure nothing is missing. After making changes or adding new content, run your markup through a validation tool. If you add any custom fields or special schema, write down what they do so others can follow along later. Doing quick checks now and then keeps your data accurate and ready for both search engines and AI.
Interoperability, MCP, and the role of structured data
More and more, AI systems and search tools are looking for websites that are easy to understand, not just for people but also for machines. The Model Context Protocol (MCP) is gaining ground as a way for language models like Google Gemini and ChatGPT to use the structured data already present on your website. MCP draws on formats like Schema.org and JSON-LD to help AI match up the connections between things such as products, authors, and organizations.
Another project, the Natural Language Web (NLWeb), an open project developed by Microsoft, aims to make web content easier for AI to use in conversation and summaries. NLWeb builds on concepts like MCP, but hasn’t become a standard yet. For now, most progress and adoption are happening with MCP, and large language models are focusing their efforts on this area.
Using Schema.org and JSON-LD to keep your structured data clean (no duplicate entities), complete (all indexable content included), and connected (relationships preserved) will prepare you for search engines and new AI-driven features appearing across the web.
Schema.org and JSON-LD: the foundation you can trust
Schema.org and JSON-LD remain the foundation for structured data on the web. They enable today’s rich results in search and form the basis for how AI systems will interpret web content in the future. JSON-LD should be your default format for new markup, allowing you to build structured data graphs that are clean, accurate, and easy to maintain. Focus on accuracy in your markup rather than unnecessary complexity.
To future-proof your data, prioritize stable identifiers such as @id and use clear types to reduce ambiguity. Maintain strong connections between related entities across your pages. If you develop custom extensions to your structured data, document them thoroughly so both your team and automated tools can understand their purpose.
Design your schema so that components can be added or removed without disrupting the entire graph. Make a habit of running validations and audits after you change your site’s structure or content.
Finally, stay current by following guidance and news from official sources, including updates about standards such as NLWeb and MCP, to ensure your site remains compatible with both current search features and new interoperability initiatives.
What do you need to describe for search engines?
To get the most value from structured data, focus first on the most important elements of your site. Describe the details that matter most for users and for search, such as your business information, your main products or services, reviews, events, or original articles. These core pieces of information are what search engines look for to understand your site and display enhanced results.
Rather than trying to mark up everything, start with the essentials that best match your content. As your experience grows, you can build on this foundation by adding more detail and creating links between related entities. Accurate, well-prioritized markup is both easier to maintain and more effective in helping your site stand out in search results and across new AI-driven features.
How to implement structured data
We’d like to remind you that Yoast SEO comes with an excellent structured data implementation. It’ll automatically handle most sites’ most pressing structured data needs. Of course, as mentioned below, you can extend our structured data framework as your needs become bigger.
Do the Yoast SEO configuration and get your site’s structured data set up in a few clicks! The configuration is available for all Yoast SEO users to help you get your plugin configured correctly. It’s quick, it’s easy, and doing it will pay off. Plus, if you’re using the new block editor in WordPress you can also add structured data to your FAQ pages and how-to articles using our structured data content blocks.
Thanks to JSON-LD, there’s nothing scary about adding the data to your pages anymore. This JavaScript-based data format makes it much easier to add structured data since it forms a block of code and is no longer embedded in the HTML of your page. This makes it easier to write and maintain, plus both humans and machines better understand it. If you need help implementing JSON-LD structured data, you can enroll in our free Structured Data for Beginners course, our Understanding Structured Data course, or read Google’s introduction to structured data.
Structured data with JSON-LD
JSON-LD is the recommended way to add structured data to your site. All major search engines, including Google and Bing, now fully support this format. JSON-LD is easy to implement and maintain, as it keeps your structured data separate from the main HTML.
Yoast SEO automatically creates a structured data graph for every page, connecting key elements like articles, authors, products, and organizations. This approach helps search engines and AI systems understand your site’s structure. Our developer resources include detailed Schema documentation and example graphs, making it straightforward to extend or customize your markup as your site grows.
Yoast SEO automatically handles much of the structured data in the background. You could extend our Schema framework, of course — see the next chapter –, but if adding code by hand seems scary, you could try some of the tools listed below. If you need help with how to proceed, ask your web developer for help. They will fix this for you in a couple of minutes.
Generators
Validators and test tools
WordPress Plugins
Yoast SEO Local (Our Local SEO plugin adds Schema.org for your business details, like address, geo-location, opening hours, etc.)
Yoast SEO uses JSON-LD to add Schema.org information about your site search, your site name, your logo, images, articles, social profiles, and a lot more to your web pages. We ask if your site represents a person or an organization and adapt our structured data based on that. Also, our structured data content blocks for the WordPress block editor make it easy to add structured data to your FAQs and How-Tos. Check out the structured data features in Yoast SEO.
The Yoast SEO Schema structured data framework
Implementing structured data has always been challenging. Also, the results of most of those implementations often needed improvement. At Yoast, we set out to enhance the Schema output for millions of sites. For this, we built a Schema framework, which can be adapted and extended by anyone. We combined all those loose bits and pieces of structured data that appear on many sites, improved these, and put them in a graph. By interconnecting all these bits, we offer search engines all your connections on a silver platter.
See this video for more background on the schema graph.
Of course, there’s a lot more to it. We can also extend Yoast SEO output by adding specific Schema pieces, like how-tos or FAQs. We built structured data content blocks for use in the WordPress block editor. We’ve also enabled other WordPress plugins to integrate with our structured data framework, like Easy Digital Downloads, The Events Calendar, Seriously Simple Podcasting, and WP Recipe Maker, with more to come. Together, these help you remove barriers for search engines and users, as it has always been challenging to work with structured data.
Expanding your structured data implementation
A structured and focused approach is key to successful Schema.org markup on your website. Start by understanding Schema.org and how structured data can influence your site’s presence in search and beyond. Resources like Yoast’s developer portal offer useful insights into building flexible and future-proof markup.
Always use JSON-LD as recommended by Google, Bing, and Yoast. This format is easy to maintain and works well with modern websites. To maximize your implementation, use tools and frameworks that allow you to add, customize, and connect Schema.org data efficiently. Yoast SEO’s structured data framework, for example, enables seamless schema integration and extensibility across your site.
Validate your structured data regularly with tools like the Rich Results Test or Schema Markup Validator and monitor Google Search Console’s Enhancements reports for live feedback. Reviewing your markup helps you fix issues early and spot opportunities for richer results as search guidelines change. Periodically revisiting your strategy keeps your markup accurate and effective as new types and standards emerge.
Read up
By following the guidelines and adopting a comprehensive approach, you can successfully get structured data on your pages and enhance the effectiveness of your schema.org markup implementation for a robust SEO performance. Read the Yoast SEO Schema documentation to learn how Yoast SEO works with structured data, how you can extend it via an API, and how you can integrate it into your work.
Several WordPress plugins already integrate their structured data into the Yoast SEO graph
Structured data has become an essential part of building a visible, findable, and adaptable website. Using Schema.org and JSON-LD not only helps search engines understand your content but also sets your site up for better performance in new AI-driven features, rich results, and across platforms.
Start by focusing on the most important parts of your site, like business information, products, articles, or events, and grow your structured data as your needs evolve. Connected, well-maintained markup now prepares your site for search, AI, and whatever comes next in digital content.
Explore our documentation and training resources to learn more about best practices, advanced integrations, or how Yoast SEO can simplify structured data. Investing the time in good markup today will help your content stand out wherever people (or algorithms) find it.
Edwin is an experienced strategic content specialist. Before joining Yoast, he worked for a top-tier web design magazine, where he developed a keen understanding of how to create great content.
The reasons for removing a page from Google’s search results haven’t much changed since I first published this article in 2023. Examples include pages with confidential, premium, or outdated info. Yet the tools and tactics have evolved.
Here’s my updated version.
Temporary Removal
The need to remove URLs from Google is urgent when a site is (i) hacked with malware or illicit content while indexed (even ranking) or (ii) inadvertently exposes private information that the search giant then indexes.
The quickest way to hide URLs from searchers is via Google’s URL removal tool in the “Indexing” section of Search Console. There, you can remove a single URL or an entire category.
Google processes these requests quickly in my experience, but it doesn’t permanently deindex them. It instead hides the URLs from search results for roughly six months.
Search Console’s tool removes URLs from search results for “about six months.” Click image to enlarge.
A similar feature in Bing Webmaster Tools, called “Block URLs,” hides pages from Bing search for approximately 90 days.
“Block URLs” in Bing Webmaster Tools hides pages from Bing search for approximately 90 days. Click image to enlarge.
Deleting a page from your web server will permanently deindex it. After deleting, set up a 410 HTTP status code of “gone” instead of 404 “not found.” Allow a few days for Google to recrawl the site, discover the 410 code, and remove the page from its index.
Note that Google discourages the use of redirects to remove low-value pages, as the practice sends poor signals to the successor.
As an aside, Google provides a form to remove personal info from search results.
Add the noindex tag
Search engines nearly always honor the noindex meta tag. Search bots will crawl a noindex page, but will not include it in search results.
In my experience, Google will immediately recognize a noindex meta tag once it crawls the page. Note that the tag removes the page from search results, not the site. The page remains accessible through other links, internal and external.
Noindex tags will not likely remove pages from LLMs such as ChatGPT, Claude, and Perplexity, as those platforms do not always honor them or even robots.txt exclusions. Deleting pages from a site is the surefire removal tactic.
Password protect
Consider adding a password to a published page to prevent it from becoming publicly accessible. Google cannot crawl pages requiring passwords or user names.
Adding a password will not remove an indexed page. A noindex tag will, however.
Remove internal links
Remove all internal links to pages you don’t want indexed. And do not link to password-protected or deleted pages; both hurt the user experience. Always focus on human visitors — not search engines alone.
Robots.txt
Robots.txt files can prevent Google (and other bots) from crawling a page (or category). Pages blocked via robots.txt could still be indexed and ranked if included in a site map or otherwise linked. Google will not encounter a noindex tag on blocked pages since it cannot crawl them.
A robots.txt file can instruct web crawlers to ignore, for instance, login pages, personal archives, or pages resulting from unique sorts and filters. Preserve search bots’ crawl time on the parts you want to rank.

 Image from author, October 2025
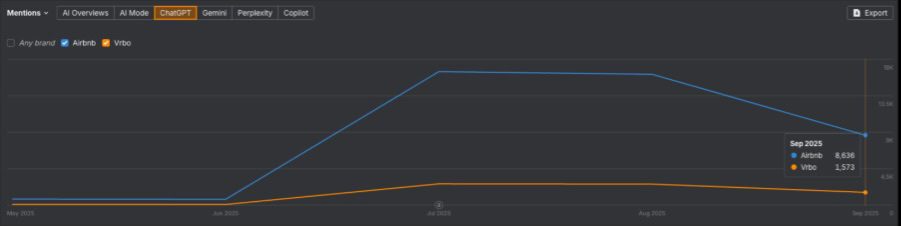 Image from author, October 2025
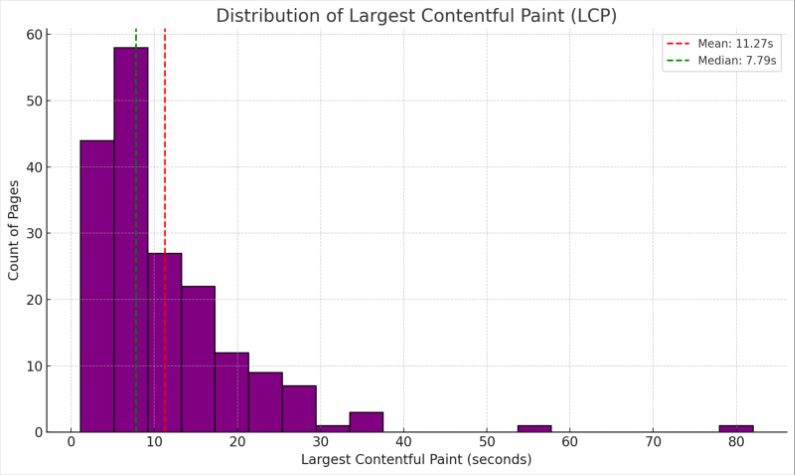 Image from author, October 2025
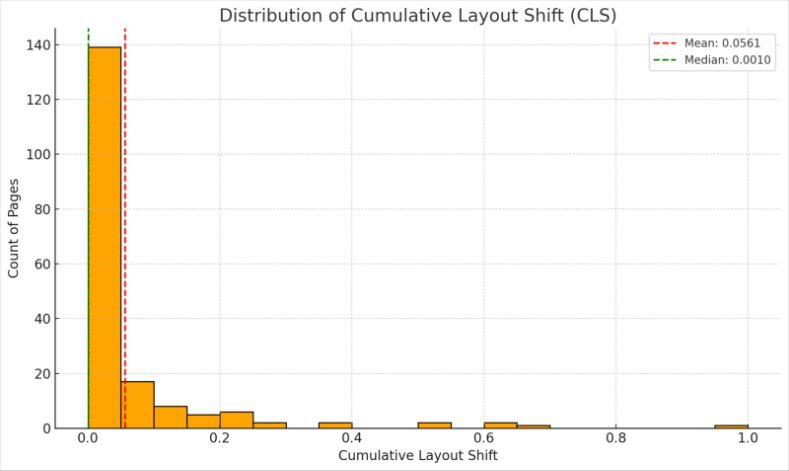 Image from author, October 2025