10 tips to streamline your blog content workflow

Content production seems quite simple, in principle. You develop an idea, write about it, do SEO checks, and click publish. Simple, right? It never turns out that way, especially when working with a team. Miscommunications, last-minute changes, and confusion about what needs to happen when. We’ve all been there! Try these ten tips to streamline your digital content workflow and eliminate much stress.

Table of contents

Before we start

Before we start, remember that the ‘perfect’ content workflow probably doesn’t exist. After all, every piece of content is unique, so a one-size-fits-all process is unlikely to produce the highest quality results. If your high-quality, unique content is taking forever to finish, you might struggle to meet deadlines or keep to a schedule. If that sounds like you or your organization, take a look at our tips and see how you can improve.

1. Start the process with clear goals

Whether you’re working alone or as part of a bigger team, it’s important to have a clear idea of all the steps involved and how long each step might take. Not every digital content process is the same. For instance, social media posts don’t need to be optimized for search engines, while blog posts targeting organic traffic do. Regardless of your end goal, the first step is always to start with clear goals.

Want to cover all your bases? Try to answer as many of these questions as you can, as clearly as you can:

  • What topic are you focusing on? How in-depth will you go?
  • Who are you writing for? Who is your audience?
  • What are you trying to achieve? More website visits, increased sales, and more social shares?
  • How will people be able to find your content? Where will you share it, and when?

If you specify your ideas and plans clearly at the beginning, it can help you and your team align your plans. It also helps you to stay on track, which can save you a lot of back-and-forth later on!

Read more: Audience research: how to analyze your audience »

2. Identify contributors and stakeholders

If you’re working in a team, our next tip is as important as the first. Why? Even if you’re clear about your goals, does everyone involved agree with your action plan? That’s why you need to identify your essential contributors and key stakeholders.

Depending on how big your organization is and how well-developed your process is already, making a list of contributors and stakeholders could be a lot of hard work, or a total no-brainer. If you sometimes find that your digital content workflow reaches a bottleneck (or descends to total chaos) because blockers arise from unexpected sources, it could be a sign that you need to do more work in this area.

Once you’ve come up with your plan, it’s a good idea to share it with any essential colleagues who need to give approval in the end before you start doing the real work. If you can get these people to agree with your initial plan, you can refer back to this later to explain creative choices and decisions you might need to make. When you let key parties know what to expect, you can avoid a lot of “What is this? What were you thinking?” kind of conversations.

3. Visualize your content workflow

It can be beneficial to visualize your content workflow, even if it seems daunting. At a minimum, you should write out the basic steps. If you add boxes and arrows to link the steps together, this can help to make the journey through the steps clearer (especially if there are moments when you need to loop back and repeat an earlier step). You can create this however feels comfortable to you — you could choose basic office software like Microsoft Word or Google Docs (Yoast SEO has a handy Google Docs add-on), you could try more advanced software like Visio or Lucidchart, or you could sketch it out on paper. It’s up to you!

For instance, your workflow could look like the first example written out in steps, or like the image below if you use a visualization tool. If, like us, you’re working in WordPress or Google Docs with the Yoast SEO plugin enabled, you can incorporate the features that you use into your workflow too.

Use Yoast SEO in Google Docs

Optimize as you draft for SEO, inclusivity, and readability. The Yoast SEO Google Docs add-on lets you export content ready for WordPress, no reformatting required.

Content workflow example 1

  1. Create a content brief with the agreement of any necessary colleagues
  2. Carry out keyword research using Google Trends and the Semrush keyword data tool in Yoast SEO Premium
  3. Create an article outline using a title and headings that relate to your keywords and the expected search intent
  4. Check if your stakeholders agree with the article outline: If yes, then continue; If no, go back to steps 1-3
  5. Write your draft in WordPress or Google Docs, taking the readability and SEO optimization suggestions from the Yoast SEO plugin into account
  6. Add a featured image in the Post Settings tab and a social image in the Social media appearance tab
  7. Make sure the SEO title, meta description and slug are all a suitable length and describe the content well
  8. Use the Public Preview option in WordPress to share a preview of the post with everyone who needs to give feedback or approval
  9. If feedback needs to be implemented, then implement it! If you’ve made any important changes, go back to get feedback and approval again!
  10. Once everyone who needs to has approved it, your post is ready to publish.

Content workflow example 2

An example of a Jira workflow for tracking blog projects

Read more: How to optimize a blog post for search engines: a checklist! »

4. Assign activities and responsibilities to team members

Even if you have a solid content workflow on paper, it’s important to ensure that each time you go through it, everyone is clear about who is doing what. Not only that, but how and when will different team members communicate with each other to hand over tasks or ask questions? Clearing these kinds of things up in advance can save a lot of hassle for everyone involved.

If these tasks aren’t a regular part of your team’s working day, they’ll also need to manage their own schedule to accommodate the tasks. If so, make sure that they have time to work on your planned content. It’s also worth checking what other priorities your contributors are juggling, as these could prevent progress if they become too demanding. Maybe you have the authority to make your planned content a top priority. If that’s your intention, make sure everyone involved knows that this should be #1 on their to-do list!

Naturally, you’ll want to set a deadline for when your content is going to be published. But if you think you can just send out an initial set of instructions, with one final deadline for all the tasks, and nothing concrete in between… Then things are quite likely to go wrong.

To achieve a much more reliable plan of action, you should include sub-deadlines and contact moments at key points in the content process. These help to keep everyone’s work aligned as the piece of content is developed, and can help you to avoid process bottlenecks by identifying issues early on. It’s also wise to schedule your own internal deadlines to have your content ready at least a week before you intend to publish it. That way, you can avoid last-minute changes (and all the mistakes that are likely to come with them). We’ll come back to this point later.

6. Agree on standards and priorities

So at this point, if you’ve followed all of our tips, you might be planning in sub-deadlines like ‘rough draft is ready’ or ‘final draft for approval’. Before you build all your hopes and dreams around these mini-deliverables, you’ll need to clarify how rough this rough draft can be! After all, you don’t want to end up disappointed because you only received a basic article outline and a few bullet point lists when you were expecting something almost finished.

If you’re using tools like Yoast SEO, you’ll also want to make it clear what results are acceptable to you: for instance, do you expect the readability analysis to always be green, but the SEO analysis doesn’t have to be when it’s not written for ranking purposes? Do you expect the internal linking suggestions to be added as a requirement, or are these just to be used as suggestions? Make sure everyone agrees about how you use your tools and what the end goal is.

7. Allow time for final checks and changes

If you have a regular content publishing schedule that you want to keep to, it’s a good idea to prepare your drafts with a decent amount of time to spare. That way, you can avoid stressing about deadlines and last-minute changes. Here are a few things that really ought to be on your pre-publication checklist, especially if they’re not already incorporated in your content development process:

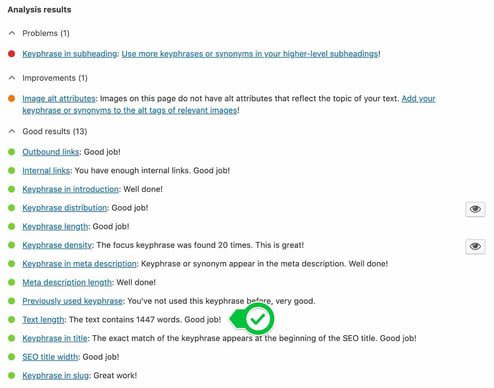
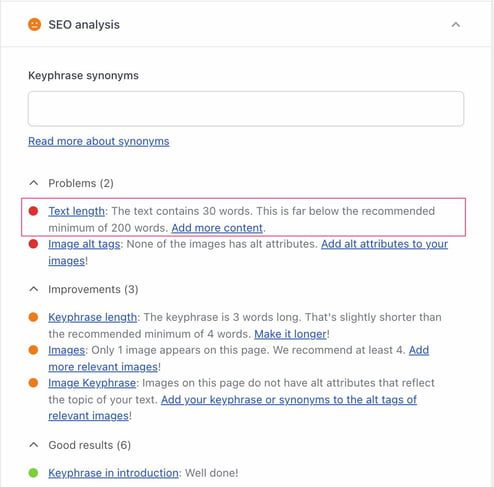
  • Check the SEO of your post using the Yoast SEO analysis. Is it good enough?
  • Check the readability of your post using the readability analysis. Is it good enough?
  • Have you added a featured image?
  • Have you added an OG image and title for optimized social sharing?
  • Is the slug short and descriptive?
  • Have you added internal links to and from other relevant pages on your site?
  • If you use tags/categories, have you selected all the right options?
  • Are comments enabled/disabled according to your preferences for this post?
  • Is the correct date/time set for your post?
Yoast SEO for Google Docs add-on
Using Yoast SEO in Google Docs makes it much easier to work across teams

As you can see, there’s quite a lot to do even after a post is written, so don’t underestimate how long these checks will take.

Got a good basic content process, but still having issues? This is what to check:

8. Do you create unnecessary work?

Sometimes tasks become more complicated than they really need to be. Are there times when one small change causes a cascade of new issues to deal with? This can be a sign that you need to rethink the order of your steps and who is involved. Small changes should be easy, right?

Often, it’s obvious who should be doing what and how the process should continue. But it’s not always. For instance, if you have a graphic design team, do they need to make every change themselves? Can you make things easier by enabling your writing team to change text and background colors themselves, for instance?

Another type of problem can arise if you don’t have a clear decision-maker in place. Sure, there might be lots of people who should have a say about the content in the end. But who makes the final decisions? If it’s not clear who is responsible for which decisions, you might end up with all your best experts trying to reach an agreement about every little thing. That can be tricky, and it can waste loads of time! Make it easier by giving specific individuals ownership of specific aspects of the process.

9. Are things not going according to plan?

Sometimes things go wrong, in spite of your best efforts. But if things are often going wrong in your content production process, you should investigate the cause of your problems. It’s always a good idea to reach out to the people involved in the steps that are going wrong. What challenges are they facing? Does the existing process make things easier for them or more difficult? And very importantly, ask if they have any ideas to improve the process!

Don’t be afraid to try something new if what you’re doing isn’t working. Even if your new idea doesn’t work out any better, you can always learn from it and try something different next time! Or put it this way: trying anything is better than burying your head in the sand and continuing with a broken content development process.

Last but not least: are you making life harder by adding in ‘nice-to-have’ extras that weren’t part of the plan? It’s an easy mistake to make! After all, when you really care about the content you’re creating, your natural instinct is to keep improving and make it the best that it can be. Even though that means making a whole new infographic. Even though that infographic wasn’t a part of the original plan. Your team can make it happen, right? Or else you can just push the deadline back…

It’s great to aim high when it comes to making quality content. But if you’re ambitious, late-arriving ideas become a burden to the process, you might want to start categorizing them into “must-have” and “nice-to-have” content elements. That way, everyone knows which parts to prioritize and which parts can be left out if they’re too difficult to achieve within the original plan. And don’t forget that one of the biggest advantages of publishing digital content is that you can continue to improve it and share it again whenever you want!

Streamline your content workflow, but don’t let it rule you!

Those are our ten tips! It can be really worthwhile to streamline your content workflow, especially if you’re experiencing issues and bottlenecks in the process. Naturally, every situation is different, and each piece of content comes with its own opportunities and challenges, too. So you need to think about what works for you and what doesn’t in order to adapt your content process.

Try to keep a balance and avoid making a content process that’s too strict or inflexible. You don’t want to set up a rigid process that dictates your editorial decisions and rules your creative output. It’s a creative process, after all! So it’s always good to keep some room for flexibility, but just how much is up to you.

Remember: whatever your content workflow looks like, WordPress, Google Docs, and the Yoast SEO plugin can help you! From your main topic and focus keyphrase, through to the final touches you add just before publishing, the tools can form checkpoints to easily align your team and your goals.

Read more: Adapting your content SEO strategy »

5 tips on how to create good seasonal content

It’s the festive season! Or it’s nearly Valentine’s Day, or the start of summer, or… You get the drift. People love to celebrate, which is why seasonal content tends to do well during those periods. So, should you put effort into creating content for the holidays? We think so! But you should be smart about it. Here are five tips to help you create good-quality seasonal content.

Why should you create seasonal content?

A big benefit of creating seasonal content is that you’ll stay top of mind. After all, your customers are probably looking for content to give them ideas for gifts, services, or events. By participating in the trend, you’ll show your audience that your business is relevant.

Of course, by having seasonal content, you’ll also be able to boost your brand’s visibility and traffic. Especially if you have content optimized for seasonal keywords! In short: most people get swept up by the holiday season, so it’s good to join the hype.

Tip 1: Create evergreen seasonal content

Good news for busy people! You don’t need to create a new piece of seasonal content every year. It’s way better to create one excellent Christmas post, for example, that you optimize every year. Preferably, you optimize it a month or two before the event or holiday takes place. 

This will save you time, and increases the likelihood of your content actually ranking (since that usually takes a while). So, avoid adding years to your content. Don’t write a piece about: Best recipes for Hanukkah 2024. Just delete the year from the title, and you’re good to go. 

If you do want to include the year in your title, don’t include it in your URL. That way, you can update the post and title each year without having to constantly create new posts and redirect the old ones.

Our Black Friday post has a year in the title, but not in the URL

What if you already have multiple content pieces about the same holiday?

If your posts rank well for different keywords and they get a decent amount of organic traffic, keep them. But if there is overlap in the keywords they’re ranking for and they get okayish traffic, it’s better to merge them into one big post. Just make sure the post’s content still makes sense. 

Our tip would be to use the URL of the post that is performing the best. For the other posts, make sure you redirect them to the optimized post so people won’t hit a 404. 

Tip 2: Do keyword research

Whether you want to write a new post or optimize an existing one, it’s good to do research. First, start with keyword research, so you know what your audience is searching for during specific events or holidays. 

Tip: you can always look for variations of your core keywords! For example, you can add “holiday” or “guide” or “summer/winter” to them.

Just don’t create content for content’s sake. Only write content if you’re sure that your audience is looking for this information. At the end of the day, you want your audience to feel that your site has added value. 

Tip 3: Do competitor research

Once you’ve picked out a main keyword, it’s good to search for that keyword in Google, for example. Analyze the top results. Are they blog posts or category pages? If they’re blog posts, what kind of articles are they? For example, if all the top posts are how-to guides then you probably have the best chance of ranking if your article is a how-to guide as well. Just make sure to write something different from what’s already out there.

Tip 4: Plan well ahead of time

It’s good to remember that people often search for gift ideas or tips for activities or recipes weeks in advance. This means you’ll need to have your seasonal content ready before the actual holiday! That’s why it might be a good idea to have a content calendar for your posts, so you won’t forget.

Plus, it’s good to publish new content early so it has time to rank. After all, once the event is there, you want your content to be findable by your audience. That’s why it’s also a good idea to make sure your content meets Google’s helpful content and E-E-A-T guidelines.

Tip 5: Keep your seasonal content updated

Even though you’ve created evergreen content, make sure to update it at least once a year—preferably a couple of weeks before the event or holiday itself. Let’s say you have a new tip, or one of your products is no longer being produced. By updating your content, you’ll ensure that your content is always relevant and helpful. Which your audience and Google will both like!

Don’t forget to republish your content as new!

Once you’ve updated your content, don’t forget to change the publish date. This way, people (and search engines) will know it’s been updated. Of course, if you have a feature on your site that shows both the publish and updated date, then this isn’t necessary.

So why should you republish or update your content? Again, it shows that your content is relevant and current. Because let’s be honest, how would you feel if you read a blog post with Tips for a perfect summer vacation and the date said 2018? You’d think it was outdated, right?

Tip: Our free Duplicate Post plugin allows you to easily rewrite and republish your posts! With the plugin, you can edit your posts without taking them offline.

A screenshot of the Rewrite & Republish feature in the WordPress backend.
You can access the Rewrite & Republish feature via the WordPress toolbar or from the post overview

Seasonal content: the gift that keeps on giving

If you’ve got a solid post that you can update every year, you’ll ensure that you’ll give your audience helpful content. Plus, you’ll gain more traffic during seasonal events. Just make sure to update or write your content weeks in advance, so it has time to rank. All that’s left then, is to promote your content, for example on your social media channels or via email marketing. Good luck!

Coming up next!

10 tips for an awesome and SEO-friendly blog post

Writing blog posts requires skill. To keep readers interested, you should think about the structure of your content and keep it enjoyable. Because if people like and understand your post, they’re much more likely going to share it with others – and that will increase your rankings. So, if you want to improve your writing skills and your rankings, start with these tips on how to write an SEO-friendly blog post!

It might sound like writing for SEO and writing to attract and engage your audience are two conflicting goals. But that’s actually not true. Sure, if you want to write an SEO-friendly post, you should feature the words you want to be found in a prominent place. But over-using keywords severely damages the readability of your text. In fact, a high keyphrase density can even be a signal to Google that you might be stuffing keywords in your text, which can negatively affect your rankings.

This post provides tips on writing blog posts that are SEO-friendly and readable. These two goals should always go hand in hand. Because we believe that writing in understandable language gets you more visitors and keeps them on your site!

Master SEO copywriting and other vital SEO skills by getting Yoast SEO academy Premium. This gives you access to all our courses and the Yoast SEO Premium plugin!

Before you start: do keyword research

Before you start writing, you have to do keyword research. If you want to dominate the search results, you’ll have to figure out which words your audience actually searches for. These are the topics you should write about and the keywords you should use in your text.

When you’ve done your keyword research and have a list of focus keywords to write about, it’s time to get on with writing. Here are 10 tips to help you end up with an awesome blog post!

Writing tips for SEO-friendly blog posts

Above all, your blog post has to be a good piece of writing. When starting a new post, many bloggers just start writing. While this may work for some people, others need more guidance. Personally, I always follow these ‘rules’ when I write a new blog.

1. Think before you write!

Before you start, think carefully about the message of your piece. It helps to answer the following questions:

  • What do you want to tell your readers, or which central question do you want to answer?
  • What’s the purpose of your article?
  • What do you want your readers to do at the end of the page?

It’s also good to think about the search intent someone may have. An easy way to get an insight into this is by looking at the search results for the search term you want to rank with.

2. Devise a structure for your post

To write a readable and SEO-friendly blog post, you need to create a clear structure. This means that every post should have:

  • some sort of introduction (in which you introduce your topic).
  • a body (in which the main message is written).
  • a conclusion (in which you summarize the main ideas or draw a conclusion).

In a few sentences, write down what you want to say in all three sections. You’ve now created a summary of your post. This will help you create a structured and readable blog post. Now the real writing can begin.

3. Use paragraphs and headings

Everybody uses paragraphs, but not everybody uses them well. For example, it might be tempting to start each new sentence on a new line because it looks nice. But you shouldn’t do that! You also shouldn’t make your paragraphs too lengthy, as each paragraph should have its own idea or subject. So, ask yourself what the main idea of each paragraph is. You should be able to summarize that main idea in one sentence. If that’s not possible and you need more sentences to explain the main idea, you simply need to use more paragraphs.

Proper headings also help your readers understand what a specific part of your text is about. If you want people to find their way through your articles, use subheadings to lead them. Subheadings help readers scan your page, and clarify the structure of your articles. They’re not just important for readability, but for SEO as well. That’s why we also advise to use your keyword in some of your subheadings. Don’t use your keyword in every heading! It will make your text read clunky and unnatural. Plus, it will put people off from reading further.

4. Use transition words

Transition words help people scan through your text and understand the relationship between sentences and paragraphs. For example, let’s say there are three reasons for people to buy your product. You should use signal words like: ‘first of all’; ‘secondly’ and ‘finally’. Also, words like ‘however’, ‘similarly’ and ‘for example’ give a clear signal to your readers. Readers will instantly get that a conclusion will follow after words like ‘to sum up’ or ‘in short’. Transition words are therefore very important to add structure to your text.

Stuffing your article with your focus keyword makes it less attractive to read, and it can hurt your rankings. Google is getting smarter, after all. It wants you to write content that users will love. It doesn’t want you to use your focus keyword in every other sentence, because Google now has other ways to analyze what your text is about. For example, one of the ways Google understands the topic of your text is by recognizing synonyms and other keywords that are related to your focus keyphrase. That’s why you should use synonyms and related keywords throughout your copy.

Synonyms are relatively easy to think of, but finding the right related keywords is a bit more challenging. That’s why the Yoast SEO plugin comes with a feature that helps you find related keyphrases right away. Based on your focus keyword, our plugin can generate a number of related keyphrases with the click of a button! Along with how many times that keyword is searched for and what the search trend looks like. This feature is powered by SEMrush and can be used in both our free and Premium plugins. So use this related keyphrase feature!

6. Optimize the length of your article

Make sure your blog posts have a minimum of 300 words but keep the length of your article balanced. Google likes long articles. However, if your article is too long, you might scare users away. So, what should you do? Our advice is to write short to medium-length articles. When you know you’re a skilled writer, you can also try your hand at longer articles. Check out this article if you’re not quite sure how long a blog post should be.

And remember to keep using your focus keyphrase throughout your text to make sure you end up with an SEO-friendly blog post!

If you’ve already written content on the same topic as your current post, don’t forget to link to and from these posts. We call this internal linking. Both your readers and Google will thank you for it, because it helps them manage your content and understand relationships between different content on your site. So, take some time to link to and from your previous content. Our internal linking tool can help you by suggesting relevant pages and posts on your site that you can link to.

To summarize, internal linking is useful because:

  • Your link structure is also important for your rankings in Google.
  • Linking to other content about a subject is great for your readers, as they may be interested in reading these related posts too. It helps them navigate your site!
  • It will make your new blog post (and the existing posts) stronger, because you show your authority on the subject.

8. Let other people read your post

Before publishing your post, make sure to let someone else read it first. Ask them whether they understand the main concept of your post, and invite them to correct any typos and grammatical errors. They can help you by providing an objective view of the readability and attractiveness of your text. If you have someone in your team who happens to be an expert on the topic you’re writing about, make sure to run your post past them. That way, they can check whether you’re covering everything you need to and give suggestions to make your post even better.

9. Add content regularly

Regularly adding new blog posts to your website tells Google that your website is alive. This is important! Because if your site isn’t active, Google will crawl it less often and this might negatively affect your rankings. But don’t just post for the sake of posting. Make sure that everything you post is high-quality content: informative, well-written articles that entertain readers and fit their search intent.

If you have difficulty posting on a regular basis, it might be a great idea to create an editorial calendar for your blog. This allows you to structure the process in a way that fits you and your team. It’s also a good idea to update your old blog posts once in a while to avoid them getting stale.

10. Use our Yoast SEO plugin

The analysis tool in our Yoast SEO plugin helps you write readable and SEO-friendly blog posts. Start by choosing the most important search term you want people to find this particular page for. This will be your focus keyphrase. After you fill this in, our plugin runs all kinds of checks to see whether your post is optimized or still needs improving. Such as:

  • Our plugin checks your post to see whether you’ve used the keyphrase in the right places, like your copy, SEO title, meta description, alt text and URL. Yoast SEO Premium also recognizes different word forms of your keyphrase.
  • It gives you suggestions for related keyphrases that you can add to boost the quality and relevance of your content.
  • It checks the readability of your text: Are your sentences or paragraphs too long? Do you use transition words?
  • It checks the internal and external links in your article. Yoast SEO Premium even provides suggestions for links to related articles on your site.
  • It calculates how often you use your keyphrase throughout your text: not enough or too often? When you have Premium it also checks if you’ve distributed your keyphrase evenly throughout your post.
  • It checks if you’ve used potentially non-inclusive words or phrases, so you can make your content relatable for everyone.
  • It also checks if other pages on your website use the same focus keyword, to prevent you from competing with yourself.

If you write a relatively SEO-friendly blog post (based on the aspects discussed above) the plugin will indicate this with a green light. Posts and pages with green lights will help you improve the ranking of the pages on your website.

An example

It’s good to remember that not every light has to be green for your overall SEO score to be good. For example, these are the results of this blog post. As you can see, it does have an overall green light for the focus keyphrase “SEO-friendly blog post”:

Analysis results as shown in the Yoast SEO sidebar

Kind of a cool way to get feedback on your content, right? When you use the Yoast SEO plugin you’ll find this feedback in the Yoast SEO sidebar next to your post and in the Yoast meta box under your post (while editing). If you’re interested in learning more about all the aspects this analysis tool looks at, read our article on how to use the Yoast SEO content analysis tool.

Conclusion

The days when a few SEO tricks were enough to get your website to rank well in Google are long gone. Nowadays, quality content is king. And good content also leads to more links, shares, tweets and returning visitors to your website. Of course, there are always other things you can do to maximize the SEO friendliness of your post, but the most important thing is to just write very, very good posts! Still not sure if your blog post is ready to publish? Take a look at this checklist for your blog post to make sure you’re good to go!

Read more: SEO copywriting: the ultimate guide »

Coming up next!

Word count and SEO: how long should a post or page be?

We often get the question of how long an online text should be. As this often depends on different factors, it’s difficult to give just one answer. But looking from an SEO and user-oriented perspective, there is a rule of thumb you can follow. We advise writing more than 300 words for posts or pages, while product descriptions should be over 200 words. Why? Because a higher word count helps Google understand what your text is about. It also gives you the room to give enough information on the topic being discussed, which is helpful for your site visitors. However, we don’t advise adding more content for the sake of it. Quality and readability always come first!

Table of contents

Did you get a red or orange traffic light because your word count isn’t high enough? Read about the text length check here, or jump to the paragraph on how to write high-quality lengthy posts or informative taxonomy archive pages.

Why does word count matter?

Defining word count is easy: it’s how many words are used in a specific text, on a page or in another place. It’s an easy way to measure text length. But why does it matter you ask? Well, making sure that your text is long enough helps Google better understand what your text is about. We’ve experienced this ourselves; we have written quite some articles that are over 2500 words, such as our SEO essentials. They are cornerstone content, and they help our organic traffic grow. Here’s how longer articles contribute to SEO:

When your text is longer, Google has more indicators to determine what it is about. The longer your text, the more often your focus keyphrase will probably appear. This is no excuse for keyphrase stuffing, though! If you optimize your copy naturally, your focus keyphrase will pop up here and there throughout your text. You can also fit in more synonyms and related keyphrases. What’s more, in a longer post, you can add more headings, links, and images, where you will mention the keyphrase or related phrases. So more content gives you more room to provide users with high-quality and nuanced information.

A longer text can also help you rank for multiple long-tail variants of the keyphrase you’ve optimized your text for. That’s because you have more opportunities to address various topics in a lengthy text. Your article, or your other posts that take a deep dive into the subtopic, will have a chance to turn up in search results for the long-tail variants of your keyphrase. If you do some well-thought-out internal linking you can even boost the traffic to the extensive post you’ve written. This helps you drive more organic traffic to your site.

Avoid having thin content

Also, if a page doesn’t have a lot of text (a low word count), Google is more likely to think of it as thin content. All search engines want to provide the best answers to online searches people do. Thin content is less likely to offer a complete answer and satisfy the needs of the public. Consequently, it will probably not rank very high.

The same goes for product pages and descriptions in your online store. While these don’t have to be as long as blog posts, it is a good idea to make sure the text is long enough. Don’t underestimate the importance of having the proper information on your products. This can make the difference between making a purchase or not, as more text helps them make an informed decision and helps them trust your website.

What does Yoast SEO check?

The text length check in Yoast SEO

Yoast SEO helps you by checking the length of your texts. This check is part of the SEO analysis, and you will find it in the SEO tab of the Yoast SEO meta box or in the Yoast SEO sidebar. It calculates how many words you’ve added to a page and whether that’s enough to help you rank. This check is also available in our Yoast SEO for Shopify app.

Feedback of the Yoast SEO analysis on text length
Feedback of Yoast SEO for Shopify analysis on text length

Every page on your site needs to contain a certain number of words to be helpful for your site visitors and Google. How long your text should minimally be, depends on the type of page. Taxonomy pages require less content than blog posts, whereas cornerstone content is often your most important content and therefore needs to contain a significant number of words.

In the table below, you can see how we assess the different pages. If you have less than the minimum number of words on a page, you’ll get a red traffic light in the Yoast SEO analysis. Where you get a green traffic light when you’ve hit the minimum word count we advise.

Taxonomy page >250 words
Regular post or page >300 words
Cornerstone product page >400 words
Cornerstone content page >900 words
Product page or description >200 words
Minimum number of words per type of page to get a green traffic light in Yoast SEO

Not enough content

Yoast SEO will also give you a red or orange traffic light if your post or page consists of less than 50 characters in the readability analysis. To properly evaluate the readability of your content, the Yoast SEO plugin needs a minimum number of characters. If your post or page contains less than 50 characters, the plugin’s readability checks won’t give you the best results. And, in most cases, you can’t provide the best answer to your audience in such a short span of words.

Word count in the Yoast SEO insights tab

You can also find the exact word count of your content in the Yoast SEO Insights tab in the sidebar. The Insights tab also contains other useful features, like the Flesch reading ease, estimated reading time, and prominent words.

How to write a high-quality lengthy post

So, longer articles might have some advantages over short posts. But while you’re writing posts with a high word count, it is important to keep the quality of the text at a high level. Good quality texts are readable, well structured, and always contain original content

Writing high-quality content for your site or online store is hard. Especially when your goal is to write articles with a high word count to grow your organic traffic. When you’re writing, and especially elaborating on what you already have, make sure you keep the following aspects in mind:

Write readable texts

The most important thing when writing long (or any kind of) posts is to write for your audience. That may sound obvious, but it is surprisingly easy to get distracted and start adding irrelevant information. Start by thinking about questions a reader could have about the topic you’re covering. Then, provide clear answers to those questions. Of course, the answers should be well-written and readable.

What can you do to make your text readable? Your text needs to follow a logical line of thought. To accomplish that, we advise you to start every paragraph with a topic sentence, i.e., a sentence that explains the main idea of that paragraph. Use the rest of the paragraph to elaborate on that sentence. Be sure to keep your sentences and paragraphs short and snappy. If you find any unnecessary words or sentences – delete them. Minimize your use of passive voice. But do connect your paragraphs to make the text easy to read, a good way to do this is by using transition words.

Use headings

One way of structuring your text is by using headings. Headings within a text serve two purposes. First: they show a top-down hierarchy. You immediately see that a subject has, for instance, three subheadings that elaborate on it further. Another function is for scanning. You can let your readers know what a paragraph is about by using headings. It also makes your text pleasant to read, as a heading tells you what the next piece of text is about.

Write original content

This is the hardest one. It is not easy being original with so much content out there. But, it might help if you reflect on what makes you unique. Think about how what you offer is different and better than what your competitors offer. Then do some keyword research to see what your audience searches for online. Preparing with research can give you plenty of ideas on what to write about and how to make yourself stand out from the crowd. In case you get stuck, we have a whole blog post on how to find inspiration.

Want to learn more on how to write high-quality posts that users and search engines will love? Our SEO Copywriting course and other SEO courses can help you with that. You can get access to these courses with Yoast SEO Premium or Yoast SEO for Shopify, which also gives you access to extra features in the Yoast SEO plugin.

Go Premium and get free access to our SEO courses!

Learn how to write great content for SEO and unlock lots of features with Yoast SEO Premium:

How to create high-quality archive pages 

Let’s start by explaining what archive pages are. WordPress uses so-called taxonomies to group content. The word ‘taxonomy’ is a fancy term for a group of things (website pages, in this case) that have something in common. WordPress has two default taxonomies: categories and tags. The difference between a category and a tag mostly has to do with structure. Categories are hierarchical: you can have subcategories and even sub-subcategories. Tags, however, don’t have that hierarchy.

WordPress automatically generates a page for each category or tag you create. So, do be mindful of them, and don’t create new tags for each post you write! We call these pages archive pages because that’s what they do: they archive posts (or products) that have something in common. Besides categories and tags, there are also other types of archive pages. You can even create a custom taxonomy or use a plugin that creates one.

Why are archive pages important for your SEO?

Taxonomy archive pages are very valuable when it comes to structuring your site. A clear site structure helps both Google and your visitors to understand and navigate your site and help you rank higher. To get the best out of your taxonomy archive pages, you will need to work on them. The pages that WordPress automatically generates tend to only consist of a list of posts without any further introduction. So, if visitors land on one of your archive pages, they don’t get much information. This increases the chance that they won’t find what they’re looking and leave the page.

How to optimize taxonomy archive pages

To make your taxonomy archives awesome, you often don’t even have to do that much. Start by adding a clear heading and an introduction, where you highlight the content on that archive page. In addition, you can add some links to that introductory content pointing to the best posts or pages on that archive page. This will go a long way in making sure that the users understand what the page is about.

For descriptions on archive pages, we recommend a minimum of 250 words. That’s less than what we recommend for blog posts, but that’s because the description of an archive page has a different purpose than a blog post. Rather than exploring a topic, these descriptions serve as an introduction to the rest of the content on that page. These texts don’t have to be lengthy. You want to rank with these pages though, and that means category and tag pages need content.

How to write high-quality product descriptions

A lot of online stores use the default text that the manufacturer provides when it comes to the products they sell. This is not something we would recommend (at all). Not only will this show Google that there are already five other websites out there that are providing the same content as you are (which hurts your rankings), but it also shows users that you don’t take the time to properly optimize your product pages. This hurts your credibility. Of course, if you have an online store with lots of products we understand that this isn’t done in a few minutes. In that case, we recommend starting with your most important products or best-sellers.

Make sure your product descriptions contain the information people will want about these products. Make this information easy to read and to the point. As you probably saw in the table, these pages often ask for less content than blog posts or other pages. But do make sure that all the information that someone would want about that product, is on the product page. As I mentioned before, a great product description can be the difference between making a sale or not.

Conclusion on word count and SEO

This post taught you that the word count of your posts and pages can influence your rankings. However, and this is very important, you should not compromise the quality of your text for the sake of writing longer pieces. So, always use your common sense and write readable, and well-structured texts that are helpful for your site visitors. Eventually, this is what Google wants as well and therefore will get you higher up the rankings!

Read more: SEO copywriting and writing for sales »

Coming up next!

How to write an SEO-friendly introduction for a blog post

What is the most important part of a post? The first paragraph! It’s the introduction of your article, and tells your audience what your post is about. But the first paragraph is also important to Google. That’s why you should give it extra attention. In this blog post, we’ll explain why an SEO-friendly introduction is so important, and give practical tips on how to write an awesome first paragraph. So read on!

Why should you write an SEO-friendly introduction? 

People usually start reading at the beginning of an article. If your introduction is not compelling, people will click away. Google knows this too, because Google is trying to mimic a human. So if your introduction is bad, you’ll see a decline in your rankings. To avoid this, your first paragraph should be well written and optimized.

What should a good introduction do? 

Because the demands of the first paragraph are higher than the demands on the rest of your text, your introduction should do at least three things. Let’s look at what these are! 

1. Introduce the topic

The first paragraph should introduce the topic. Just by reading the introduction, readers should know the message of your article is. It has to answer the question: What do you want to tell people in this article? 

The introduction of this blog post has the message: ‘the introduction of your article is very important to both your audience and Google.’ Because that’s what this article is about. It’s what we want you to remember.

SEO tip: use your focus keyphrase

Introducing the topic also allows you to use your focus keyphrase in the introduction. You should use the exact search terms that your audience uses. It’ll make your audience confident that your post will answer the question they asked Google. 

2. Get people excited to read more

The second thing a good introduction should do: get people excited. To do this, you need a hook. Something that’s fun or catches people’s attention. Your introduction should make people want to read more. People should feel curious about what’s next and excited to have found such an amazing article. 

3. Set expectations

The third thing an SEO-friendly introduction should do is set expectations. By reading the first paragraph of your post, readers should know what to expect. Because if your introduction is vague or boring, chances are high that people will click away.

Tips on how to write an SEO-friendly introduction 

Think before you write 

As we’ve discussed, your introduction is your most important paragraph. So, think about what you’re going to write! Think about your audience: who are you trying to reach? What will they learn from your article, or which problems are you solving? If you know the answer to these questions, your introduction will be much easier to write.

Of course, you can also write your introduction last. While it’s good to think about the focus of your post before you start writing, you can discover new insights while writing. After finishing your post, you’ll have a clear idea of what it’s about, which hopefully makes your introduction easier to write. It just depends on your preference!

Example

Let’s take this article as an example. Our desired audience is mostly writers and bloggers; people who want to create content in order to rank higher in the search engines. That’s also their main problem: their content is not ranking as high as they would like. This article is then part of the solution, because it gives people practical tips on how to improve the introduction of their posts. 

Focus on the problem 

You should mention the problem your audience is facing in the introduction. If people recognize the problem, they’ll want to read the rest of your article to see if it helps them find a solution.

Make it relatable 

Hey, you! The one reading this post! If you address your readers directly, they’ll feel more inclined to continue reading. So, make your readers feel like you’ve written this post especially for them. Use ‘you’ and ‘your’ and ask them questions. It’ll make people feel like you’re talking to them. 

Make it fun 

Use quotes, statistics, stories, and anecdotes in order to make your introduction more fun to read. Quotes and statistics will make you more convincing, while stories and anecdotes make your article more entertaining to read.

Tip: if you use quotes or stories in your introduction, it’s nice to mention them again in your conclusion. This will make your article feel ‘complete’. Plus, it’ll help your readers to remember your story and your message.

Use a different font

You know the introduction should be well written, but did you know it should also be well designed? Make it stand out by using a different font or embolden the words. Your readers will immediately know that they’re reading the introduction. Plus, it will make the introduction look important (which it is!).

Use that focus keyphrase! 

We’ve already discussed this, but it’s good to mention it again: if you want to write an SEO-friendly introduction, use your focus keyphrase in the first paragraph! You want your audience to recognize what they were searching for immediately. Because it will convince your audience that they’re reading the right post.

Keep it readable 

Readability is important for your entire article, and even more so for the introduction! Don’t make your first paragraph hard to read. Use short sentences, and avoid the passive voice.

In addition, an introduction shouldn’t be too long. It’s best to write one paragraph with 10 or 12 sentences at the most. You could divide an introduction into two shorter paragraphs; just don’t make the paragraphs longer than 12 sentences.

Short recipe for an SEO-friendly introduction 

Let’s make this short and practical. Here’s the recipe on how to write an SEO-friendly introduction:

  1. Start with a hook. A hook can be anything that catches the reader’s attention. You could state a controversial opinion, or ask a (rhetorical) question. You could share a statistic. Just make sure to write two or three sentences that entice your reader, and make them want to read on.
  2. Introduce the message of your article. After your hook, write two or three sentences in which you introduce the main problem that you’re solving in the blog post.
  3. Next, write two or three sentences about what people can expect in this article. A helpful sentence is: “In this post, we’ll discuss/you’ll learn…”

Love your site by writing SEO-friendly introductions

If you write content, you want your audience to read it! But you also want to rank high in the search engines. That’s why you have to make sure that the most important part of your text, the introduction, gets extra attention. Give your first paragraph a little extra SEO love, because it could make all the difference.

Read more: SEO love: Why you should add links to a new post as soon as possible »

SEO love series

Coming up next!

Why you only need one H1 heading per post or page

The title of your post or page usually gets the H1 heading tag. It’s only logical to give your post one title, right? Having more than one H1 is like saying: “Hey, this text is about two topics of equal importance.” Yoast SEO warns you with a red traffic light if you use more than one H1 heading. Here, we’ll explain why your post or page only needs one H1 heading.

Table of contents

Did you get a red traffic light in Yoast SEO for using more than one H1 heading? Read more about what the single title check does and how you can fix the red or orange light.

Heading structure and SEO

In many CMSs like WordPress or Shopify, headings are ordered in ranks (or levels). The highest rank is H1, the title of your post or page. In the rest of the text, you use H2 – H6 headings. With them, you indicate the importance of each section and how it relates to the rest of the text. So, when a reader lands on your page, the headings help them make sense of the content. It helps readers to scan the text and learn how it fits together.

Search engines also “read” headings and try to understand the structure of your text. Instead of the regular text you and I read, they go to the HTML version of your site and read the HTML heading tags. The headings help them comprehend the relative importance of your text’s (sub)topic.

One or multiple H1s?

As mentioned above, the H1 is the title of your post (not to be confused with the SEO title). We would suggest using the H1 heading only once. We believe that’s the best choice because:

  • Headings help readers and Google understand your text. If there are multiple H1 headings, your readers and Google might get confused. People might get confused, distracted, or even frustrated when there’s no clear distinction between main and subtopics. As a result, they may leave your site.
  • Proper use of headings makes your text more accessible. Think of visually impaired people who use screen readers. These devices can use headings to navigate through your text. More than one H1 in one article complicates this, and without visual cues, it might confuse people even more.

Of course, using the other headings as much as you need is perfectly acceptable. Still, you should keep in mind that headings are hierarchical. For example, you should use H2 before you use H3 within a particular topic. Check out this extensive guide on headings and SEO if you want to use them optimally.

What does the single H1 heading check in Yoast SEO do?

The single H1 assessment of Yoast SEO (both in our WordPress SEO plugin and Shopify SEO app) checks whether the body of your text contains an H1 heading at any position other than the very beginning. If Yoast SEO detects an H1 heading in the body of your text, it gives you a red bullet in the feedback. Luckily, solving this issue is straightforward.

Yoast SEO lets you know when you’ve used multiple H1s in your text

Finding and changing your H1 headings

To ensure your post doesn’t have double titles, you’ll need to find all H1s in your text and change them to a lower heading level.

Changing an H1 heading in the classic editor in WordPress

If you click one of your headings in the classic editor, the clickable drop-down menu in the upper left corner will show the heading level you’ve selected. You can change it to another level by opening the drop-down menu and selecting another level. If the Yoast SEO feedback indicates that your text contains more than one H1 heading, check all your headings by clicking them. Then, select another level to change your H1 into H2 or another appropriate heading.

Turning selected text into a heading in WordPress classic editor

Changing an H1 heading in the block editor in WordPress

In the block editor, Yoast SEO helps you find the H1s quickly. Click the eye icon next to the assessment and see the H1 titles highlighted in the editor. If you want to change the level of your headings, click them. The menu bar above the block shows you the level of the heading. Then, select another level to change your H1 into H2 or another appropriate heading.

Change the header format by clicking on it

Changing an H1 heading in Shopify

When you go to one of your products or blog posts in the backend of Shopify, you’ll notice the ‘Title’ field at the top. This is where you fill in your title (which is automatically your H1 on that page).

In the description field below, you can write your product description or blog post and add headings by clicking the ‘Paragraph’ button above the content field. This dropdown allows you to add headings of different levels. If you get a red traffic light for your H1 assessment in Yoast SEO, find the wrong headings by clicking the eye icon. When you’ve found the H1 in your content, change it into H2 or another appropriate heading.

Click the eye icon to find the redundant H1s

Conclusion

Using headings in the right way helps your SEO. What you learned from this post is quite simple. An H1 heading is the title of your post. You don’t want double or triple titles, so use the H1 heading only once. If you need to remember, Yoast is here to help you!

If you’re on Shopify, the Yoast SEO app can help keep an eye on your headings and other important SEO elements. In addition, it gives you access to all of our SEO courses to master the art of SEO! When you’re on WordPress and ready to take your SEO to the next level, go Premium to get access to all the features in Yoast SEO and all of our SEO courses. This will help you further optimize your site for visitors and search engines.

Go Premium and get free access to our SEO courses!

Learn how to write great content for SEO and unlock lots of features with Yoast SEO Premium:

Read more: Complete beginner’s guide to SEO »

Become a Yoast SEO pro series

Coming up next!

Content planning for a (growing) blog: 6 easy-to-use tips

Maintaining a blog is about more than just writing a bunch of blog posts. You should develop a strategy and plan your content – especially if you’re writing with multiple authors. You should also interact with your audience and respond to their comments. In this post, I’ll explain the importance of content planning and give some practical tips on how to plan your blog posts – effortlessly!

A blog post planning that works

If your blog and audience are growing and you’re getting more serious about blogging, you should make a plan for your content. This might seem unnecessary at first, but it will make your life so much easier! Especially if you work with guest bloggers or multiple authors who write about different topics.

But how do you create a proper plan? Well, we’ve got six important pointers for you:

Want to read more about the technical side of a growing blog? Then read our article on how to manage the technical SEO of a growing blog. Or struggling with your blogs structure? Read how to keep the structure of your growing blog under control!

1. Create an editorial calendar

An editorial calendar is essential if you’re working with multiple authors and you’re posting frequently. So, what is an editorial calendar? It’s a calendar in which you plot all the posts that you’re going to write the upcoming weeks, months, or even year!

This could just be an Excel sheet, but it’s easier to use an editorial plugin or a service with a drag-and-drop calendar. Think Trello, MeisterTask or Monday. In this calendar, you can easily assign posts to authors and editors, and (if you like) use labels for categorization.

2. Sit down and brainstorm

If you want to fill your editorial calendar, you could start with a brainstorm session. Invite all your blog authors, and sit together. Ask everyone what their ideas are and which posts they would like to write in the near future. Of course, you should use your keyword research as a basis.

While you’re brainstorming, make a list of everyone’s ideas and wishes, then plot them out on the editorial calendar. Make sure your authors finish their blog posts a few days before the publish date so you can proofread and edit if needed. Plus, you can use that time to find or create accompanying illustrations or photos.

3. Decide on frequency

You should blog regularly. Still, it’s hard to give exact numbers. For most company blogs, one daily post is fine and doable. For a personal blog, however, this probably isn’t be feasible. Try to establish some kind of frequency and stick to it. Your readers will appreciate a reliable schedule.

Once you know you can commit to your chosen schedule, make sure to communicate it to your audience, so they know what they can expect!

4. Add variation

If you often write about similar topics – beware of keyword cannibalization though – make sure to vary a little. Don’t post articles about nearly identical topics one after another. Of course, you can still write blog series, but try to vary between subjects as much as possible.

You could also make variations in the form of your content. A video post, for example, spices things up!

5. Use news and current events

When planning your content, you should take a look at your calendar as well! Are there any major events coming up that are worth mentioning in your blog post? Or should you write a few seasonal posts? Make sure to mix these ‘current-events posts’ with other posts you have lined up.

6. Use a style guide

Creating a style guide for your blog is a great way to make sure everyone writes and spells in the same way. Of course, we should all write in a grammatically correct way, but the use of capitals and brand names could differ. As all authors write for the same blog, it will create more unity if everyone spells the important words in the same way.

In the style guide, you could also agree on the length of your posts, the use of paragraphs and headings, and the use of images. It should be a document in which you write down all the things that have to be consistent in your posts. And don’t forget to add some pointers for SEO copywriting as well!

If you work with an occasional guest blogger, a style guide could be a great document to help them write a post that fits the style of your blog as well.

Content planning will help you grow!

A growing blog will ask for more content planning, especially if you’re working with multiple authors. It’s important to agree on style, the topics you want to write about, and the number of blog posts you want to publish. And don’t forget to evaluate your content strategy from time to time. As long as authors keep on working and talking together, a blog with multiple authors can be a great success and make your site grow even further!

Read more: Blogging: the ultimate guide »

Coming up next!