What is keyphrase density and why is it important?
Yoast SEO checks for the keyphrase density or keyword density of your text. But what is keyphrase density exactly? And why is it important for your SEO? In this article, we answer these questions. On top of that, we’ll discuss what you can do to improve the keyword density of your content so you score a green bullet on the plugin’s keyphrase density check. Let’s dive in!
Did you get an orange or red traffic light for the keyphrase density check in Yoast SEO? Here’s what this check does and how to improve your keyphrase density.
What is keyphrase or keyword density?
Keyphrase density is the number of times your focus keyphrase occurs in your copy, compared to the total text of that page. So if you have a text that is 100 words and 5 of those are your focus keyphrase, your keyphrase density is 5%. We used to call it keyword density, but nowadays it’s more common to focus on a search term that consists of more than one word. That’s why we rather call it keyphrase density in Yoast SEO.
Why is it important for SEO?
Your keyphrase density is important for SEO because Google tries to match a user’s search query to the best-fitting page out there. To match your pages with a certain query, Google needs to understand what the page is about. That’s why you need to use your keyphrase, the phrase you’d like to rank for, in your copy. Luckily, this often comes naturally. If you want to rank for, for instance [bake vegan pancakes] you probably use this phrase or variations of it throughout your text.
However, if you repeat your keyphrase too often in your copy it becomes unpleasant to read. That’s something you should avoid at all times. After all, you want users to enjoy and understand your copy well. A high keyphrase density is also a signal to Google that you might be stuffing your text with keywords – also known as over-optimizing. As Google likes to show the best result to users, both in relevance and readability, this can negatively affect your rankings.
What does the keyphrase density check do?
The keyphrase density check in Yoast SEO assesses whether you’ve used the word(s) from your focus keyphrase often enough in your copy. It also checks if you didn’t go overboard and use the keyphrase too often. It’s good to know that the length of your keyphrase plays a factor in how your score is calculated. If you choose a longer phrase, it might be much more difficult to use it a certain number of times in your text, than if you’re using a shorter keyphrase. The check takes this into consideration to preserve the readability of your text.
We’ve included the length of your keyphrase as a weighting factor when calculating keyphrase density. That means that you will need to use your longer keyphrase less often in the text than your shorter keyphrase, to get a green traffic light. Not only do we tell you how many times you already used your keyphrase in the text, we also give you an idea about how many times you should use it.

In the free version of Yoast SEO for WordPress, you’ll get a green traffic light if your keyphrase density lies between 0.5 and 3%. For a match to be counted, all words should occur in one sentence, but the order of the words may differ.
You won’t see the percentage mentioned in your feedback. Instead, we mention the exact number of times you used your keyphrase throughout your text and compare this to the number we advise. We feel that absolute numbers make it easier to work on improving your text.
Premium and Shopify: Word form recognition and related keyphrases
In certain languages, Yoast SEO Premium and Yoast SEO for Shopify recognize various word forms of your keyphrase. For instance, [train], [trained] or [training]. This means that Yoast SEO picks up on these variations and sees them as forms of your chosen keyphrase. Making it easier for you to naturally write about your topic and be less concerned about using your keyphrase often enough.
Let’s say you’d like to rank for [bake vegan pancakes]. If you write, “Here, you’ll learn how to bake the best vegan pancakes” this will be counted as an occurrence of the keyphrase. Also, if you’d write “baking a vegan pancake is easy as pie”, Yoast SEO Premium and our Shopify app recognize that as the focus keyphrase as well. That’s why the upper boundary in these tools is a bit higher: 3.5% instead of 3%.
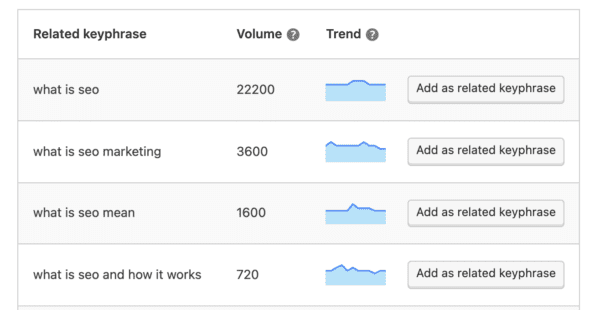
In Premium and our Shopify app, you can also enter related keyphrases. These are words and phrases that are connected to your focus keyphrase, but not synonyms. Any related keyphrases you add have a keyphrase density check of their own. So if the density of your focus keyphrase is too high, have a look at any related keyphrases and see if those are more suitable to use instead.
Go Premium to get access to this feature!

Unlock lots of features and get access to all of our SEO courses with the Yoast SEO Premium plugin:
How to improve your keyphrase density
If your keyphrase density score is too low, that means that it’s not clear enough that your text is about that specific topic. In that case, you should use the keyphrase (or variations of it) more often. Check your copy and make sure you make clear what you’re writing about. Stay on topic! If the keyphrase density is too high, you’re using your keyphrase too often. Your text will probably come across as quite spammy, to both your website visitors and Google.
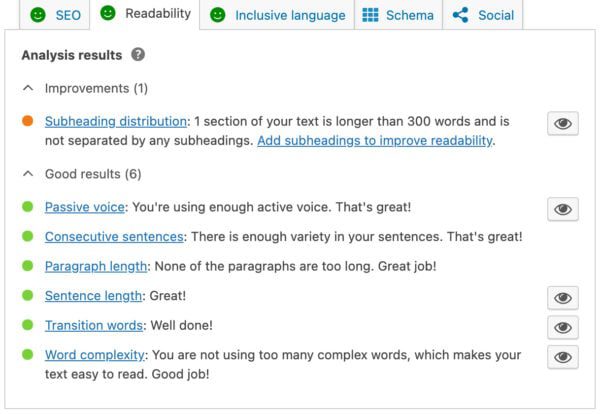
Using synonyms is a great way to avoid repetitiveness. Synonyms do not count towards your keyphrase density score, as that exclusively looks at the use of your actual focus keyphrase. If you’ve used synonyms and are worried it might be too much, here’s a tip! Have a look at the keyphrase distribution check in Yoast SEO. That highlights your focus keywords and its synonyms throughout the text. If you’ve entered synonyms that is. By looking at the highlighted phrases you can determine whether your keyphrase (in any form) is mentioned often enough throughout the text. A good check to see whether you stay on topic until the end!
Why do I have a red score on the keyphrase density check?
If you get a red traffic light for using your focus keyphrase too often or not enough and you’re not sure why, here are some things to look out for.
- First off, make sure your full focus keyphrase is within one sentence to make sure it’s being counted.
- Check your spelling. If you use [pancake] in your text, but wrote [pencake] in the focus keyphrase field, the plugin will not recognize it. Using capital letters, like in [Pancake] or even [PANCAKE] will not impact recognition though.
- If your keyphrase density is too high, make better use of synonyms. Synonyms of your focus keyphrase will not count towards your total score, but they’ll probably make your text more pleasant to read.
- Some page builders in WordPress conflict with our plugin. If our plugin is not able to find your content or your keyphrase due to a page builder, the results will be distorted. The fastest way to rule out conflicts is to perform a conflict check.
- Some non-latin, non-ideograph based languages may not calculate accurately. Please submit a bug to notify us of that, it’s much appreciated.
I don’t get feedback on my keyphrase density. Why is that?
If you don’t get feedback on your keyphrase density, there are a couple of things you should check:
- Did you enter your focus keyphrase in the focus keyphrase field? Because that’s a basic requirement for the plugin to run the check.

- The keyphrase density check is only performed when your content consists of at least 100 words.
- Sometimes our plugin conflicts with another plugin, a feature within your theme or, in rare cases, something on your server. For example, there has been a recent increase in users with a plugin or theme that provides a visual page or content builder. This may not be compatible with our page analysis.
Conclusion
Make sure you use your focus keyphrase enough throughout the whole text. But at the same time, don’t overdo it. You don’t want Google to think you’re stuffing your text with keywords. It’s doesn’t make for great user experience and will hurt your rankings.
If your keyphrase density is too low: add your focus keyphrase into your text more often. Also, check if your text stays on topic, because it should be quite easy to mention your keyphrase enough. If your score is too high, reassess your text first. See if there are places where you can replace your keyphrase with a synonym. With these tips, you should be able to score that green traffic light for keyphrase density!
Keep reading: SEO copywriting: The ultimate guide »
Camille is a content specialist at Yoast. As part of the Search team, she enjoys creating content that helps you master SEO.