Tips For Running Paid Media Campaigns In Highly Regulated Industries via @sejournal, @timothyjjensen

For those of us working within strict industries, managing paid media campaigns involves added layers of work that may not be included in less regulated companies.

Healthcare, finance, and political organizations are potential examples here, although many industries have their own quirks both in internal policies and ad platform restrictions.

According to EMARKETER, in 2023, the financial services industry made up 11.4% of U.S. digital ad spend, while healthcare & pharma entailed 7.3%.

With these highly regulated industries entailing close to 20% of spend together (not counting other categories), that means many paid search marketers have touched or will touch campaigns in these areas at some point in their career.

In order to manage campaigns successfully in these niches, you need to think about both how to efficiently work through processes in your own organization to ensure assets are approved and ready in a timely manner, as well as know what to expect after setting your campaigns live in the platforms.

In this article, I’ll share a few tips to help, applicable both to those in-house at highly regulated organizations and to agency partners managing ads.

Plan Ahead

Work the expected timeline for approvals and edits into your planning for a campaign, and be realistic about how long it could take.

When ad graphics need to be designed and also go through compliance and legal review, you can’t promise to have a campaign active in a week.

Think through all the pieces you need to build out a set of campaigns:

  • Ad copy.
  • Images (created for all sizes needed).
  • Videos.
  • Keywords.
  • Audience lists.
  • Landing page.
  • Documentation of targeting criteria, if that needs to be approved.

Then, you can work through a conservative schedule for the creation of each of these items, as well as planning to submit for approval and allowing additional time for edits and final approval.

Additionally, think through other items that may be outside of your immediate control as a paid search manager, such as landing page development and additional approvals needed for that.

Document Ad Formats & Use Consistent Templates

Often, the individuals within your organization reviewing your paid media assets are not at an “in the weeds” level understanding of how ads will display.

You can make the process smoother both for them and for yourself by clearly documenting individual ad formats and explaining nuances such as character limits and responsive ad functionality.

Provide screenshots of possible ways that ads can display and provide links to platform previews where relevant.

Building out an ad without activating it can provide an option to view it in multiple potential formats, especially for ad types like responsive display ads and Google Demand Gen that can appear in many different layouts.

Meta’s Creative Hub is also a useful tool to build out sample ads and grab screenshots.

Set up templates that you can use in the future, including guidelines directly in the documents, as well as formulas to flag issues such as going over character count.

These can be created in Excel documents, shared Google Docs, or proprietary tools within your organization.

Approve Multiple Variants At Once

In organizations where the wheels of internal approvals move slowly, getting multiple text and image variants approved at once can help ease the process of updating ads in the future.

This process may require some extra work upfront but will allow for more efficiency over time.

For instance, you may launch a Meta campaign using one text variant and four image variants.

When you’ve reached significance and are ready to move on to the next test, you can choose the best image and test it with multiple text variants.

Having those text variants approved ahead of time will allow flexibility in being able to roll out this next initiative immediately when the prior test has wrapped up instead of having to wait for additional approval.

Use Pinned Headlines And Descriptions

Often, regulated industries require you to include a precisely worded disclaimer in ad copy. Pinned assets in responsive search ads are your friend here, as you can ensure that they will always show.

Use the first or second headline position or the first description position, as beyond that, assets may be cut off.

To pin an asset in a Google Ads search campaign, click the thumbtack symbol that appears when you mouse over a headline or description field.

You can then select the number position to pin it to (1, 2, etc.). Note that if you pin multiple assets to the same position, Google may pick any of those assets to show.

Google Responsive Ad pinned assetsScreenshot from Google Ads, September 2024

Unfortunately, campaign types such as Performance Max, Demand Gen, and Display don’t allow you to pin headlines, so you’ll need to be more careful in providing copy that contains your desired disclaimers for those formats, or you may decide they are not workable with your requirements.

You can also discuss allowing for a “one-click rule” that doesn’t require a disclaimer in ad copy as long as it appears on the landing page when users click through.

Review Automatic Optimizations & Recommendations

When every word of your ad copy needs to be approved by your organization to run, you need to be particularly careful about features such as Google’s automatically created assets, which can insert text you didn’t want in your ads.

Be sure to turn these off for each campaign, before your boss or client contacts see them applied in the wild.

To do so in bulk, go to the Campaigns section and navigate to Settings. Select all campaigns.

Auto created assetsScreenshot from Google Ads, September 2024

Click the Edit dropdown and scroll until you find “Change automatically created assets settings.” You’ll then see the form below, where you can select “Off” and optionally provide a reason to give Google feedback.

Assets opt outScreenshot from Google Ads, September 2024

Additionally, watch for settings that modify images in unexpected ways, such as Meta’s image optimization features, which can result in unapproved graphic variants being out in the wild or even the addition of animation and music.

Look for the Advantage+ Creative section in ad set settings, and you’ll see an option to edit and turn off unwanted variations.

Meta Advantage+ OptimizationsScreenshot from author, September 2024

In general, be mindful that platforms are constantly testing new ways to automatically optimize and add assets. Watch for updated settings and checkboxes that you may not have seen before.

Familiarize Yourself With Industry-Specific Guidelines

Ad platforms often have their own stricter guidelines for sensitive industries, and you’ll need to be aware of what ad content and targeting settings can trigger disapprovals.

For instance, Google does not allow certain demographic targeting for finance or healthcare. Remarketing is also banned for some industries.

On the Meta Ads front, housing, credit, and employment ads are particularly restricted, with limitations on available targeting criteria. Political ads also require a verification process before being approved to run.

You can keep up with these updates in a variety of ways:

  • Visit ad platform support pages, where they will provide updates on upcoming policy changes. Here are a few links to current policy resources, each of which outlines technicalities for restricted content:
  • If you have platform reps, they can share additional guidance, often with more detailed documentation not publicly available on the web, and can reach out to internal contacts to clarify specific questions you may have.
  • While it’s not the ideal path to go, you’ll inevitably learn do’s and don’ts for your industry through trial and error as ads and campaigns are flagged in your accounts. Be sure to make note of disapprovals you’ve encountered and how they were resolved.

Often, ad platforms will provide a notice in the platform showing the specific policy violation or restriction that’s triggered for your ads.

However, particularly in sensitive niches, there are cases where ads may not run or be limited from running without clear notice.

In these cases, it’s helpful both to be as familiar with policies as possible when negotiating with support, as well as working directly with a platform rep if possible.

Use The Ad Platform Appeal Process

If you’ve complied with ad platform policy for your industry but are still facing disapproval issues, you can generally appeal for support.

The Google Ads Policy Center (Tools > Troubleshooting > Policy Manager) offers a hub where you can track the status of appeals, and other major platforms also offer options to monitor the status of appeals.

This is also an area where reps can sometimes be helpful in pushing through ad reviews or providing feedback that’s not showing in the ad platform interface.

Start Adapting Your Approach

If you’re managing PPC campaigns for a highly regulated industry, think through these tips to see where they can help improve your processes.

Do you have the internal steps for campaign planning, approval, and execution documented?

Are you fully familiar with how the ad platforms approach your industry?

Take the steps to meet with your team or client and determine how you can apply these tips.

More resources:


Featured Image: VideoFlow/Shutterstock
Optimizing International PPC Campaigns: Best Practices For Keyword Localization via @sejournal, @brookeosmundson

As brands expand into new international markets, the challenge of running successful PPC campaigns becomes increasingly complex.

Navigating the differences in culture, language, consumer behavior, and market dynamics requires a more nuanced approach than simply translating ads.

For PPC marketers using platforms like Google or Microsoft Ads, it’s critical to adapt campaign strategies for these global audiences.

This article will cover best practices for optimizing international PPC campaigns, with a specific focus on keyword localization.

We’ll explore four key themes that can drive more successful international PPC results:

  • Keyword localization.
  • Geo-specific bid adjustments.
  • Market-specific creative adaptation.
  • Leveraging automation tools for international scaling.

1. Keyword Localization: Translating Intent, Not Just Language

Keyword localization is a cornerstone of international PPC success, but it’s often misunderstood as a simple translation exercise.

When translating keywords from one language to another, it’s not a “2+2=4” equation most of the time.

In reality, it’s much more complex.

Keyword localization involves understanding the intent behind searches and adapting keywords to match the local language, cultural context, and user behavior.

Steps To Effective Keyword Localization

  • Market Research: Before diving into translation, research how consumers in the target country search for products or services. This involves understanding search intent, popular terms, slang, and regional dialects.
  • Translation with a twist: Work with native speakers or linguists familiar with the market. Tools like Google Translate can give you a starting point, but they won’t capture cultural subtleties. Manual keyword research in local search engines is vital.
  • Use local search engines: Google may dominate globally, but other regions may favor different search engines. Baidu in China, Yandex in Russia, and Naver in South Korea have distinct algorithms and keyword trends. Tailor your keywords to the dominant platform in each market.
  • Test and optimize: International markets are fluid. What works in one month might need refinement in the next. Regularly review performance and optimize based on search trends, conversion data, and shifting customer behaviors.

For example, in Spain, the keyword “coches baratos” (cheap cars) may seem like a direct translation of its English counterpart.

However, further research might reveal that “ofertas coches” (car deals) or “vehículos económicos” (affordable vehicles) performs better depending on user intent.

2. Geo-Specific Bid Adjustments: Tailor Bids For Performance By Region

International campaigns are prone to fluctuations in performance, driven by differences in local competition, purchasing power, and user behavior.

Geo-specific bid adjustments allow you to tailor your bidding strategy to the realities of each market, maximizing return on ad spend (ROAS).

Below are some best practices for geo-specific bidding:

  • Analyze Regional Performance: Use data to assess performance on a country or even city level. Look for patterns like higher conversion rates in certain regions and adjust bids accordingly. This is especially important in diverse markets where sub-regions may perform differently, like the UK or Canada.
  • Adjust Bids Based on Currency Value and Buying Power: Regions with lower purchasing power or fluctuating currency values may require different bid strategies. In some markets, a lower cost-per-click (CPC) approach could help maintain profitability.
  • Consider Time Zone Differences: Adjust bids based on peak performance hours in each time zone. A broad international campaign can benefit from time-based adjustments that ensure ads show during peak periods in each country.

For instance, if your campaign targets both New York and Berlin, you may find that your peak performance hours vary drastically, necessitating different bid adjustments to maximize efficiency.

In this instance, it’s likely worth segmenting your campaigns by region to account for maximum return on investment or ROI in each region.

In larger enterprise accounts, most regions have different audience sizes, which require different budgets.

If your brand falls into that category, it may be worth creating a separate Google Ads account per region, which can roll up into one MCC account for easier management.

3. Market-Specific Creative Adaptation: Speak The Local Language Through Ad Copy

One of the most common mistakes in international PPC campaigns is failing to adapt ad creatives to local contexts.

Just as keyword localization requires cultural adaptation, ad creatives must be tuned to resonate with local audiences.

A few approaches to localized creative to think about include:

  • Ad Copy and Messaging: Localize ad copy to reflect cultural preferences, holidays, humor, and common phrases. Avoid literal translations that may miss the mark. Collaborate with local copywriters who understand the nuances of language and sentiment.
  • Visual Adaptations: Imagery that works in one region may not resonate in another. If your ad visuals feature people, clothing, or settings, make sure they align with local norms and expectations.
  • Calls to Action (CTAs): CTAs should be adapted based on local shopping behaviors. In some regions, urgency works well (“Buy Now”), while in others, a softer approach may perform better (“Learn More” or “Discover”).

For example, a successful ad campaign in the US using a humorous tone may need to be entirely rethought for a market like Japan, where subtlety and respect play a bigger role in advertising.

4. Leveraging Automation Tools For International Scaling

Managing international PPC campaigns across multiple markets can quickly become overwhelming.

Automation tools, both native to ad platforms and third-party solutions, can help streamline campaign management while still allowing for localized control.

Automation Tactics To Help Scale International PPC Campaigns

  • Smart Bidding: Utilize Google or Microsoft’s automated bidding strategies tailored to individual market performance. Smart bidding leverages machine learning to optimize bids for conversions or ROAS, adjusting bids based on real-time data.
  • Dynamic Search Ads (DSAs): Dynamic Search Ads can help expand your reach by automatically generating ad headlines based on your website’s content. For international campaigns, ensure that your website is properly localized to ensure the DSAs serve relevant, accurate ads.
  • Automated Rules and Scripts: Set up automated rules or scripts to adjust bids, pause underperforming keywords, or raise budgets during peak times. For example, you might set rules to increase bids during holidays specific to individual regions, like Singles’ Day in China or Diwali in India.

Automation tools should be used to complement your manual efforts, not replace them. While they can help manage large campaigns more efficiently, regular oversight and optimization are still essential.

A Holistic Approach To International PPC Success

Expanding into international PPC campaigns presents both challenges and opportunities.

Success depends on taking a holistic approach that incorporates keyword localization, tailored bidding strategies, localized creatives, and effective use of automation.

By adapting your strategies to each specific market, you’ll be able to tap into the unique search behaviors, cultural nuances, and competitive dynamics of global consumers.

Remember that the global PPC landscape is constantly evolving, and regular monitoring, testing, and optimization will be key to staying ahead of the competition.

Whether you’re managing campaigns in-house or as part of an agency, these best practices will help you optimize your international PPC efforts and drive better performance across borders.

More resources: 


Featured Image: Mer_Studio/Shutterstock

Ad Copy Tactics Backed By Study Of Over 1 Million Google Ads via @sejournal, @navahf

Mastering effective ad copy is crucial for achieving success with Google Ads.

Yet, the PPC landscape can make it challenging to discern which optimization techniques truly yield results.

Although various perspectives exist on optimizing ads, few are substantiated by comprehensive data. A recent study from Optmyzr attempted to address this.

The goal isn’t to promote or dissuade any specific method but to provide a clearer understanding of how different creative decisions impact your campaigns.

Use the data to help you identify higher profit probability opportunities.

Methodology And Data Scope

The Optmyzr study analyzed data from over 22,000 Google Ads accounts that have been active for at least 90 days with a minimum monthly spend of $1,500.

Across more than a million ads, we assessed Responsive Search Ads (RSAs), Expanded Text Ads (ETAs), and Demand Gen campaigns. Due to API limitations, we could not retrieve asset-level data for Performance Max campaigns.

Additionally, all monetary figures were converted to USD to standardize comparisons.

Key Questions Explored

To provide actionable insights, we focused on addressing the following questions:

  • Is there a correlation between Ad Strength and performance?
  • How do pinning assets impact ad performance?
  • Do ads written in title case or sentence case perform better?
  • How does creative length affect ad performance?
  • Can ETA strategies effectively translate to RSAs and Demand Gen ads?

As we evaluated the results, it’s important to note that our data set represents advanced marketers.

This means there may be selection bias, and these insights might differ in a broader advertiser pool with varying levels of experience.

The Relationship Between Ad Strength And Performance

Google explicitly states that Ad Strength is a tool designed to guide ad optimization rather than act as a ranking factor.

Despite this, marketers often hold mixed opinions about its usefulness, as its role in ad performance appears inconsistent.

data for rsa ad strengthImage from author, September 2024

Our data corroborates this skepticism. Ads labeled with an “average” Ad Strength score outperformed those with “good” or “excellent” scores in key metrics like CPA, conversion rate, and ROAS.

This disparity is particularly evident in RSAs, where the ROAS tends to decrease sharply when moving from “average” to “good,” with only a marginal increase when advancing to “excellent.”

data for demand gen ad strengthScreenshot from author, September 2024

Interestingly, Demand Gen ads also showed a stronger performance with an “average” Ad Strength, except for ROAS.

The metrics for conversion rates in Demand Gen and RSAs were notably similar, which is surprising since Demand Gen ads are typically designed for awareness, while RSAs focus on driving transactions.

Key Takeaways:

  • Ad Strength doesn’t reliably correlate with performance, so it shouldn’t be a primary metric for assessing your ads.
  • Most ads with “poor” or “average” Ad Strength labels perform well by standard advertising KPIs.
  • “Good” or “excellent” Ad Strength labels do not guarantee better performance.

How Does Pinning Affect Ad Performance?

Pinning refers to locking specific assets like headlines or descriptions in fixed positions within the ad. This technique became common with RSAs, but there’s ongoing debate about its efficacy.

Some advertisers advocate for pinning all assets to replicate the control offered by ETAs, while others prefer to let Google optimize placements automatically.

data on pinningImage from author, September 2024

Our data suggests that pinning some, but not all, assets offers the most balanced results in terms of CPA, ROAS, and CPC. However, ads where all assets are pinned achieve the highest relevance in terms of CTR.

Still, this marginally higher CTR doesn’t necessarily translate into better conversion metrics. Ads with unpinned or partially pinned assets generally perform better in terms of conversion rates and cost-based metrics.

Key Takeaways:

  • Selective pinning is optimal, offering a good balance between creative control and automation.
  • Fully pinned ads may increase CTR but tend to underperform in metrics like CPA and ROAS.
  • Advertisers should embrace RSAs, as they consistently outperform ETAs – even with fully pinned assets.

Title Case Vs. Sentence Case: Which Performs Better?

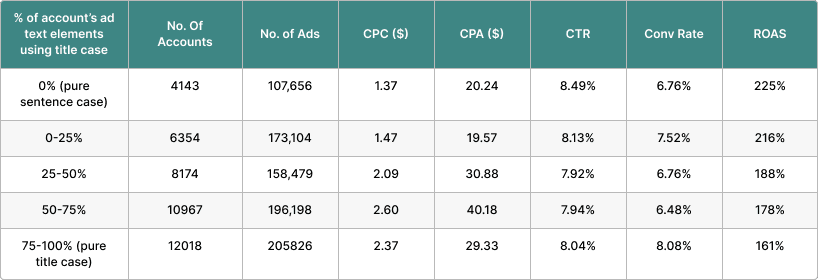
The choice between title case (“This Is a Title Case Sentence”) and sentence case (“This is a sentence case sentence”) is often a point of contention among advertisers.

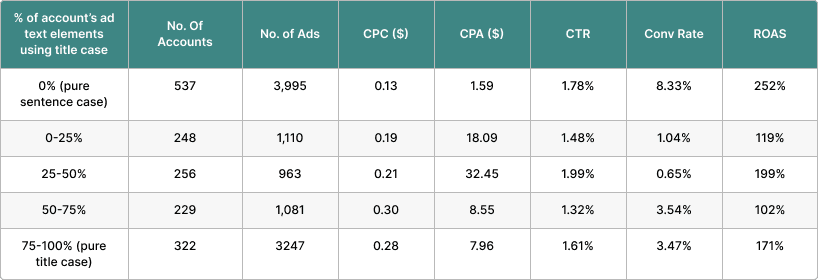
Our analysis revealed a clear trend: Ads using sentence case generally outperformed those in title case, particularly in RSAs and Demand Gen campaigns.

Data on title vs sentence casingImage from author, September 2024

(RSA Data)

(ETA Data)Image from author, September 2024

(ETA Data)

(Demand Gen)Image from author, September 2024

(Demand Gen)

ROAS, in particular, showed a marked preference for sentence case across these ad types, suggesting that a more natural, conversational tone may resonate better with users.

Interestingly, many advertisers still use a mix of title and sentence case within the same account, which counters the traditional approach of maintaining consistency throughout the ad copy.

Key Takeaways:

  • Sentence case outperforms title case in RSAs and Demand Gen ads on most KPIs.
  • Including sentence case ads in your testing can improve performance, as it aligns more closely with organic results, which users perceive as higher quality.
  • Although ETAs perform slightly better with title case, sentence case is increasingly the preferred choice in modern ad formats.

The Impact Of Ad Length On Performance

Ad copy, particularly for Google Ads, requires brevity without sacrificing impact.

We analyzed the effects of character count on ad performance, grouping ads by the length of headlines and descriptions.

rsa headline character countImage from author, September 2024
RSA description lengthImage from author, September 2024

(RSA Data)

ETA dataImage from author, September 2024
Image from author, September 2024

(ETA Data)

creative length demand genImage from author, September 2024
Image from author, September 2024

(Demand Gen Data)

Interestingly, shorter headlines tend to outperform longer ones in CTR and conversion rates, while descriptions benefit from moderate length.

Ads that tried to maximize character counts by using dynamic keyword insertion (DKI) or customizers often saw no significant performance improvement.

Moreover, applying ETA strategies to RSAs proved largely ineffective.

In almost all cases, advertisers who carried over ETA tactics to RSAs saw a decline in performance, likely because of how Google dynamically assembles ad components for display.

Key Takeaways:

  • Shorter headlines lead to better performance, especially in RSAs.
  • Focus on concise, impactful messaging instead of trying to fill every available character.
  • ETA tactics do not translate well to RSAs, and attempting to replicate them can hurt performance.

Final Thoughts On Ad Optimizations

In summary, several key insights emerge from this analysis.

First, Ad Strength should not be your primary focus when assessing performance. Instead, concentrate on creating relevant, engaging ad copy tailored to your target audience.

Additionally, pinning assets should be a strategic, creative decision rather than a hard rule, and advertisers should incorporate sentence case into their testing for RSAs and Demand Gen ads.

Finally, focus on quality over quantity in ad copy length, as longer ads do not always equate to better results.

By refining these elements of your ads, you can drive better ROI and adapt to the evolving landscape of Google Ads.

Read the full Ad Strength & Creative Study from Optmyzr.

More resources: 


Featured Image: Sammby/Shutterstock

How To Set Up Your First Paid Search Campaign via @sejournal, @brookeosmundson

Paid search advertising is a powerful way to drive traffic and conversions for your brand.

However, setting up your first campaign can feel overwhelming if you’re new to the game. Even if you’re a PPC pro, it can be hard to keep up with all the changes in the interfaces, making it easy to miss key settings that can make or break performance.

In this guide, you’ll find the essential steps to set up a successful paid search campaign, ensuring you’re equipped with the knowledge to make informed decisions that lead to positive results.

Step 1: Define Your Conversions & Goals

Establishing clear goals and understanding what constitutes a conversion is the foundation of a successful paid search campaign.

This clarity ensures that every aspect of your campaign is aligned with your business objectives.

Identify Your Key Performance Indicators (KPIs)

In order to identify those KPIs, it’s crucial to understand the overarching business objectives. Begin by mapping out your broader business goals.

Ask yourself, “Am I aiming to increase sales, generate leads, boost website traffic, or enhance brand awareness?”

From there, you can define specific KPIs for each objective. Some examples include:

  • Sales: Number of transactions, revenue generated.
  • Leads: Number of form submissions, phone calls, appointments created.
  • Traffic: Click-through rate (CTR), number of sessions.
  • Brand Awareness: Impressions, reach.

Set Up Conversion Tracking

Knowing your goals is one thing, but being able to accurately measure them is a completely different ballgame.

Both Google and Microsoft Ads have dedicated conversion tags that can be added to your website for proper tracking.

Additionally, Google Analytics is a popular tool to track conversions.

Choose what conversion tags you need to add to your website and ensure they’re added to the proper pages.

In this example, we’ll use Google Ads.

To set up conversion tracking using a Google Ads tag, click the “+” button on the left-hand side of Google Ads, then choose Conversion action.

Create a conversion action in Google AdsScreenshot from Google Ads, September 2024

You’ll choose from the following conversions to add:

  • Website.
  • App.
  • Phone calls.
  • Import (from Google Analytics, third party, etc.).

After choosing, Google Ads can scan your website to recommend conversions to add, or you have the option to create a conversion manually:

How to create a manual conversion action in Google Ads.Screenshot from Google Ads, September 2024

During this step, it’s essential to assign value(s) to conversions being created, as well as the proper attribution model that best represents your customer journey.

Most PPC campaigns are now using the data-driven model attribution, as opposed to a more traditional “last click” attribution model. Data-driven attribution is especially helpful for more top-of-funnel campaigns like YouTube or Demand Gen campaign types.

After the conversion has been created, Google provides the necessary code and instructions to add to the website.

Google Ads conversion code snippet exampleScreenshot from Google Ads, September 2024

Enable Auto-Tagging

Setting up auto-tagging from the get-go eliminates the need to append UTM parameters to each individual ad, saving you time during setup.

It also allows for seamless data import into Google Analytics, enabling detailed performance analysis within that platform.

To enable auto-tagging at the account level, navigate to Admin > Account settings.

Find the box for auto-tagging and check the box to tag ad URLs, then click Save.

Turn on auto-tagging in Google Ads in the account settings.Screenshot from Google Ads, September 2024

Step 2: Link Any Relevant Accounts

Linking various accounts and tools enhances your campaign’s effectiveness by providing deeper insights and seamless data flow.

Now, this step may come sooner if you plan to import conversions from Google Analytics into Google Ads, as the accounts will have to be linked prior to importing conversions.

To link accounts, navigate to Tools > Data manager.

Where to find Linked Accounts in Google Ads.Screenshot from Google Ads, September 2024

You can link accounts such as:

  • Google Analytics.
  • YouTube channel(s).
  • Third-party analytics.
  • Search Console.
  • CRM tools (Salesforce, Zapier, etc.).
  • Ecommerce platforms (Shopify, WooCommerce, etc.).
  • Tag Manager.
  • And more.

Step 3: Conduct Keyword Research & Structure Your Campaign

Now that you’ve got the foundations of goals and conversions covered, it’s time to complete some keyword research.

A robust keyword strategy ensures your ads reach the right audience, driving qualified traffic to your site.

Start With A Seed List

Not sure where to start? Don’t sweat it!

Start by listing out fundamental terms related to your products or services. Consider what your customers would type into a search engine to find you.

Doing keyword research into search engines in real-time can help discover additional popular ways that potential customers are already searching, which can uncover more possibilities.

Additionally, use common language and phrases that customers use to ensure relevance.

Use Keyword Research Tools

The Google Ads platform has a free tool built right into it, so be sure to utilize it when planning your keyword strategy.

The Google Keyword Planner gives you access to items like:

  • Search volume data.
  • Competition levels.
  • Keyword suggestions.
  • Average CPC.

All these insights help not only determine what keywords to bid on but also help form the ideal budget needed to go after those coveted keywords.

When researching keywords, try to identify long-tail keywords (typically, these are phrases with more than three words). Long-tail keywords may have lower search volume but have higher intent and purchase considerations.

Lastly, there are many paid third-party tools that can offer additional keyword insights like:

These tools are particularly helpful in identifying what competitors are bidding on, as well as finding gaps or opportunities that they are missing or underserving.

Group Keywords Into Thematic Ad Groups

Once you have your core keywords identified, it’s time to group them together into tightly-knit ad groups.

The reason for organizing them tightly is to increase the ad relevance as much as possible. Each ad group should focus on a single theme or product category.

As a good rule of thumb, I typically use anywhere from five to 20 keywords per ad group.

Another item to keep in mind is which match types to use for keyword bidding. See the example below from Google on the three keyword match types available:

  • Broad.
  • Phrase.
  • Exact.
The difference in keyword match types in Google AdsImage credit: support.google.com, September 2024

Create A Hierarchical Campaign Structure

Once your ad groups have been segmented, it’s time to build the campaign structure(s).

You’ll want to divide your account into campaigns based on broader categories, such as:

  • Product lines.
  • Geographic regions.
  • Marketing goals.
  • Search volume.

For example, you can create one campaign for “Running Shoes.” Within that campaign, you create three ad groups:

  • Men’s running shoes.
  • Women’s running shoes.
  • Trail running shoes.

Now, there may be times when you have a keyword with an abnormally higher search volume than other keywords within a particular category.

Depending on your budget, it may be worth segmenting those high-volume search term(s) into its own campaign solely for better budget optimization.

If a high-volume keyword is grouped into ad groups with low-volume keywords, it’s likely that most of the ads served will be for the high-volume keyword.

This then inhibits the other low-volume keywords from showing, and can wreak havoc on campaign performance.

Utilize Negative Keywords

Just as the keywords you bid on are crucial to success, so are the negative keywords you put into place.

Negative keywords can and should be added and maintained as ongoing optimization of any paid search campaign strategy.

The main benefit of negative keywords is the ability to exclude irrelevant traffic. They prevent your ads from showing on irrelevant searches, saving budget and improving CTR over time.

Negative keywords can be added at the ad group, campaign, or account level.

Step 4: Configure Campaign Settings

Now that you’ve got the campaign structure ready to go, it’s time to start building and configuring the campaign settings.

Campaign settings are crucial to get right in order to optimize performance towards your goals.

There’s something to be said with the phrase, “The success is in the settings.” And that certainly applies here!

Choose The Right Bidding Strategy

You’ll have the option to choose a manual cost-per-click (CPC) or an automated bid strategy. Below is a quick rundown of the different types of bid strategies.

  • Manual CPC: Allows you to set bids for individual keywords, giving you maximum control. Suitable for those who prefer more hands-on management.
  • Target Return on Ad Spend (ROAS): Optimizes bids to maximize revenue based on a target ROAS you set at the campaign level.
  • Target Cost Per Acquisition (CPA): Optimizes bids to achieve conversions at the target CPA you set at the campaign level.
  • Maximize Conversions: Sets bids to help get the most conversions for your budget.

Set Your Daily Budget Accordingly

Review your monthly paid search budget and calculate how much you can spend per day throughout the month.

Keep in mind that some months should be different to account for seasonality, market fluctuations, etc.

Additionally, be sure to allocate campaign budgets based on goals and priorities to maximize your return on investment.

You’ll also want to keep in mind the bid strategy selected.

For example, say you set a campaign bid strategy with a Target CPA of $30. You then go on to set your campaign daily budget of $50.

That $50 daily budget would likely not be enough to support the Target CPA of $30, because that would mean you’d get a maximum of two conversions per day, if that.

For bid strategies that require a higher CPA or higher ROAS, be sure to supplement those bid strategies with higher daily budgets to learn and optimize from the beginning.

Double-Check Location Settings

When choosing locations to target, be sure to look at the advanced settings to understand how you’re reaching those users.

For example, if you choose to target the United States, it’s not enough to enter “United States” and save it.

There are two options for location targeting that many fail to find:

  • Presence or interest: People in, regularly in, or who’ve shown interest in your included locations.
  • Presence: People in or regularly in your included locations.
Location settings in Google AdsScreenshot from Google Ads, September 2024

Google Ads defaults to the “presence or interest” setting, which I’ve seen time and time again where ads end up showing outside of the United States, in this example.

Again, the success is in the settings.

There are more settings to keep in mind when setting up your first paid search campaign, including:

  • Ad scheduling.
  • Audience targeting.
  • Device targeting.
  • And more.

Step 5: Write Compelling Ad Copy

Your ad copy is the gateway to attracting qualified customers.

Crafting the perfect mix of persuasion and relevancy into your ad copy can significantly impact your campaign’s success.

Create Attention-Grabbing Headlines

The headline is the most prominent part of the ad copy design on the search engine results page. Since each headline has a maximum character limit of 35 characters, it is important to make them count.

With Responsive Search Ads, you can create up to 15 different headlines, and Google will test different variations of them depending on the user, their search query, and multiple other factors to get that mix right.

Below are some tips for captivating a user’s attention:

  • Use Primary Keywords: Include your main keywords in the headline to improve relevance and Quality Score.
  • Highlight Unique Selling Points (USPs): Showcase what sets your product or service apart, such as free shipping, 24/7 support, or a unique feature.
  • Incorporate Numbers and Statistics: Use numbers to catch attention, like “50% Off” or “Join 10,000+ Satisfied Customers.”
  • Include a Strong Call-to-Action (CTA): Encourage immediate action with phrases like “Buy Now,” “Get a Free Quote,” or “Sign Up Today.”

Write Persuasive Descriptions

Description lines should complement the headline statements to create one cohesive ad.

Typically, two description lines are shown within any given ad. Each description line has a 90-character limit.

When creating a Responsive Search Ad, you can create four different descriptions, and then the algorithm will show variations of copy tailored to each individual user.

  • Expand on Headlines: Provide additional details that complement your headline and reinforce your message.
  • Address Pain Points: Highlight how your product or service solves specific problems your audience faces.
  • Use Emotional Triggers: Appeal to emotions by emphasizing benefits like peace of mind, convenience, or excitement.
  • Incorporate Keywords Naturally: Ensure the description flows naturally while including relevant keywords to maintain relevance.

Make Use Of Ad Assets (Formerly Extensions)

Because of the limited character count in ads, be sure to take advantage of the myriad of ad assets available as complements to headlines and descriptions.

Ad assets help provide the user with additional information about the brand, such as phone numbers to call, highlighting additional benefits, special offers, and more.

Some of the main ad assets used include:

  • Sitelinks.
  • Callouts.
  • Structured Snippets.
  • Calls.
  • And more.

You can find a full list of available ad assets in Google Ads here.

Step 6: Ensure An Effective Landing Page Design

You’ve spent all this time crafting your paid search campaign strategy, down to the keyword and ad copy level.

Don’t stop there!

There’s one final step to think about before launching your first paid search campaign: The landing page.

Your landing page is where users land after clicking your ad. An optimized landing page is critical for converting traffic into valuable conversions and revenue.

Ensure Relevancy And Consistency

The content and message of your landing page should directly correspond to your ad copy. If your ad promotes a specific product or offer, the landing page should focus on that same product or offer.

Use similar language, fonts, and imagery on your landing page as in your ads to create a cohesive user experience.

Optimize For User Experience (UX)

If a user lands on a page and the promise of the ad is not delivered on that page, they will likely leave.

Having misalignment between ad copy and the landing page is one of the quickest ways to waste those precious advertising dollars.

When looking to create a user-friendly landing page, consider the following:

  • Mobile-Friendly Design: Ensure your landing page is responsive and looks great on all devices, particularly mobile, as a significant portion of traffic comes from mobile users.
  • Fast Loading Speed: Optimize images, leverage browser caching, and minimize code to ensure your landing page loads quickly. Slow pages can lead to high bounce rates.
  • Clear and Compelling Headline: Just like your ad, your landing page should have a strong headline that immediately communicates the value proposition.
  • Concise and Persuasive Content: Provide clear, concise information that guides users toward the desired action without overwhelming them with unnecessary details.
  • Prominent Call-to-Action (CTA): Place your CTA above the fold and make it stand out with contrasting colors and actionable language. Ensure it’s easy to find and click.

Step 7: Launch Your Campaign

Once you’ve thoroughly completed these six steps, it’s time to launch your campaign!

But remember: Paid search campaigns are not a “set and forget” strategy. They must be continuously monitored and optimized to maximize performance and identify any shifts in strategy.

Create a regular optimization schedule to stay on top of any changes. This could look like:

  • Weekly Reviews: Conduct weekly performance reviews to identify trends, spot issues, and make incremental improvements.
  • Monthly Strategy Sessions: Hold monthly strategy sessions to assess overall campaign performance, adjust goals, and implement larger optimizations.
  • Quarterly Assessments: Perform comprehensive quarterly assessments to evaluate long-term trends, budget allocations, and strategic shifts.

When it comes to optimizing your paid search campaign, make sure you’re optimizing based on data. This can include looking at:

  • Pause Underperforming Keywords: Identify and pause keywords that are not driving conversions or are too costly.
  • Increase Bids on High-Performing Keywords: Allocate more budget to keywords that are generating conversions at a favorable cost.
  • Refine Ad Copy: Continuously test and refine ad copy based on performance data to enhance relevance and engagement.
  • Enhance Landing Pages: Use insights from user behavior on landing pages to make data-driven improvements that boost conversion rates.

Final Thoughts

Setting up your first paid search campaign involves multiple detailed steps, each contributing to the overall effectiveness and success of your advertising efforts.

By carefully defining your goals, linking relevant accounts, conducting thorough keyword research, configuring precise campaign settings, crafting compelling ad copy, and optimizing your landing pages, you lay a strong foundation for your campaign.

Remember, the key to a successful paid search campaign is not just the initial setup but also ongoing monitoring, testing, and optimization.

Embrace a mindset of continuous improvement, leverage data-driven insights, and stay adaptable to maximize your campaign’s potential.

More resources: 


Featured Image: vladwel/Shutterstock

Fuel Your Lead Goals: How To Optimize Value-Based Bidding For Maximum ROI via @sejournal, @adsliaison

This is it, the final chapter in our journey to mastering value-based bidding!

We have covered a lot of ground, from determining whether value-based bidding is a fit for your business, to understanding what data you’ll need, to assigning the right values, and choosing the right bid strategy.

After you have executed your value-based bidding strategy in your campaigns, it’s important to understand how and when to measure performance and how to optimize for your goals.

Check out the last two-minute video in our series on value-based bidding, and then we’ll go deeper into the details of optimizing value-based bidding.

When To Start Analyzing

To get a clear picture of how your campaigns are performing, you need enough data to work with.

Aim for at least 50 conversions or a full month of data, whichever comes first.

Remember to exclude the initial ramp-up period when your campaigns are still learning and gathering data. This ensures you’re analyzing stable and representative performance.

Evaluating Performance: Focus On The Value Metrics

In value-based bidding, we’re primarily concerned with two key metrics:

  • Conversion Value: This represents the total value generated from conversions driven by your ads. It’s the monetary worth of the actions users take after clicking on your ad, whether it’s a purchase, a sign-up, or a subscription.
  • Average Target Return On Ad Spend (ROAS): This is the traffic-weighted average ROAS that your bid strategy optimized for over a given time period. If you don’t see this metric in your performance table, be sure to add it from the column icon at the top of your Campaigns table. It’s available for both standard and portfolio bid strategies.

Optimization: Balancing Efficiency And Growth

If you think of your value-based bidding campaign as a car, your target ROAS and budget are your controls to adjust its speed and efficiency. To take this analogy further:

Target ROAS: This is like setting your cruise control. Adjusting your target ROAS influences how aggressively your bids compete in auctions.

  • A higher target ROAS means your bids will be more conservative, and you’ll likely compete in fewer auctions. Set a higher target ROAS if you want to prioritize efficiency.
  • Setting a lower target ROAS allows for more aggressive bidding. You’ll likely compete in more auctions and reach more customers. Set a lower target If you want to prioritize growth.

Budget: This is your gas tank. The amount of gas you put in depends in part on the bidding strategy you’ve chosen.

  • If you’ve set a target ROAS, ensure your budget aligns with your target ROAS and allows the system enough room to optimize effectively. You want to always have plenty of gas in the tank.
  • With a Maximize Conversion Value bidding strategy (without a target ROAS), the system aims to use all the gas you give it each day. It prioritizes driving the highest possible value within a specific allocated budget.

Understanding The Relationship Between Your Controls

Just like in a car, how you use the controls affects your overall performance.

Bid Limits – Don’t Limit Your Speed

You might be tempted to set limits on how much you pay per click (like setting a maximum speed limit) by setting bid limits. However, they can actually constrain the system and hinder performance.

It’s like trying to win a race while keeping your car below a certain speed. In value-based bidding, it’s best to let the system automatically adjust your bids based on the potential value of each click.

  • You may opt to set bid limits when you’re getting started or are in a highly competitive sector, but keep these tradeoffs in mind as you evaluate performance.
  • Note that bid limits are only used in Search Network auctions and only available for portfolio bid strategies.

Budget Constraints – Ensure Enough Fuel

If you’re using a target ROAS, make sure your budget isn’t constrained. Otherwise, it’s like trying to drive a long distance with very little gas. You won’t get very far.

  • A restrictive budget can limit the system’s ability to participate in valuable auctions and achieve your desired return. The system needs a sufficient budget to effectively optimize for your target ROAS.

More Optimization Tools

Use these additional tools to help you optimize your value-based bidding campaigns:

Bid Simulators

These simulators allow you to experiment with different ROAS targets and see the estimated impact on key metrics like conversions and cost when adjusting your targets.

Bid Strategy Report

This report provides insights into your campaign performance over time. It helps you understand how your bids are performing, diagnose any unusual fluctuations, and identify areas for improvement.

  • The conversion value delay shows how long it takes for customers to convert. This amount of time is the recent period to exclude when evaluating performance, as some conversions may still be reported later.
  • This also is where you’ll find the “Actual ROAS” metric, which represents the actual ROAS that this strategy was able to achieve. Keep in mind that small fluctuations in performance are normal.

Performance Planner

Forecast target and budget scenarios across your campaigns.

  • Performance Planner simulates relevant ad auctions over the last seven to 10 days, including variables like seasonality, competitor activity, and landing page.
  • It also includes conversion delay estimates for Search and Performance Max impact estimates.

Portfolio Bidding & Shared Budgets

These features enable you to allocate spend across a group of campaigns. They can be especially useful when using a target ROAS since a shared budget will automatically reallocate any underused budget to budget-capped campaigns.

  • Only apply shared budgets to campaigns that share the same goal (e.g., don’t have campaigns with different targets or bidding strategies sharing a budget).
  • Also, note that shared budgets can’t be applied to campaigns that are part of an experiment.

Embracing The Journey

Optimization is an ongoing process.

As your business evolves and your understanding of your customers deepens, revisit your conversion values to ensure they still accurately reflect the worth of each lead.

Adding “value” to your advertising strategies will allow you to go beyond customer (or lead) acquisition costs, focusing on driving return in your campaigns.

You’re now equipped with the knowledge and tools to bid to value.

By focusing your budget on finding the leads that align with your goals, you can drive meaningful results for your business.

Watch The Other Videos In This Series:

More resources: 


Featured Image: BestForBest/Shutterstock

Preparing For The Feedless Future With Google Merchant Center Next via @sejournal, @gilgildner

For some years now (ever since Google Merchant Center was introduced in 2010), ecommerce advertisers have been working with product feeds.

It’s historically been a complex and often fragile process, but thanks to the introduction of Google Merchant Center Next, we have some new tools at our fingertips.

Here’s a look at how things are changing with Next.

The History Of Google Merchant Center

Back in the very beginning, we remember having to download CSV files from the website with all product information, and embarking on a long process of cleaning up and formatting the data so that it could be manually uploaded into Google Merchant Center (GMC).

In the early days, before policies became more strict, you could even use Merchant Center to advertise anything from repair services to round-the-world gap year vacations!

But in time, GMC became far more sophisticated (and also more restricted). Along with increased restrictions came the ease of use. Uploading data became much easier and more stable.

Eventually, plugins and connectors began doing most of the job for you, then platforms like Shopify got native integrations, and now with the advent of Google Merchant Center Next, you almost don’t need feeds at all!

Common Complaints About GMC

For most of the past 14 years of Merchant Center history, you’ve likely heard a few bits of common wisdom repeated ad nauseam:

Optimize your shopping feeds inside of GMC! Keep your Google categories accurately assigned inside of GMC! Add your metadata inside of GMC! Fill out all the boxes in GMC!

The world is slowly changing, and now, with GMC Next, you don’t have to make these changes within the GMC interface.

The changes need to happen on the website. While feeds won’t totally go away overnight (and neither will the need to optimize products), Google Merchant Center Next is ushering in a new feed-less era.

Announced at Google Marketing Live 2023, Merchant Center Next actually hasn’t taken hold as rapidly as expected. Even over a year after its announcement, most but not all of our client accounts have shifted over.

GMC Next started rolling out for new users first, but Google has stated the full rollout should be completed sometime in 2024. Whether this is the actual date is yet to be seen.

What Is Google Merchant Center Next?

The core differentiator with Merchant Center Next is the simplification of website verification and the automatic population of product feeds from your website. This means that Google will scrape product information, pricing, imagery, and more directly from your site.

Additionally, it has integrated a new feature called Product Studio that allows you to use AI to update or change your product images and offers more comprehensive performance insights.

Screenshot from Google Merchant Center NextScreenshot from Google Merchant Center Next, August 2024

Many marketers had a negative gut reaction to the announcement of Next, but our entire team at Discosloth was actually pretty excited about this development.

Feed management (and especially the involvement of any third-party integrations, connectors, and tools) has always been a bit clunky, so the removal of any friction is a welcome feature.

While you can still use Shopify to upload your product data, many people have found it to be more difficult with some products not being uploaded properly. As it turns out, feeds have technically gone away, but in a way, they have actually just been renamed to Data Sources.

Screenshot from Google Merchant Center NextScreenshot from Google Merchant Center Next, August 2024

It appears that product feeds, as we know them, might be going away.

This doesn’t mean that product data management will become obsolete; rather, it indicates a shift in how this data is handled within the Merchant Center Next ecosystem.

The Mindset Change

I ultimately think that removing feeds is a fantastic approach because it shifts the mindset of marketers. Rather than focusing on incremental metadata optimization on hidden feeds, it will instead encourage advertisers to update & improve the actual listings on the actual site.

Rather than just making sure endless attributes are filled out in the backend, it means that the actual website and associated metadata will need to be correctly optimized. This eliminates double work and conflicting data.

When the website itself is the primary focus, it has positive effects on performance for all channels, like organic or social – not just paid.

While many paid marketers have been focused only on optimizing products and images within the Merchant Center, without paying any attention to the website listings, now may be the time to change that approach.

Thanks to this, the website owners may start seeing a better overall conversion rate for the entire website, across all channels.

This is a great step in the right direction. Contrary to what many naysayers think about the onset of AI and generative automation, I’m a fan of taking away the grunt work from marketing and handing it all to the robots.

A more automated approach to feed management will undoubtedly grant us a lot more bandwidth to make actual strategy and content decisions on the products themselves.

While we’ve been seeing more comprehensive data on product performance appearing in Google Merchant Center over the last few years, now may be the time to dig a little bit deeper.

While GA4 has widely become useless for advanced data analysis, the new GMC Next allows us to see website traffic for both paid and organic traffic from product listings, review competition and visibility, and get better data on the best-selling products and new trends.

Perhaps the feature I like the most: comparing the prices of your stock-keeping units (SKUs) vs. competitors. This is the kind of data that has been classically underused.

Instead of a misguided focus on inserting our favorite keywords into descriptions, we can finally focus on the quality and competitiveness of your products.

Screenshot from Google Merchant Center Next, August 2024

Taking Merchant Center Beyond Optimization

Performance Max and Demand Gen campaign types have given us some new tools and strategies to use in ecommerce advertising, but it’s become harder to see granular data on where your ads are appearing, detailed performance metrics, and perhaps most notably, which keyword terms & specific audiences these campaigns are appearing for.

Many advertisers are afraid that Google Merchant Center Next may be on a similar path of removing even more granular data and making it even harder for advertisers to be specific in our ad targeting.

But so far, most of the early complaints people had when Next was introduced have already been fixed. We got access back to supplemental feeds, we can now make bulk changes (even though it’s not as easy as it used to be) and we can once again appeal any incorrectly disapproved products.

Of course SKUs and product feeds need to be optimized, but this shouldn’t be anything out of the ordinary.

Optimizing this should be an assumed baseline for any ecommerce storefront.

Merchant Center Next, as we’ve found, is most effectively used for tactics far beyond what the old Merchant Center offered. Some of the most important tactics we now use include things like getting insights on specific SKUs to make sure you always hold in inventory, and diving deep into competitive visibility and pricing in order to massively increase sales.

More resources: 


Featured Image: N Universe/Shutterstock

How To Choose The Right Bid Strategy For Lead Generation Campaigns via @sejournal, @adsliaison

Welcome back to our series on getting started with value-based bidding for lead gen marketers!

We’ve discussed evaluating whether it makes sense for your business, setting your data strategy, and assigning the right values for your conversions.

Now, we’re going to cover the final step before activating your value-based bidding strategy: choosing the right bid strategy for your lead generation campaigns.

The big benefit of value-based bidding is that it allows you to prioritize conversions that are most likely to drive higher revenue or achieve your specific business goals, such as sales, profit margins, or customer lifetime value.

By assigning different values to different conversion actions, you gain greater control over your bidding strategy and optimize for conversions that deliver the most significant impact.

Whether it’s a purchase, a lead, or a specific action on your website, value-based bidding ensures that your bids reflect the true worth of each conversion, enabling you to maximize your return on investment (ROI).

The bidding strategy you select to optimize for value depends on a few factors. Check out this two-minute video for a quick overview, and then keep reading to dive deeper.

Which Value-Based Bidding Strategy Should You Choose?

With value-based bidding, Smart Bidding predicts the value of a potential conversion with each auction.

  • If the bid strategy determines that an impression is likely to generate a conversion with high value, it will place a higher bid.
  • If this bid strategy determines that the impression isn’t likely to generate a high-value conversion, it’ll place a lower bid.

Value-based bidding can use data from all of your campaigns, including the conversion values you are reporting, to optimize performance.

It also uses real-time signals, such as device, browser, location, and time of day, and can adjust bids based on whether or not someone is on one of your remarketing lists.

To start bidding for value, ensure the following:

  • Measure at least two unique conversion values optimized for your business.
  • Have at least 15 conversions at the account level in the past 30 days. (Note: Demand Gen should have at least 50 conversions in the past 35 days, with at least 10 in the last seven days or 100 conversions in the past 35 days.)

You’ve got two bidding strategy options to tell Google how you want to optimize for value:

  • Maximize conversion value.
  • Maximize conversion value with a target ROAS.

Here’s a quick way to think about each before we dig in further:

Maximize conversion value Target ROAS
Goal Maximize conversion values for a specific budget. Maximize conversion values for a target return on ad spend.
When
  • Your priority is to maximize value and spend the budget.
  • You don’t have a specific ROI target.
  • You have a specific ROI target.

Maximize Conversion Value

This option focuses on maximizing conversion value within a defined budget.

It’s suited for advertisers who prioritize driving the highest possible value within a specific allocated budget.

Advertisers often start with this before moving to a target ROAS strategy.

Maximize Conversion Value At A Target ROAS

This option allows you to set a specific target return on ad spend (ROAS) and instructs Google Ads to optimize your bids to achieve that target while maximizing conversion value.

Target ROAS: Why Your Budget Should Be Uncapped

When bidding with a target ROAS, your campaign budget should not be limited or capped.

That may sound scary at first, but let me reassure you that it doesn’t mean you don’t have control over your campaign spend!

Your ROAS target is the lever that manages your spend.

With a target ROAS, you’re telling Google to optimize for value at that specific target rather than find as much value within a specific budget.

So, when your budget is limited, it potentially prevents the system from having the flexibility to find the next conversion at your target.

Setting Your ROAS Targets

You can choose whether to use a recommended target ROAS or set your own.

When setting ROAS targets, use the last 30 days’ return on ad spend as a benchmark.

Google’s target ROAS recommendations are calculated based on your actual ROAS over the last few weeks.

This recommendation excludes performance from the last few days to account for conversions that may take more than a day to complete following an ad click or interaction (such as an engaged view).

You can find more details on target ROAS here.

Get Started With An Experiment

While you can launch value-based bidding directly, you may want to start with a small test using a campaign experiment. This allows you to compare the performance of value-based bidding against your existing bidding strategy and make data-driven decisions.

You have two options to create a campaign experiment:

One-Click Experiment From Recommendations Page

You may see suggestions on implementing value-based bidding on your Recommendations page.

The recommendation to “Bid more efficiently with Maximize conversion value” will show if our simulations identify that your account is measuring two or more unique conversion values and will likely benefit from this strategy.

From this recommendation, you can create a one-click experiment to test the impact of value-based bidding on a specific campaign.

Custom Experiment

You also have the option to create a more tailored experiment to test value-based bidding in your campaign.

Be sure to choose a campaign that receives sufficient traffic and conversions to generate statistically significant results.

Configure the experiment to use value-based bidding, while the original campaign continues to use your existing bidding strategy.

See the instructions here to set up a custom experiment.

How To Jumpstart Value-Based Bidding

You can employ strategies to jumpstart the system, such as initially setting a low ROAS target or starting with Maximize conversion value without a ROAS target.

If you opt to start with Maximize conversion value without a target, be sure that your budgets are aligned with your daily spend goals.

Allow A Ramp-Up Period Before You Optimize

Once you’ve launched value-based bidding, give the system a ramp-up period of two weeks or three conversion cycles. This allows Google Ads to learn and optimize your bids effectively.

When measuring performance, be sure to exclude this initial period from your analysis to obtain accurate insights.

We’ve now covered all the basics for getting started with value-based bidding.

In our last segment, we’ll discuss monitoring and optimizing your performance to drive value for your business.

More resources:


Featured Image: Sammby/Shutterstock

Performance Max For Lead Generation: Advanced Strategies And Pitfalls To Avoid

Since its launch in 2021, Google’s Performance Max (PMax) campaigns have revolutionized how we approach cross-channel advertising.

But while this AI-powered campaign has been a game-changer for many, particularly in ecommerce, its application for lead generation comes with unique challenges and opportunities.

I thought this would be a good time to share advanced strategies for leveraging PMax in lead generation campaigns. We’ll also identify common pitfalls and reveal how to maximize your results.

The Lead Gen Challenge: Quality Over Quantity

Unlike ecommerce, where a purchase marks a clear end to the customer journey, lead generation is just the beginning.

This fundamental difference creates a significant hurdle for PMax campaigns, presenting unique challenges that require advanced strategies.

Menachem Ani, founder of JXT Group, explains the core issue:

“Unlike e-commerce, where a purchase signifies the ‘end’ of the transaction, lead creation is the beginning of the sales process—and just because someone fills out a form doesn’t make them a quality lead.”

The challenge lies in teaching Google’s algorithm to distinguish between high-quality and low-quality leads.

Without this crucial information, PMax campaigns can fall into what some marketers call the “feedback loop of doom” – optimizing for quantity over quality and potentially flooding your pipeline with unqualified leads.

Feedback Loop of Doom | Performance MaxImage from author, September 2024

Another critical factor in determining whether PMax suits your lead generation efforts is Google’s understanding of your business and website.

PMax heavily relies on your website content when targeting users. If Google misinterprets your service offerings, your campaigns are likely to underperform.

To assess Google’s comprehension of your business, try this simple test: Input your website URL into the Search Terms section of Google’s Keyword Planner.

Review the generated keywords and evaluate their relevance to your services. This exercise can provide valuable insights into how well Google understands your business, which is crucial for PMax’s success in lead generation campaigns.

Cracking The Code: Strategies For Success

1. Harness The Power Of Offline Conversion Tracking (OCT)

The key to success with PMax for lead generation lies in feeding Google’s algorithm with quality data. This means implementing robust OCT.

Cathryn Stormont, a freelance consultant, emphasizes:

“To make Performance Max for lead generation work, it is vital to instruct Google on the outcome. If you don’t, it will seek to bring in as many submissions as possible – regardless of the quality.”

Action steps:

  • Integrate your CRM system with Google Ads.
  • Import offline conversion data, either manually or automatically.
  • Define what a qualified lead is for your business and make the form difficult to complete.*
  • Set qualified leads as your primary conversion point.

* You can do this by adding several qualifying questions, setting up confirmation pages for qualified leads versus unqualified leads, and only counting the qualified leads.

2. Leverage Cross-Campaign Optimization

Use data from successful campaigns across other channels to inform your PMax strategy. This is especially useful when dealing with limited data in new PMax campaigns.

Practical tips:

  • Incorporate broader themes and topics related to your products or services as asset signals rather than specific keywords. For example, if you sell home renovation products, use signals like “home improvement,” “interior design,” or “home renovations” instead of specific product keywords.

Note: It’s important to understand that PMax uses these signals differently than traditional keyword targeting. The goal is to help Google understand your potential customers’ broader context and interests, not to target specific search terms.

  • Collaborate with your sales and marketing teams to incorporate insights from persona studies and campaign success stories

3. Rethink Your Campaign Structure

It’s vital to understand PMax’s strengths and limitations. Performance Max excels at capturing existing demand but struggles with generating new demand.

To leverage this characteristic effectively, consider implementing an advanced tactic:

Run a PMax campaign alongside a separate Search campaign that targets high-quality, intent-driven search keywords. This approach allows you to:

  • Use traditional Search campaigns to capture high-intent traffic based on specific keywords.
  • Let PMax excel at what it does best: Remarketing to this high-quality traffic and working on converting them.

Action steps:

  • Identify your highest-performing, intent-driven keywords from historical data.
  • Create a focused Search campaign using these keywords.
  • Set up a complementary PMax campaign.
  • Ensure your audience settings allow PMax to remarket to users interacting with your Search ads.
  • Monitor both campaigns closely, adjusting budget allocation based on performance.

This strategy lets you maintain control over your highest-value search terms while leveraging PMax’s optimization and remarketing capabilities. It creates precise targeting of traditional Search and the broad reach and AI-driven optimization of PMax.

Remember, viewing these campaigns as complementary rather than competitive is key. Doing so can create a more comprehensive and effective lead generation strategy that captures high-intent traffic and then nurtures it effectively toward conversion.

4. Harness The Power Of First-Party Data

Your first-party data is gold for PMax campaigns. It provides Google with clear signals about who is genuinely interested in your products or services.

Steps to implement:

  • Add high-value customer lists from your CRM.
  • Utilize existing remarketing lists.
  • If compliant with privacy regulations, import contacts who have engaged with your email campaigns.

5. Strategic Exclusions

While PMax limits our control compared to traditional search campaigns, we can still guide the algorithm by telling it where not to show our ads.

Tactics to consider:

  • Exclude poor-performing keywords and placements at the account level.
  • Use Google’s Insights reports to identify and exclude irrelevant search terms and placements.

Pitfalls To Avoid

1. Neglecting Lead Scoring

Not all leads are created equal. Implement a lead scoring system in your CRM and feed this data back to Google. This allows the algorithm to optimize for lead quality, not just quantity.

2. Ignoring The Full Funnel

Remember that lead generation is just the start. Track and optimize for downstream metrics like qualified leads, meetings set, and eventual sales.

3. Over-Reliance On Automation

While PMax is highly automated, it still requires human oversight and strategic input. Review performance regularly, adjust audience signals, and refine your creative assets.

4. Neglecting Creative Assets

PMax relies heavily on your creative input. Ensure you provide a diverse range of high-quality assets, including compelling ad copy, eye-catching images, and engaging videos.

5. Leverage Negative Keywords And URL Controls

While Performance Max limits traditional keyword targeting, Google now allows advertisers to use negative keyword lists in these campaigns.

This feature is crucial for lead generation efforts, serving two essential purposes:

  • Brand Protection: Create a list of your branded keywords and exclude them in PMax. As Brooke Osmundson explains, “At the very minimum, create a list of targeted brand keywords and exclude them in PMax. This allows your tried-and-true search campaign to run and optimize per usual, without PMax cannibalizing any existing efforts”.
  • Competitor Exclusion: You can also exclude competitor brand terms if you believe Google might show your ads for these searches inappropriately.

Additionally, pay close attention to URL settings. Consider disabling URL Expansion in your PMax settings, as this will help you retain control over what landing pages are used. For lead generation, sending users to the right landing page is crucial for lead quality.

If you choose to keep URL Expansion enabled, be sure to exclude irrelevant pages like blogs, recruitment pages, or ‘About’ sections to maintain control over the user journey.

These controls allow you to shape your PMax campaign more precisely, ensuring it complements your existing strategies and maintains the quality of your lead generation efforts.

6. Overlooking Placement And Asset Control

Reviewing the display placements and excluding irrelevant websites from showing your ads is essential. Typically, gaming sites and kids’ apps are the first things you want to exclude.

Also, be wary of Google’s automatically created assets. At my PPC agency, Hop Skip Media, we’ve seen instances where Google automatically creates YouTube videos of inferior quality. Make sure you turn those off and review assets regularly.

7. Misunderstanding Google’s Comprehension Of Your Business

Before fully committing to PMax for lead generation, assess whether Google accurately understands your business and website content.

You can do this by inputting your website URL into the Search Terms section of the Keyword Planner and evaluating the relevance of the generated keywords.

If there’s a significant mismatch, PMax may need help to target the right audience for your lead generation efforts.

8. Neglecting To Define And Track Quality Leads

Make your lead generation forms more discriminating by including qualifying questions.

Set up separate confirmation pages for qualified and unqualified leads, and only count qualified leads when firing your conversion pixel. This approach helps ensure that PMax optimizes for quality leads rather than just quantity.

By avoiding these pitfalls and implementing the strategies we’ve discussed, you can significantly improve the effectiveness of your Performance Max campaigns for lead generation.

Remember, the key is continually providing Google’s algorithm with high-quality data and maintaining strategic oversight of your campaigns.

The Future Of PMax For Lead Gen

Like anything in Google Ads, Performance Max for lead generation is not a set-it-and-forget-it solution. It requires a strategic approach, continuous optimization, and a deep understanding of your lead qualification process.

By implementing offline conversion tracking, leveraging first-party data, structuring campaigns thoughtfully, and avoiding common pitfalls, you can harness the power of Google’s AI to generate more leads and better leads.

As Google continues to refine and improve Performance Max, we can expect even more sophisticated targeting and optimization capabilities.

The marketers who will succeed are those who stay ahead of the curve, continuously testing, learning, and adapting their strategies.

Remember, the goal isn’t just to fill your funnel – it’s to fill it with suitable leads. With these advanced strategies, you’re well-equipped to make Performance Max a powerful tool in your lead generation arsenal.

More resources: 


Featured Image: Vitalii Vodolazskyi/Shutterstock

Assigning The Right Conversion Values To Make Value-Based Bidding Work For Lead Gen via @sejournal, @adsliaison

Last week, we tackled setting your data strategy for value-based bidding.

The next key is to assign the right values for the conversion actions that are important to your business.

We know this step is often seen as trickier for lead gen-focused businesses than, say, ecommerce businesses.

How much is a whitepaper download, newsletter signup, or online quote request worth to your business? While you may not have exact figures, that’s OK. What you do know is they aren’t all valued equally.

Check out the quick 2-minute video in our series below, and then keep reading as we dive deeper into assigning conversion values to optimize your value-based bidding strategy.

Understanding Conversion Values

First, let’s get on the same page about what “conversion value” means.

A conversion refers to a desired action taken by a user, such as filling out a lead form, making a purchase, or signing up for a newsletter.

Conversion value is simply a numerical representation of how much each of these conversions is worth to your business.

Estimating The Value Of Each Conversion

Ideally, you’d have a precise understanding of how much revenue each conversion generates.

However, we understand that this is not always feasible.

In such cases, it’s perfectly acceptable to use “proxy values” – estimations that align with your business priorities.

The important thing is to ensure that these proxy values reflect the relative importance of different conversions to your business.

For example, a whitepaper download may indicate less “value” than a product demo registration based on what you understand about your past customer acquisition efforts.

Establishing Proxy Values

Let’s explore some scenarios to illustrate how you might establish proxy values.

Take the event florist example mentioned in the video. You’ve seen that clients who provide larger guest counts or budgets in their online quote requests tend to result in more lucrative events.

Knowing this, you can assign higher proxy values to these leads compared to those with smaller guest counts or budgets.

Similarly, if you’re an auto insurance advertiser, you might leverage your existing lead scoring system as a basis for proxy values. Leads with higher scores, indicating a greater likelihood of a sale, would naturally be assigned higher values.

You don’t need to have exact value figures to make value-based bidding effective. Work with your sales and finance teams to help identify the key factors that influence lead quality and value.

This will help you understand which conversion actions indicate a higher likelihood of becoming a customer – and even which actions indicate the likelihood of becoming a higher-value customer for your business.

Sharing Conversion Values With Google Ads

Once you’ve determined the proxy values for your conversion actions, you’ll need to share that information with Google Ads. This enables the system to prioritize actions that drive the most value for your business.

To do this, go to the Summary tab on the Conversions page (under the Goals icon) in your account. From there, you can edit your conversion actions settings to input the value for each. More here.

As I noted in the last episode, strive for daily uploads of your conversion data, if possible, to ensure Google Ads has the most up-to-date information by connecting your sources via Google Ads Data Manager or the Google Ads API.

Fine-Tuning With Conversion Value Rules

To add another layer of precision, you can utilize conversion value rules.

Conversion value rules allow you to adjust the value assigned to a conversion based on specific attributes or conditions that aren’t already indicated in your account. For example, you may have different margins for different types of customers.

Instead of every lead form submission having the same static value you’ve assigned, you can tell Google Ads which leads are more valuable to your business based on three factors:

  • Location: You might adjust conversion values based on the geographical location of the user. For example, if users in a particular region tend to convert at a higher rate or generate more revenue.
  • Audience: You can tailor conversion values based on specific audience segments, such as first-party data or Google audience lists.
  • Device: Consider adjusting conversion values based on the device the user is using. Perhaps users on mobile devices convert at a higher rate – you could increase their conversion value to reflect that.

When implementing these rules, your value-based bidding strategies (maximize conversion value with an optional target ROAS) will take them into account and optimize accordingly.

Conversion value rules can be set at the account or campaign levels. They are supported in Search, Shopping, Display, and Performance Max campaigns.

Google Ads will prioritize showing your ads to users predicted to be more likely to generate those leads you value more.

Conversion Value Rules And Reporting

These rules also impact how you report conversion value in your account.

For example, you may value a lead at $5, but know that these leads from Californian users are typically worth twice as much. With conversion value rules, you could specify this, and Google Ads would multiply values for users from California by two and report that accordingly in the conversion volume column in your account.

Additionally, you can segment your conversion value rules in Campaigns reporting to see the impact by selecting Conversions, then Value rule adjustment.

There are three segment options:

  • Original value (rule applied): Total original value of conversions, which then had a value rule applied.
  • Original value (no rule applied): Total recorded value of conversions that did not have a value rule applied.
  • Audience, Location, Device, or No Condition: The net adjustment when value rules were applied.

You can add the conversion value rules column to your reporting as well. These columns are called “All value adjustment” and “Value adjustment.”

Also note that reporting for conversion value rules applies to all conversions, not just the ones in the ‘conversions’ column.

Conversion Value Rule Considerations

You can also create more complex rules by combining conditions.

For example, if you observe that users from Texas who have also subscribed to your newsletter are exceptionally valuable, you could create a rule that increases their conversion value even further.

When using conversion value rules, keep in mind:

  • Start Simple: Begin by implementing a few basic conversion value rules based on your most critical lead attributes.
  • Additive Nature of Rules: Conversion value rules are additive. If multiple rules apply to the same user, their effects will be combined.
  • Impact on Reporting: The same adjusted value that’s determined at bidding time is also used for reporting.
  • Regular Review for Adjustment: As your business evolves and you gather more data, revisit your conversion values and rules to ensure they remain aligned with your goals.

Putting The Pieces Together

Assigning the right values to your conversions is a crucial step in maximizing the effectiveness of your value-based bidding strategies.

By providing Google Ads with accurate and nuanced conversion data, you empower the system to make smarter decisions, optimize your bids, and ultimately drive more valuable outcomes for your business.

Up next, we’ll talk about determining which bid strategy is right for you. Stay tuned!

More resources: 


Featured Image: BestForBest/Shutterstock

How To Set A Winning Data Strategy For Value-Based Bidding via @sejournal, @adsliaison

Value-based bidding is only as successful as the inputs you provide. It’s not just about having data; it’s about having the right data.

In last week’s article of this value-based bidding series, we looked at how to determine whether this strategy will be a good fit for your business.

Now, we’re going to dig into the steps needed to ensure you’ve got the right data foundation for value-based bidding to be effective in this second video of our series.

Once you’ve got your data foundation established, the other key piece is telling Google what your goals are. You need to set clear goals so that Google’s AI knows what to aim for.

It may sound a bit daunting at first, but with a few steps, you can ensure your value-based bidding campaigns are firing on all cylinders.

Step 1: Tighten Up Your Tracking

The first order of business is to make sure your Google Tag or Google Tag Manager is properly installed and configured across your website.

This little snippet of code is responsible for measuring crucial information about user interactions, particularly those important lead form submissions to be used as your initial conversion action.

Step 2: Share Offline Conversion Data

Not all valuable customer interactions happen online.

Phone calls and other offline conversion events are often just as important in your lead generation efforts.

Each stage of the offline sales cycle – lead, marketing qualified lead, sales qualified lead, closed deal, etc. – has a certain value for your business.

Sharing this offline conversion event data back into your campaigns helps drive your value-based bidding strategy to find more of the conversions you value most.

Enhanced Conversions for Leads: Now, let’s dive a bit deeper. The most durable method for sharing offline sales conversion data is enhanced conversions for leads.

Enhanced conversions for leads allows you to attribute offline conversions back to your Google Ads campaigns. When a user submits a form on your site, it sends back hashed lead information that you specify, such as an email address.

You then store that lead in your CRM or database, and when that lead converts or completes a further action, you upload that hashed lead information for Google to match it back to the ad that drove the lead (auto-tagging is required).

If you’re currently using offline conversion import (OCI) to bring in your offline data, we recommend transitioning to enhanced conversions for leads for several reasons: It’s privacy-safe and can provide more accurate measurement, supports cross-device conversions and engaged-view conversions, and is easier to implement because you don’t need to make any modifications to your lead forms or CRM systems to receive a GCLID.

You can implement enhanced conversions for lead using the Google tag or with Google Tag Manager – more on making this switch here.

Google Ads Data Manager: Google Ads Data Manager is designed to make it easier to import and activate your offline conversion and first party-data in one central location.

You’ll find “Data manager” under the Tools icon in your Google Ads account. This is where you can connect your first-party data sources, such as BigQuery, Google Cloud, HTTPS, HubSpot, Snowflake, Google Sheets and more via a direct partner connection or Zapier.

Note, if you don’t see your preferred data source listed among the featured products, be sure to click “Search all” to find more options.

Configure your data sources to ensure that all your conversion data, regardless of where it originates, is feeding into Google’s AI.

You can also access and configure your Google tag from Data Manager.

Step 3: Use Data-Driven Attribution

As you know, the customer journey is rarely linear. People might visit your website several times from various sources and interact with your brand on multiple channels before finally submitting a lead, signing up for your newsletter, or becoming a customer.

A data-driven attribution model takes all of these touchpoints into account, assigning credit to each interaction based on its actual contribution to the conversion.

It looks at conversions from your website and Google Analytics from Search, Shopping, YouTube, Display and Demand Gen ads, and determines which keywords, ads and campaigns have the most impact on your goals.

The benefit of this approach to attribution, especially when using value-based bidding strategies, is that it gives Google’s AI a more nuanced understanding of what’s driving results than a last-click or other static attribution model.

This means the system can make better-informed decisions about where and how to allocate your ad spend to find more conversion value based on your goals.

Setting The Right Goals

Now that you’ve got the right data flowing in, it’s time to tell Google’s AI what to focus on.

While you can – and should – track a variety of actions within Google Ads, when it comes to bid optimization, it’s important to choose a single, primary goal and focus on one single stage of the customer journey.

Ideally, your primary goal should be the action that’s closest to the end of the customer journey where you have sufficient conversion volume.

You’ll want to make sure this action occurs at least 15 times per month at the account level so that Google’s AI has enough data to work with.

Additionally, the shorter the conversion delay (the time between an ad click and the conversion), the better.

That doesn’t mean that if you have a long sales cycle and relatively low closed-deal conversion volume you can’t use value-based bidding.

You’ll just need to look at other actions your potential customers take that have more volume and a shorter conversion delay. This could be a lead form submission, a product demo request, a free trial sign-up, etc.

Keep The Data Fresh

Lastly, you want to be sure to upload your conversion data to Google Ads frequently, preferably on a daily basis.

This ensures that Google AI always has the most up-to-date information, allowing it to make the most accurate predictions and optimizations.

Again, you can upload this data by connecting your sources in Data Manager or the Google Ads API.

What’s Next

We’ve covered a lot of ground, from ensuring you’re capturing the right data to setting clear goals for Google’s AI.

Next week, we’ll get into actually assigning values to your conversions, a crucial step in maximizing the return on your ad spend and bidding to value.

More resources: 


Featured Image: BestForBest/Shutterstock